
STEP 1:
WeatherTRAK New User Introduction Training
Taking the first step in connecting to your new WeatherTRAK technology.
Video Summary
This video is the first step in the WeatherTRAK onboarding process. It explains how new users get access to the system and what they must do before moving to the next training steps.
1. Your Welcome Email
WeatherTRAK sends you a Welcome Email when your account is created.
What it includes
Your username
Your temporary password
The login link
- What you must do
Log in with the temporary password
Create your own secure password
Log in again using the new password
- This is the first required action.
You will also receive six onboarding emails in total. They include training options, feature highlights, FAQs, and helpful articles.
2. What WeatherTRAK Does (Quick Explanation)
WeatherTRAK is a smart, cloud-based irrigation system.
It helps you:
Reduce water waste
Run efficient schedules
Prevent irrigation damage
Save time in the field
Get system alerts and data instantly
- All controllers report to the cloud so your mobile app and Central (website) stay in sync.
3. WeatherTRAK Mobile (Field Use)
WeatherTRAK Mobile is the app used in the field.
It lets you:
See sites, controllers, and stations
Run stations manually
Make quick programming changes
Look up alerts
Use maps to find irrigation components
- How to get it
Download WeatherTRAK Mobile 3
Google Play (Android)
App Store (iPhone)
Log in using your username + the new secure password
- This is your second required action.
4. WeatherTRAK Central (Office Use)
WeatherTRAK Central is the web platform at weathertrak.net.
Use it for:
Full controller programming
Managing multiple sites
Reports and budgeting
Mapping tools
Handling alerts
- How to access
Go to weathertrak.net on any computer and log in with your secure username and password.
This is your third required action.
5. Your Three Required Action Items
✔ Action 1 – Find your Welcome Email
Secure your username and temporary password. Log in and create your new secure password.
✔ Action 2 – Download WeatherTRAK Mobile 3
Install the app and log in with your new password.
✔ Action 3 – Log in to WeatherTRAK Central
Go to weathertrak.net, log in, and confirm you can see your assigned sites and controllers.
STEP 2:
Get to know WeatherTRAK Mobile
A demonstration of the management features of WeatherTRAK Mobile.
Video Summary
This video shows new users how to use WeatherTRAK Mobile 3 out in the field. It covers navigation, controller settings, station programming, and basic mapping.
1. Before You Go On-Site
Make sure you have:
WeatherTRAK Mobile 3 downloaded
Your username and password
Access to the site/controller you will program
Log in on your smartphone to begin.
2. Basic App Navigation
WeatherTRAK Mobile has three main pages:
Sites
Controllers
Stations
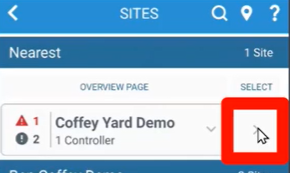
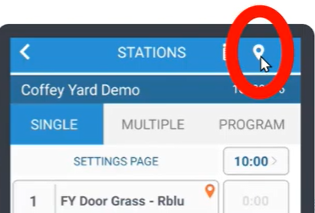
How navigation works
Big button (left): opens features for that page
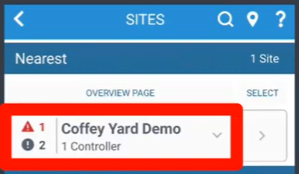
Small button (right): drills down to the next level
Map Pin (top right): opens the site map
Example:
Site → (small button) → Controllers → (small button) → Stations
3. Programming Controller Settings
Controller settings are found on the Controllers page → big left button (Settings).
What you set here:
Controller type, firmware version, modem type
Time zone
Max active stations
Runtime Valve Test (should be ON)
Setup menu items matching field conditions
Flow setup
Master Valve (NO/NC)
Flow Sensor type
Pump start relay station
Days & Times
Allowed irrigation start time
Water window duration
Water day mode (follow local watering rules)
Always tap Apply after making changes.
4. Programming Station Settings
Go to: Sites → Controllers → Stations → big button for Station 1
Steps for each station:
Set manual run timer for your wet check (default minutes)
Tap Start to run the station in the field
Name the station
Use names that help techs find it (directions, landmarks, etc.)
Fill out Auto Mode settings:
Sprinkler type
Plant type
Soil type
Sun exposure
Slope
Tap Apply to save
Tap Place to drop a map pin for that station
Drag it to the correct spot
Tap ✔ to confirm
Take photos and add notes
Tap Save to store the pin
Use the Advance arrow to move to the next station and repeat until all stations are programmed.
5. Mapping Key Irrigation Components
After stations are set, add important assets to the map.
How to add assets:
Open the map (Map Pin top right)
Use the blue GPS dot to see where you are
Tap + (Add) to drop a pin at your current location
Choose the asset type (backflow, rain sensor, etc.)
Adjust the pin location if needed
Tap ✔ to confirm
Take 1–2 photos (close + environmental view)
Assign it to the correct controller/station
Add helpful details (model, serial number, manufacturer)
Tap Save
Adding these gives future techs exact locations for valves, flow sensors, backflows, etc.
6. Finished With Step 2
You now know the basics of WeatherTRAK Mobile, including:
Navigation
Controller setup
Station programming
Mapping stations and assets
You’re ready for Step 3: Get to Know WeatherTRAK Central.
STEP 3:
Get to know WeatherTRAK Central
A demonstration of the management features of WeatherTRAK Central.
Video Summary
This video teaches new users how to navigate and use WeatherTRAK Central at weathertrak.net. It reviews the homepage, the main tabs, and the tools available for controller management, alerts, reporting, budgeting, and site mapping.
1. Logging In
Go to weathertrak.net on any internet-connected computer.
Enter your username and secure password.
You will land on the Home Page.
2. Home Page Overview
The Home Page gives fast access to the most important system information:
What you’ll see:
What’s New bulletin (company updates)
Account Summary (controller count + active alerts)
Controller Status Summary
Shows controllers that are paused, off, or otherwise unable to irrigate
Alert Categories
Major Alerts List with sort/filter/export tools
Support hours + quick links
“Manage a Controller” search box to jump directly to any controller
Key Tip
Every column header is a sort tool, and the fields below are filter boxes.
You can export any filtered list as PDF or Excel.
3. Main Navigation Tabs
Across the top, you will see several tabs.
Below is what each one does.
Sites Tab
Includes:
Site List – all sites with basic info
Site Map – view all mapped assets on the map
Manage Site – update site name, address, pictures, compliance rules, and RainShare settings
Smart Irrigation Tab
This is where most programming and controller work happens.
Program Page
View and change:
Controller settings
Start times & water windows
Station programs
Station names, sprinkler type, plant type, etc.
Manage Page (very important)
Shows real-time controller info:
Controller status
Firmware and modem type
Weather
Ability to:
Send Rain Pause
Send Event Pause (scheduled)
Turn controller ON/OFF
Direct links to controller alerts
Station-by-station irrigation details
Other Smart Irrigation Features
Controllers Page – list of all controllers
Manual Page – start manual irrigation
Learn Flow – run or schedule Learn Flow tests
OptiFlow Tab (if your account uses OptiFlow)
Only visible for OptiFlow-enabled controllers.
Includes:
Configure Page – OptiFlow setup
Optimize Page – see optimized schedules and unlock controllers
Site Map Tab
Shows:
All mapped assets (station pins, valves, flow sensors, backflows, etc.)
You can click assets to see details, photos, and notes
This ties directly to mapping work done in WeatherTRAK Mobile.
Budget Monitor Tab
Tools for managing water budgets:
Monitor Budgets
Water Meter List
Water Bill List
Budget Details
Allows tracking actual water use vs. budget in real time.
Compliance Monitor Tab
Used for sites under watering restrictions.
Shows compliance rules
Includes Program Grouping Tool, which lets you update many programs at once
Example: set all programs to water only Monday/Wednesday/Friday
Alerts Tab
Alert List – all current alerts across all controllers
Fully sortable/filterable/exportable
Alert Setup – sign up for text/email alert notifications
Reports Tab
WeatherTRAK provides 30+ reports, including:
Run-time history
Water usage history
Controller settings detail
And many more
Use this tab to review controller behavior over time.
Admin Tab (only for accounts with admin permissions)
Manage user access
Add/remove users
Most accounts rely on HydroPoint Support instead of using the Admin tool themselves.
End of Step 3
Step 3 shows how to navigate all key pages in WeatherTRAK Central.
You are now ready for:
Step 4: Support & Training Resources
STEP 4:
Get to know WeatherTRAK Support and Training Resources
Learn how to get help while learning about your new WeatherTRAK.
Video Summary
Step 4 explains all the support, training, and learning resources available to WeatherTRAK users. HydroPoint provides multiple ways to get help, learn the system, and find documentation.
1. Customer Support
HydroPoint offers 6-day-a-week, bilingual support.
How to reach support:
Website: support.hydropoint.com
Phone: 800-number listed on the site
Support can answer real-time WeatherTRAK questions, troubleshoot issues, and help with account access.
2. Knowledge Base
Users can access:
Popular articles
Latest videos
How-to guides
Product information
Great for fast answers and self-service learning.
3. Technical Resources
On the WeatherTRAK website’s Resources tab, you can find:
Tech specs
Reference manuals
Product data sheets
Hardware documentation
Use this section when you need detailed technical info.
4. HydroPoint University (Online Training)
HydroPoint provides free, on-demand, structured training at:
hydropoint.learnupon.com
Training available:
Basic WeatherTRAK system introduction
Basic training in Spanish
Advanced courses (including OptiFlow)
Tested and certified training paths
5. YouTube Training Playlists
More learning materials are available on the HydroPoint YouTube channel.
Recommended playlists:
Smart Water Management Webinar Series (Smart Water Wednesdays)
WeatherTRAK Mobile App Playlist (mobile app demos)
WeatherTRAK Alert Videos
Good for users who prefer video instruction.
Summary
WeatherTRAK provides a full network of support to ensure users succeed, including:
Live customer support
Knowledge base articles and videos
Technical documents
Free online training
YouTube demos and webinars
This is the final step of the Getting Started onboarding series.
After Step 4, users are ready for deeper topics such as WeatherTRAK Alerts and alert management tools.
If you have questions, here are 3 ways to get answers:
1. Search within this WeatherTRAK knowledgebase
2. Visit the WeatherTRAK support page
3. Call 800-362-8774 or email support@hydropoint.com, hours are Mon-Fri 3:00 AM – 6:00 PM PT and, Sat 9:00 AM – 2:00 PM PT.