


KoolGrid – Powerful PHP Grid

Contents
Entering Invoice Information. 3
Product Entry & Ship Checklist. 6
BaseStation 1000 “X”, “C”, “P” & /R. 6
SubStation “X”, “C”, “P” & /R Test Checklist. 7
BL-5200X/P-R Family Ship Checklist. 8
BL-52xx-001/101 Family Ship Checklist. 8
BL-BHMxxx Hydrometer/BL-BFMxxx Flowmeter Ship Checklist. 9
BL-CLOUD-LTE Module Birth Cert/ Ship Checklist. 9
BL-CLOUD-WFE Module Ship Checklist. 10
BL-CM4G-X-GW Module Ship Checklist 10
BL-CP-PFSxxx Ship Checklist. 11
BL-ER Module Ship Checklist. 11
BL-SUBSTATION-RV-DP (VZ & AT) & BL-SUBSTATION SOLAR-RV (VZ & AT) Ship Checklist. 12
Shipping/Freight Information. 13
Starting in KoolGrid
Logging Process
Open KoolGrid in internet browser
http://10.11.12.34/KoolPHPSuite/Examples/KoolGrid/Hierarchy/Three_Levels_HierarchyQBInv/
No login or password is required.
Note: To search KoolGrid go to:
http://10.11.12.34/KoolPHPSuite/Examples/KoolGrid/Hierarchy/Three_Levels_HierarchyQBsearch/
Start the day by getting the shipped packets from the warehouse in the morning, Enter them into the freight information onto the FREIGHT spreadsheet and email to Angel.
Entering Invoice Information
Get the invoice packets (the invoice with all attached paperwork) from the “Invoices To Log” bin.
·
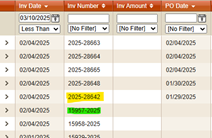
Once you have KoolGrid open, you can sort through the fields at the top or you can go with the current view and work on the invoices and enter the data for the current invoices.
· The invoices that we work on are the ones that start with the year and then a – and a 5-digit number (2025-15935). There are two different sets of numbers in the system. The yellow highlighted number below is the format that we use and show you an example. The green highlighted numbers are not the ones we will be entering data for.
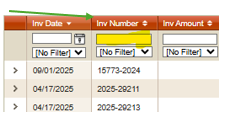
· The information can be found by either scrolling through the Inv Number column and finding the invoice # or enter the Invoice # in the field at the top of the column and then select one of the search options.
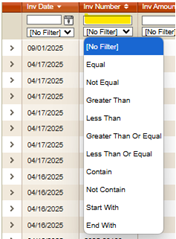
· You can search for the last 5 digits of the invoice by typing them into the search line and choosing a “Contain or Equal” filter from the dropdown menu.

Once you have found the invoice that you are looking to enter information for, Click on the arrow and expand the details for the invoice.
·

By clicking on the arrow in the first column it will turn it to face downward and expand the details of the invoice.
· Click on the item to enter the data for that product. Then click on the Add New Record to enter the information
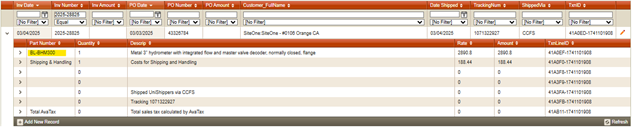
· To edit any of the fields in the invoice you need to click on the pencil

on the far right of the invoice # row.
Unit Builds
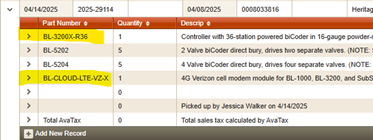
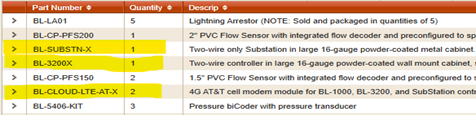
A Unit build will need to be numbered if there are more than one on the invoice. There are several items that will have unit builds. The three items highlighted in the image show units that are part of a build. The BL-SUBSTN-X, and BL-3200X will have numbers that will correspond to the BL-CLOUD-LTE-AT-X.
o
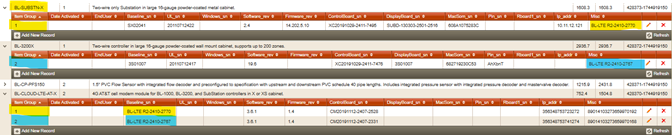
Make sure that the BL-LTE R2-xxxx-xxxx are numbered in the Item Group with the corresponding units.
Multiple of the item
If there are multiple of items, then you will need to add a 1 in the first item in the Item Group: field. And then click on the Add New Record

to enter the next item and follow the same steps as above.

Product Entry & Ship Checklist
As a reminder that not all the fields on the forms will be filled out. If they are replacements or warranty parts or just the selected item that may have multiple types listed on a document.
BaseStation 1000 “X”, “C”, “P” & /R
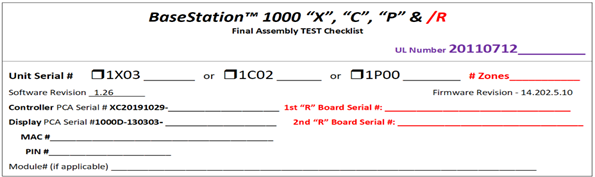
· Unit Serial # - will be marked under the type of BaseStation “X”, “C”, “P” & /R that is on the order and will be recorded in the Baseline_sn field. Example 1X03035
· UL Number - starting with the 201 and entering the entire number including the handwritten numbers will be entered into the UL_sn field.
· Software Revision - will be entered into the Software_rev field.
· Firmware Revision - will be entered into the Firmware_rev field.
· Controller PCA Serial # - will be entered into the ControlBoard_sn field starting with the XC.
· Display PCA Serial # - will be entered into the DisplayBoard_sn field starting with the 1000D.
· MAC # - will be entered into the MacSom_sn field.
· Pin # - will be entered into the Pin_sn field.
· 1st and 2nd “R” Board Serial # - will be entered into the Rboard1_sn field. The Numbers can be combined in this field.
· Module# - can be entered into the Misc field.
· Once all the information has been entered the click on Confirm in the left lower corner of the field.
BaseStation 3200S-Std/R
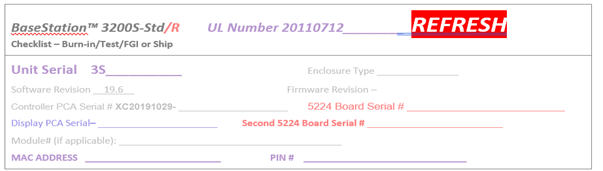
· Unit Serial # - will be recorded in the Baseline_sn field. Example 3S03035
· UL Number - starting with the 201 and entering the entire number including the handwritten numbers will be entered into the UL_sn field.
· Software Revision - will be entered into the Software_rev field.
· Controller PCA Serial # - will be entered into the ControlBoard_sn field starting with the XC.
· Display PCA Serial # - will be entered in to the DisplayBoard_sn field starting with the 1000D.
· MAC # - will be entered into the MacSom_sn field.
· Pin # - will be entered into the Pin_sn field. This needs be entered as lower case, caps and #’s.
· 5224 Board Serial # and the Second 5224 Board Serial # - will be entered into the Rboard1_sn field if there are numbers in the field. The Numbers can be combined in this field.
· Module# - can be entered into the Misc field.
· Once all the information has been entered the click on Confirm in the left lower corner of the field.
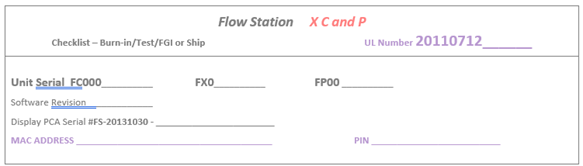
Flow Station X C and P
· Unit Serial # - will be recorded in the Baseline_sn field. Example FC0035
· UL Number - starting with the 201 and entering the entire number including the handwritten numbers will be entered into the UL_sn field.
· Software Revision - will be entered into the Software_rev field.Z
· Display PCA Serial # - will be entered in to the DisplayBoard_sn field starting with the FS-20131030- .
· MAC # - will be entered into the MacSom_sn field.
· Pin # - will be entered into the Pin_sn field. This needs be entered as lower case, caps and #’s.
· Once all the information has been entered the click on Confirm in the left lower corner of the field.
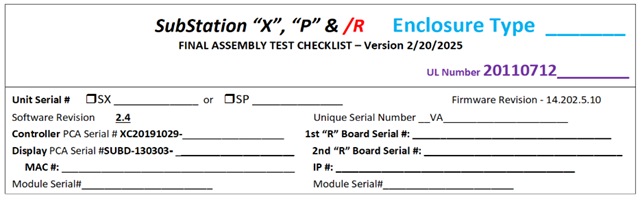
SubStation “X”, “C”, “P” & /R Test Checklist
· Unit Serial # - will be recorded in the Baseline_sn field. Example SX03035
· UL Number - starting with the 201 and entering the entire number including the handwritten numbers will be entered into the UL_sn field.
· Software Revision - will be entered into the Software_rev field.
· Firmware Revision - will be entered into the Firmware_rev field.
· Controller PCA Serial # - will be entered into the ControlBoard_sn field starting with the XC.
· Display PCA Serial # - will be entered in to the DisplayBoard_sn field starting with the SUBD-130303- .
· MAC # - will be entered into the MacSom_sn field.
· IP # - will be entered into the IP addr field.
· 1st and 2nd “R” Board Serial # - will be entered into the Rboard1_sn field. The Numbers can be combined in this field.
· Module Serial # - can be entered into the Misc field.

BL-5200PCK-R Family Ship Checklist
· This document can be used for the BL—5200PCK-R12, BL-5200PCK-R24, BL-5200PCK-R36, or BL-5200PCK-R48. It will let you know in the first line which item it is.
·

Find the number with the section with the numbers and enter the Unit Serial Number: in the Baseline (even if there are two numbers then they both get entered in the same field.
· Once all the information has been entered the click on Confirm in the left lower corner of the field.
BL-5200X/P-R Family Ship Checklist
· This document can be used for the BL—5200XS-R, BL-5200X/P-R12/24, BL-5200X/P-R36, or BL-5200X/P-R48. It will let you know in the first line which item it is.
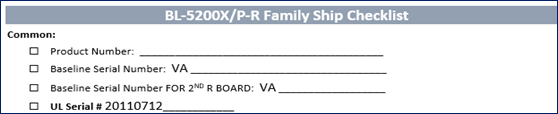
· Baseline Serial Number: - the first and second Baseline Serial # are entered into the Baseline_sn field.
· UL Number - will be entered into the UL_sn field.
· PCA Serial Number’s - can be entered into the Rboard field.

· Once all the information has been entered the click on Confirm in the left lower corner of the field.
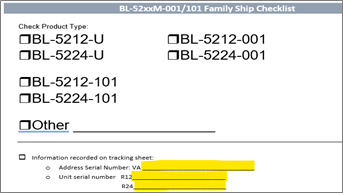
BL-52xx-001/101 Family Ship Checklist
The unit type will be marked in the upper section.
· Address Serial Number: - this information will be entered in the Baseline_sn field.
· Unit serial number - will be entered into the Rboard field.
· PCA Serial Number’s - will be entered into the Rboard field.
· Once all the information has been entered the click on Confirm in the left lower corner of the field.
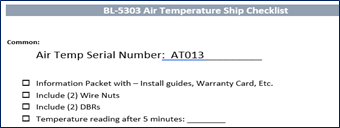
BL-5303 Air Temperature Ship Checklist
· Air Temp Serial Number: - will be recorded in the Misc field.
· Once all the information has been entered the click on Confirm in the left lower corner of the field.
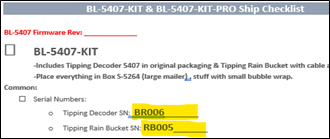
BL-5407-KIT & BL-5407-KIT-PRO Ship Checklist
· Tipping Decoder SN and the Tipping Rain Bucket SN: - will be recorded in the Misc field.
· Once all the information has been entered the click on Confirm in the left lower corner of the field.
BL-BHMxxx Hydrometer/BL-BFMxxx Flowmeter Ship Checklist
·
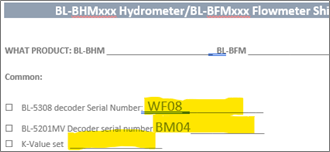
BL-5308 Decoder Serial Number and the BL-5201MV Decoder serial numbers are both entered into the Misc Field with a space between the numbers. Example WF08xxx BM04xxx
· K-Value set is entered into the IP_addr field as Kval 1.23
· Once all the information has been entered the click on Confirm in the left lower corner of the field.
BL-CLOUD-LTE Module Birth Cert/ Ship Checklist
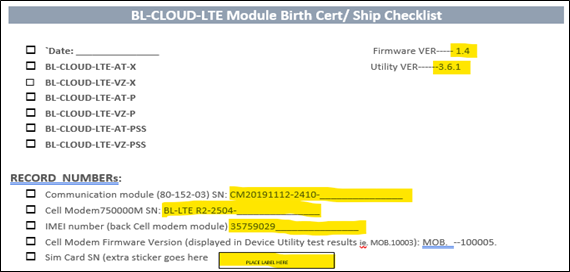
The type of modem will be marked below the date field.
· Communication Module SN: CM2019 will be entered in the ControlBoard_sn.
· Cell Modem 750000M SN: BL-LTE R2-24xx-xxxx will be entered in the Baseline_sn.
· Utility VER will be entered in the Software_rev.
· Firmware VER enter in the Firmware_rev.
· IMEI number will entered in the Ip_addr.
· The SIM Card SN ID # will be entered in the Misc field.
· Once all the information has been entered the click on Confirm in the left lower corner of the field.
BL-CLOUD-WFE Module Ship Checklist
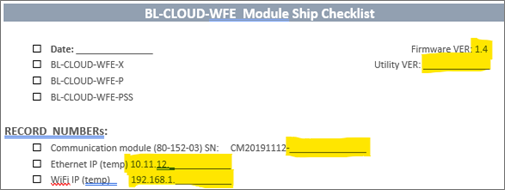
· Communication Module SN: CM2019 will be entered in the ControlBoard_sn.
· Utility VER will be entered in the Software_rev.
· Firmware VER enter in the Firmware_rev.
· Ethernet IP (temp) number and the WiFi IP (temp) will both be entered in the Ip_addr.
· And then save by clicking on the Confirm.
BL-CM4G-X-GW Module Ship Checklist
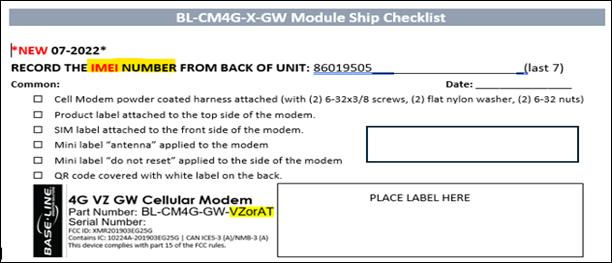
· The 4G Serial Number - is recorded in Baseline_sn field and should be found in the label placed in the Label field.
· The IMEI Number - will be in the IP Address Field
· The SIM ID # - will be entered into the Misc field and will usually be a sticker above the Label Field.
· Once all the information has been entered the click on Confirm in the left lower corner of the field.
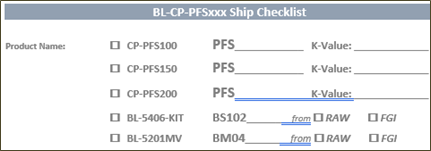
BL-CP-PFSxxx Ship Checklist
· The Product Name CP-PFSxxx Number - is has three selections, this will correspond to the one being shipped and have # in it that will be recorded into Baseline_sn field.
· The K-Value - will be in the IP Address Field as Kval x.xxx
· The BL-5406-KIT and the BL-5201MV - will be entered into the Misc field.
· Once all the information has been entered the click on Confirm in the left lower corner of the field.
BL-ER Module Ship Checklist
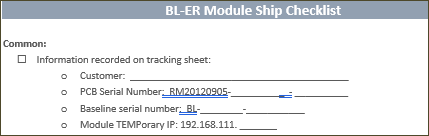
· PCB Serial Number: - RM20120905-xxxx-xxxx will be entered in the DisplayBoard_sn.
· Baseline Serial Number: - will be entered in the Baseline-sn. BL-xxx-xxxx
· Firmware VER enter in the Firmware_rev.
· Module TEMPorary IP: - will both be entered in the Ip_addr. 192.168.111.xxx
· And then save by clicking on the Confirm.
BL-PFSxxx Ship Checklist
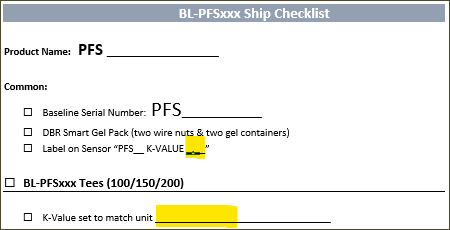
· Baseline Serial Number: - will be entered in the Baseline-sn.
· K-Value - enter in the Pin_sn. It can appear in either
· And then save by clicking on the Confirm.
BL-SUBSTATION-RV-DP (VZ & AT) & BL-SUBSTATION SOLAR-RV (VZ & AT) Ship Checklist
These two have the same information other than the Solar-RV has the Solar PCA # listed below the 6-Valve Terminal SN:
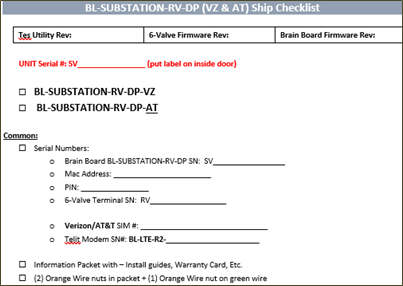
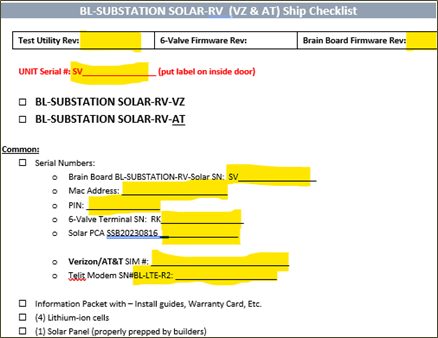
· The Test Utility Rev: - is entered in the Software_rev. field.
· Brain Board Firmware Rev - is recorded into Firmware_rev. field.
· The UNIT Serial # - will be recorded in the Baseline_sn and the DisplayBoard_sn fields. This is listed in the Brain Board BL-SUBSTATION-RV-xx field as well.
· The Mac Address - will be entered into the MacSom_sn field.
· The PIN - will be in the Pin_sn Field.
· The 6-Value Terminal SN - will be entered into the Rboard_sn field.
· The Solar PCA number will be entered into the Controlboard_sn field.
· The Version.AT&T Sim # - will be entered into the Misc field.
· Telit Modem SN# BL-LTE-R2-xxxx-xxxx will be entered into the IP_addr field.
· Once all the information has been entered the click on Confirm in the left lower corner of the field.
Shipping/Freight Information
Entering Shipping information into the system.
·

The shipping information is on the invoice front page and can also be found in KoolGrid on the Shipping & Handling Row. Confirm the tracking # and copy or enter it into the second field. Add the freight company into the third field. Then confirm the invoice date and enter that into the first field. Once finished click on the green check

mark at the end of the right field.
- Fill out the date, tracking number and shipped via columns. Enter the information in the row you are editing (not in the top row, which is for search filters).
- For the date column, you should click the little calendar icon to pop-up a calendar.
- For the shipped via column, use the same format every time for a particular shipping method. Options are:
- UPS Ground
- UPS NDA AM; UPS NDA; UPS NDA Saver
- UPS 2nd Day AM; UPS 2nd Day
- LTL-RL
- 3rd Party-GRND
- Will Call


- Click the green checkmark when you are done. The red X is to cancel your entry.
Filing Paperwork
- When you are done logging both the shipping information and the serial number information, then stamp the physical copy of the invoice with the “Entered” stamp and then date and initial it.
File the logged invoice packets in the Customer PO Folders in the top drawer of the large black filing cabinet.
- File by month of shipment.
- Newest shipments in front.