
Overview
After an FM300 flow sensor is installed with the Data Collector, the monitoring point must be configured in the HPDS Admin Tool. This setup is required to properly display flow data on WaterCompass.net.
Before starting the setup, ensure you have the following:
- An existing WeatherTRAK.net login with Admin-level permissions.
- The serial number of the device(s) you are setting up.
- Account access for New Accounts. Refer to the appendix for instructions on updating permission settings.
Glossary
Data Collector: the device that receives data for the flow sensor and sends the usage data into the cloud.
Flow Sensor: the device that measures flow within a pipe and provides data to the Data Collector.
Step 1: Assign the Data Collector (Controller)
Before configuring the OptiFlow Hydraulic Tree, you must transfer the WaterCompass Data Collector from the installers virtual warehouse to the customer account and site.
- From the Admin Tool home, select Controllers.

- Enter the Serial Number associated with the WaterCompass Data Collector into the search bar.
- Select Edit.

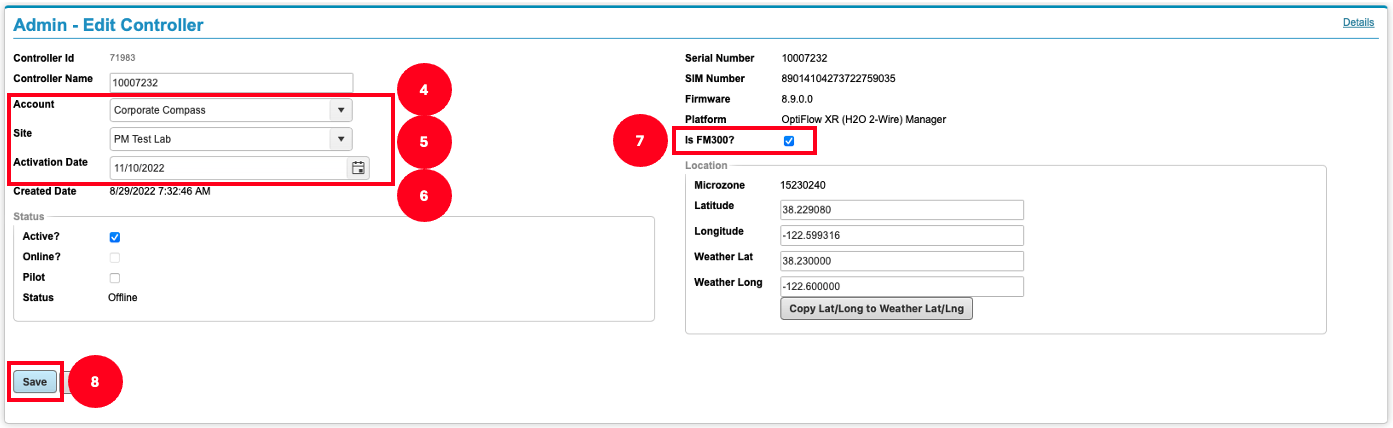
- Choose the appropriate Account from the dropdown menu.
- Select the Site from the dropdown menu.
- Set the Activation Date.
- Check the field labeled Is FM300?.
- Click Save. Saving will transfer the Data Collector to the new Account and Site.
9. Click the WeatherTRAK Central tab in the upper-left corner.

Step 2: Configure the OptiFlow Hydraulic Tree
Once the WaterCompass Data Collector has been assigned to the correct account and site, the next step is to configure the OptiFlow Hydraulic Tree in WeatherTRAK Central.
Access the Configuration Screen:
- Hover over the OptiFlow tab and select the Configure subtab.

- Use the search box next to the Account and Site name to select the correct Account and Site.

Configure Site Settings:
- Under the Hydraulic Tree menu, locate the site name and click the gear icon to open the Site Settings menu.
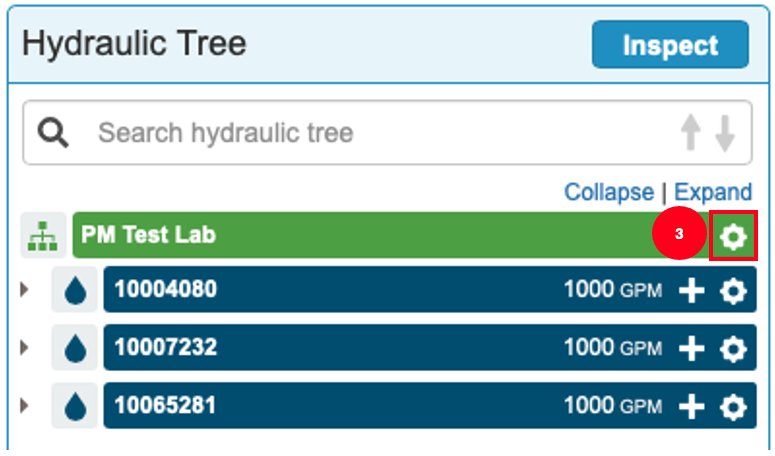
- Click Edit Site Settings.

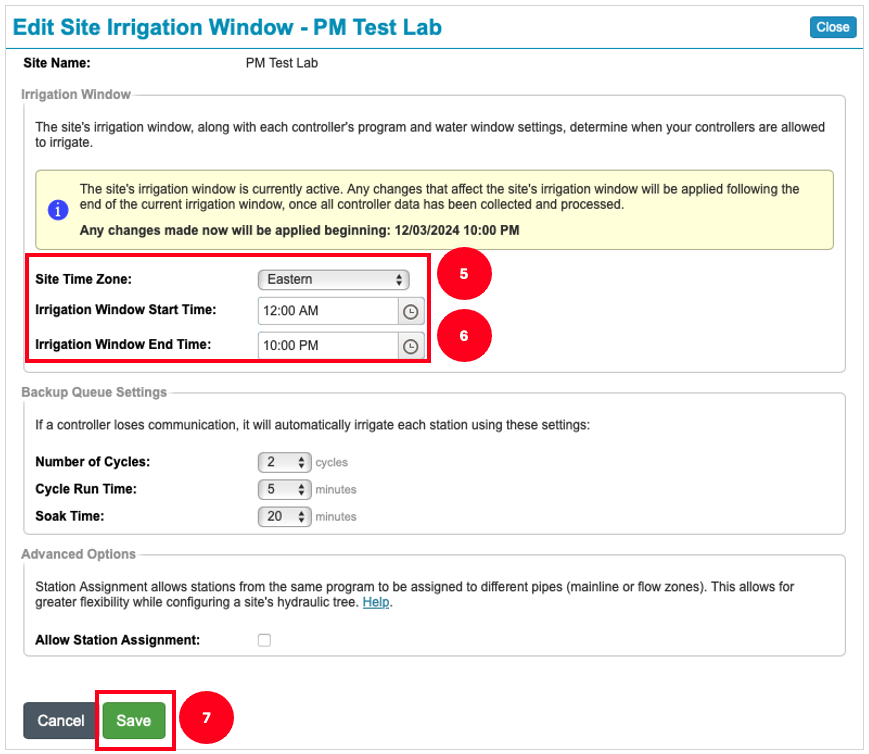
- Time Zone: Set the time zone to match the property where the Data Collector is installed.
- Irrigation Window: Set the watering time from 12:00 AM to 10:00 PM for the water source.
- Click Save when done.
Add a Water Source:
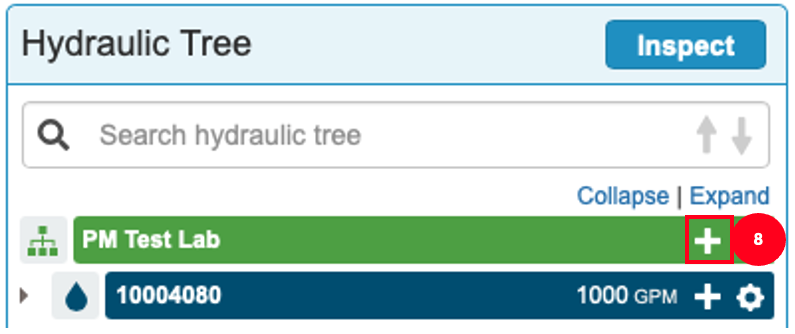
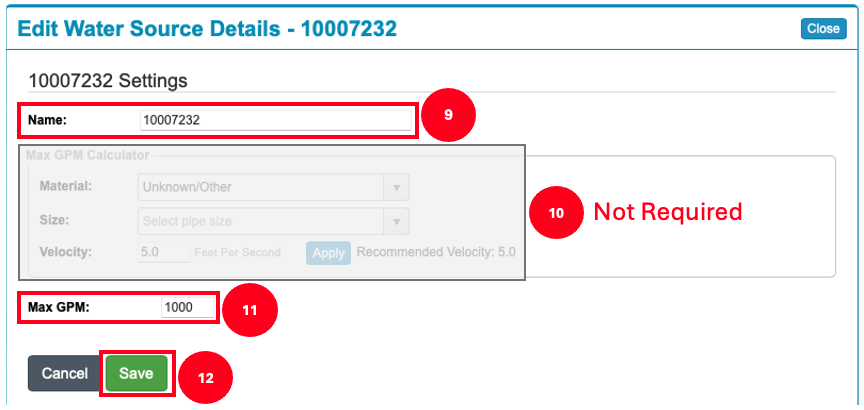
- Under the Hydraulic Tree menu, click the + symbol next to the site name to add a new Water Source.
- Choose a name for the Water Source (using the same serial number as the Data Collector is acceptable).
- Skip the Max GPM Calculator section as it is not required.
- Enter 1000 for Max GPM as a placeholder (required field).
- Click Save to complete the Water Source setup.
Add a Pipe to the Water Source:
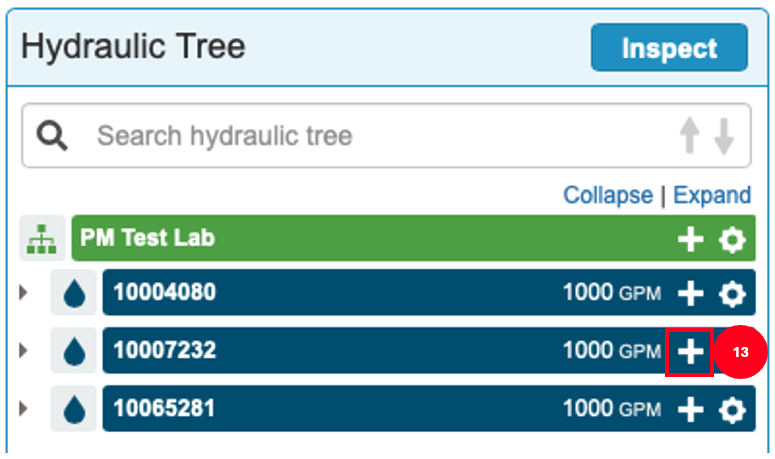
- Under the Hydraulic Tree menu, click the + symbol next to the Water Source you just created.
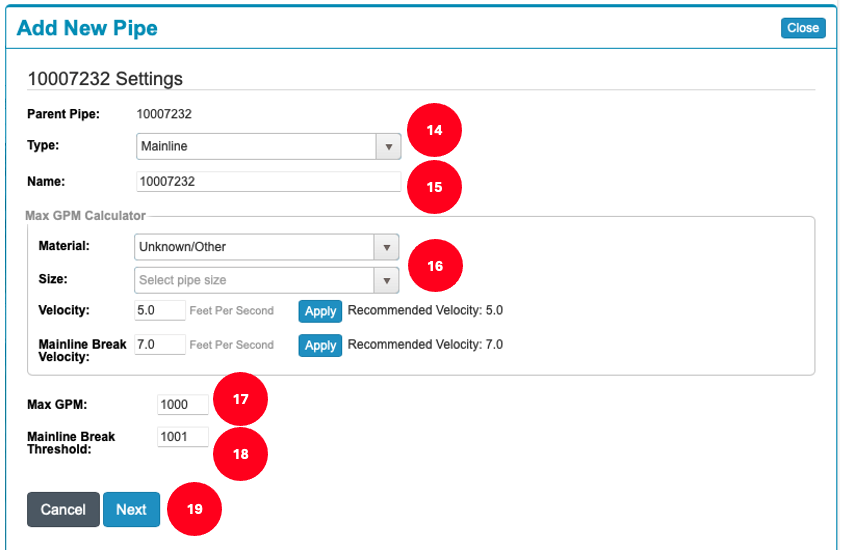
- Select Type = Mainline.
- Choose a name for the mainline (using the same name as the Water Source is acceptable).
- Skip the Max GPM Calculator section.
- Enter 1000 for Max GPM (placeholder value).
- Enter 1001 for the Mainline Break Threshold (this value must be greater than Max GPM).
- Click Next.
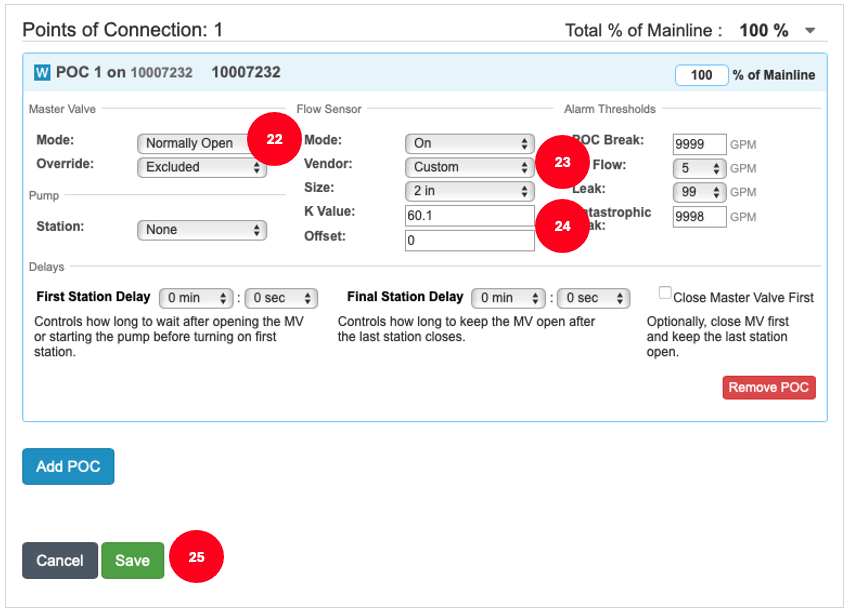
Add Point of Connection (POC):
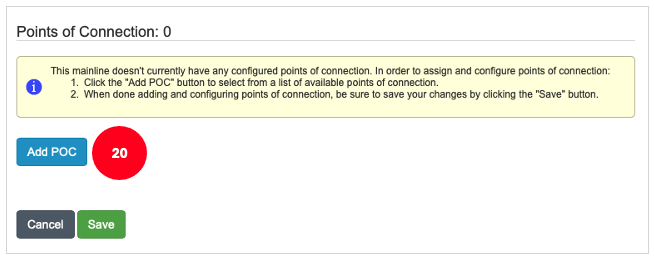
- In the Edit Mainline Details menu, click Add POC.
- Click the Select a Point of Connection dropdown and select the Data Collector by referencing the serial number.If there are multiple POCs available for the Data Collector’s serial number, select POC1

- Set Flow Sensor Mode to On.
- Set Vendor to Custom.
- Verify that the Flow Sensor, Vendor, K Value, and Offset are correct.
- Click Save to complete the Hydraulic Tree setup.
Note: You do not need to fill out the Master Valve, Pump, or Alarm Thresholds sections.
Step 3: Create a Water Meter
Once the Hydraulic Tree is configured, the next step is to create and set up the water meter to associate the FM300 flow monitor with monitoring points.
- Access the Water Meter List:
- Hover over the Budget Monitor tab in WT Central and select Water Meter List.
- Click Add New Water Meter.
- Create the Water Meter:
- In the Meter Name field, enter a name for the water meter and click Save.
- Important: Do not assign the controller to the water meter on this page.
Step 4: Assign the Flow Sensor to the Water Meter
With the water meter created, the next step is to assign the flow sensor to the water meter and monitoring point.
- Open the Admin Tool:
- Navigate to the WaterCompass section and select Water Meters.
- Find and Edit the Water Meter:
- Use the search bar to locate the water meter you created in Step 3, then click the Edit link.
- Assign the Flow Sensor:
- In the Available Sensors field, find the WeatherTRAK OptiFlow XR Flow Sensor and select it.
- Click the left arrow to assign the flow sensor to the water meter.
- Confirm that the WeatherTRAK OptiFlow XR Flow Sensor is correct and click Save.
Step 5: Assign a Usage Group
Assigning a usage group to the monitoring point ensures that the data collected by the flow monitor is categorized correctly.
- Navigate to Usage Groups:
- In the Admin Tool, go to the WaterCompass section and select Usage Group.
- Search for the Site:
- Use the search bar to find the site where the water meter is located, then click Edit.
- Select the Correct Usage Group:
- Choose the appropriate usage group for the new water meter. Options include:
- Indoor Usage
- Outdoor Usage
- Mixed Usage
- Choose the appropriate usage group for the new water meter. Options include:
- Note: Selecting the correct usage group is crucial as it affects how usage is displayed in the WaterCompass Dashboard.
- Save the Changes:
- Click Save to apply the usage group.
Step 6: Verify the Data
Once the FM300 Data Collector is configured, you should verify that the WaterCompass.net dashboard is receiving incoming data from the newly set up device.
- Wait 20 Minutes:
- Allow 20 minutes for the data to start populating.
- Navigate to WaterCompass.net:
- Go to WaterCompass.net and select the customer's account.
- Verify Data in Analytics:
- Navigate to the Analytics tab and select the site that contains the WaterCompass Data Collector (OptiFlow XR Controller).
- Confirm that the FM300-US is sending data to WaterCompass.
- Check the Usage Tab:
- Alternatively, you can verify the data by checking the Usage tab for the site.
Appendix
Set Permissions in HPDS Admin Tool
Enable Permissions to the Customer Account