
If you have a pond or a cistern that is fed from an external water source, you can use a Baseline biSensor soil moisture sensor with your Baseline controller to monitor the water level in a pond or cistern and turn on a valve when the water drops below a specified level. You program the controller to turn off the valve based on the time that it takes to refill the water.
Perform the following steps to use a biSensor to maintain the water level in a reservoir:
Step 1- Determine the acceptable low water level in the reservoir, and then calculate how much time is needed to refill the reservoir.
Determine how low you want the water level to be when it needs to start refilling. Use the height of the water in the reservoir rather than a measured quantity. You will position the biSensor in the tank at this level.
When the reservoir is at the refill level, turn on the water supply and record the amount of time that it takes to fill.
Note
If you are irrigating from a reservoir while it is filling, refer to our recommendations for Irrigating from a Pond or Cistern.
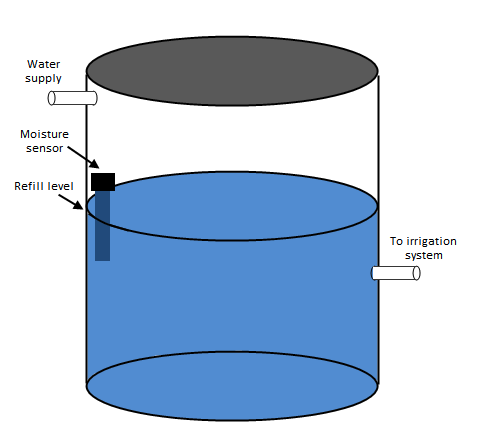
Step 2 - Install the biSensor in the reservoir at the low water level and wire it to the controller.
Take note of the serial number of the biSensor that you are installing in the reservoir. You will need this number when you program the controller.
For best results, position the biSensor vertically in the reservoir. It doesn’t matter which end is up, but mount the sensor so the wires can be routed out of the reservoir. Make sure that at least half of the biSensor blade is below the water at the depletion level.
Important
When mounting the biSensor, do not drill or nail through any part of the biSensor; it will void the biSensor warranty. A suggested method for mounting the biSensor is to install a pole in the reservoir and attach the biSensor to the pole with zip ties.
Mount the biSensor securely so it does not move. Variations in the position of the biSensor will result in erratic behavior.
Follow the wiring instructions in the biSensor installation guide to connect the biSensor to the two-wire path or to the biSensor ports on the controller or on the powered biCoder.
Make sure that you maintain polarity on the wire connections.
Fasten the wiring with wire nuts, and then test communication with the controller before you complete the installation with waterproof connectors.
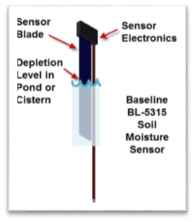
Step 3 - Program the controller to detect the low water reading.
Assign the biSensor
1. On the BaseStation 1000 controller, press Search & Assign. The Search & Assign menu displays.
2. Press or to highlight the Moisture Sensor option, and then press OK to select it. The Moisture Sensor screen displays.
3. If the Device Assignment option is highlighted, press OK to select it. If Device Assignment is not highlighted, press or to highlight it, and then press OK. The Moisture Assignment screen displays.
4. When the Search option in the Action column is highlighted, press OK to search for biSensors. When the controller finds the devices, their serial numbers display in the Action column.
5. Press or to move through the list of devices in the Action column. Highlight the serial number of the biSensor that you installed in the reservoir.
6. Press button to move to the Moisture Sensor column.
7. Press or to move through the list. Highlight the number that you want to assign the biSensor to.
8. Press OK. The serial number of the device that you selected in the Action column now displays next to the number in the Moisture Sensor column.
Take a biSensor Reading
1. When the reservoir is at the level where it should be refilled, press the Test button on the controller. The Test menu displays.
2. Press or to highlight the Test Moisture Sensor option, and then press OK. The Test Moisture Sensor screen displays.
3. Press or to select the biSensor that you installed in the reservoir.
4. Press OK to test the biSensor.
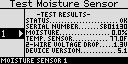
If any zones or programs are running when the test is activated, watering will pause for 10 minutes. The test results display the moisture percentage.
5. Write down the moisture reading.
6. Press RUN to return to the Run menu.
Step 4 – Programming the Controller to Open the Valve for the Water Supply
Designate a Valve and a Program to Fill the Reservoir
In order to have the system operate only the valve that fills the reservoir, make sure that the biCoder for that valve is assigned as a single device in a program.
1. On the BaseStation 1000 controller, press Program Setup, and then select the Zone Runtimes option.
2. On the Zone Runtimes screen, press PRG to select a program number that is not used for any other watering. The Program number displays in the upper-left corner of the Zone Runtimes screen.
3. Press to highlight the serial number of the biCoder for the valve that fills the reservoir, and then press + or – to enter a runtime that is long enough to fill the reservoir.
4. Remember this program number.
Note
If you want the reservoir to fill while other zones are running, be sure to set the number of concurrent zones for the controller to allow for this.
Configure the Start Condition
1. On the BaseStation 1000 controller, press Program Setup. The Program Setup menu displays.
2. Press PRG until the program that you set up for the fill valve displays in the upper-left corner of the screen.
Note
To move backwards in the list of programs, press and hold PRG, and then press – repeatedly.
3. Press to highlight the Setup Prg. Start option, and then press OK . The Setup Prg. Start screen displays the list of start conditions.
4. Press to highlight the Moisture Start option, and then press OK. A checkmark displays next to the Moisture Start option.
5. Press to configure the moisture start settings.
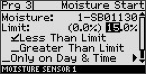
6. Notice that the serial number for one of your biSensors is highlighted in the Moisture field. If this is the serial number for the biSensor that monitors the refill level in the reservoir, no change is required. If you need to use a different biSensor, press + or – to select a different serial number.
7. Press to highlight the Limit field, and then press + or – to enter the refill moisture reading that you wrote down from the biSensor test.
Note
In the Limit field, the value in parentheses is the most current reading from the soil moisture biSensor. Keep in mind that the biSensor is read every 10 minutes.
8. Press to highlight Less Than Limit, and then press OK.
9. Make sure Only on Day & Time is not selected.
10. Do not start the Calibration.
11. Press RUN to exit Program Setup.
When the biSensor reading matches the value that you entered in the Limit field, the controller will open the valve to refill the reservoir and run for the amount of time that you configured in the Zone Runtimes screen.
Troubleshooting
If you set up your BaseStation 1000 controller according to these instructions and your system is not working as expected, review the following issues:
Issue: The moisture sensor is behaving erratically.
- Make sure that the moisture sensor is securely mounted in the reservoir. If the water movement in the reservoir causes the sensor to move, the sensor will behave erratically.
Issue: The reservoir is over filling.
- Make sure that the run time for the zone is accurate based on the fill rate.
- Make sure that the zone does not have a run time in another program.
Issue: The reservoir is going dry.
- Make sure that the moisture sensor didn’t move.
- Make sure the zone that is designated to fill the reservoir is enabled.
If there is a master valve on the water source used to fill the reservoir, make sure that the master valve turns on when the zone runs.
- Make sure that enough water remains in the reservoir below the depletion level to allow time for the controller to read the sensor and respond. The required quantity of reserved water will vary depending on the following factors:
- Whether the moisture sensor is connected over two-wire or conventional wire
- Whether water is being drawn from the reservoir while it is being filled
- The flow rate for the fill and the flow rate for the depletion (if applicable)