
Make sure to first read Hydropoint RMA Processes. The following steps will outline how to create and populate the necessary RMA records.
Important
The following products DO NOT require a return of the defective part. These are considered non-recoverable material and there is no benefit to returning them. In these cases, create the RMA Return Record as outlined below, but do not add any product for return. We will ship replacement parts with the RMA Order and no return labels.
NOTE! If you determine that investigating why or how a component failed that we would not normally have returned, make a judgement call and have it returned for closer investigation. Make the Failure analysis team aware if doing so.
- Decoders
- Fuses
- Cables
- Transformers
- PFS Flow Sensors
- BHM Registers
- INT boards
- SIM Cards
- Moisture Sensors
Ethernet Radio Replacement Requirements
When replacing Ethernet radios, it’s critical to identify whether the device is an endpoint or a gateway. This ensures the correct type of radio is shipped and prevents delays or incorrect replacements.
⚠️ This information must be included in the shipping instructions
RMA's consist of 3 record types:
- Originating SalesForce service (Support case)
- RMA Return Record (for product return and failure analysis)
- RMA Order Record (for replacement order)
Creating A New RMA Return Record
Note: All required fields in the originating Support case must be populated per standard case management process, or the automation in the subsequent steps will not work as designed.
Follow this process to create a return authorization record and identify the product and quantities we expect the customer to return to our warehouse.
1. In Salesforce Lighting > Support Case > Initiating Service Request > click the "New RMA" button from the RMA section in the body of the record. From there select Create RMA.

2. Salesforce will re-route you to a screen to create the new RMA record. Select "New RMA" and click Next.
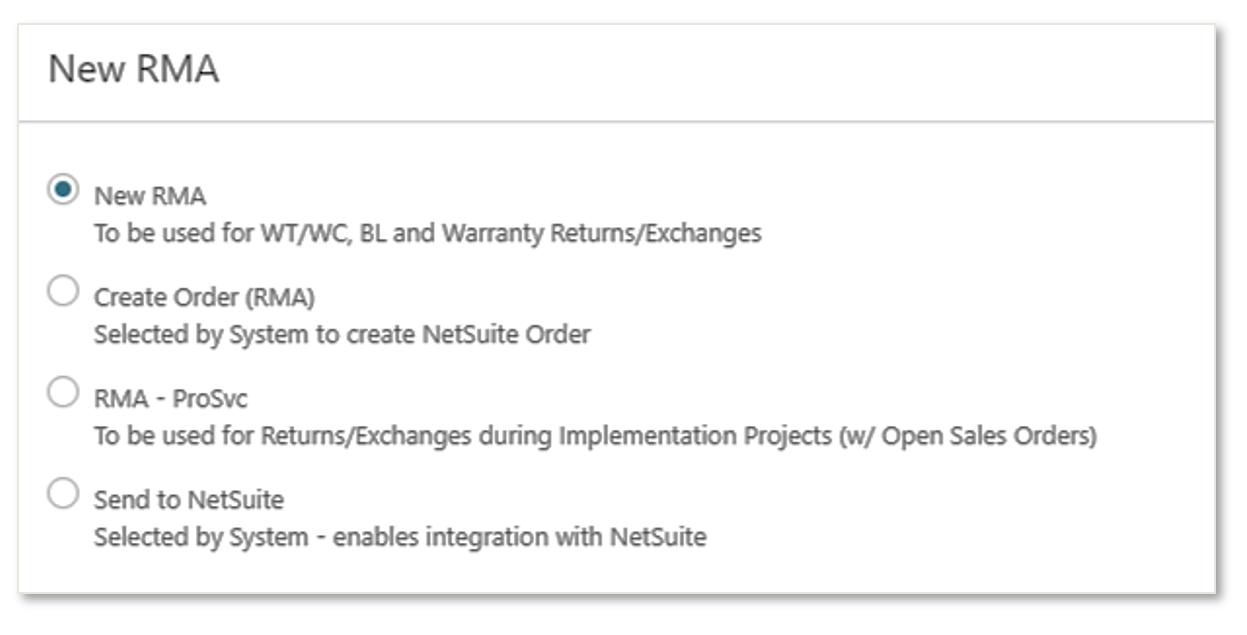
3. The "New RMA" set up page will pop-up and the following fields should be auto populated based on the originating service case data:
- Initiating Service (Originating Case ID Number)
- RMA Status (Open by default)
- Main Contact (Contact Name)
- Account and Site Account
- Asset and/or Serial Number (BL MAC Address)
Important
Make sure to gather and enter the component serial number(s) before moving forward with an RMA. This will validate warranty coverage and set the expectation if any components are OOW before processing the request.
Ensure all required fields are correctly populated.
In the "Asset Details" section, add specific component serial numbers (ie: board, decoder, etc.) in the "Additional Serial Numbers" field:
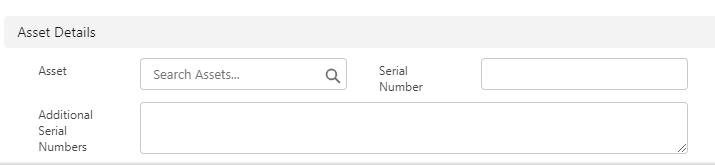
Before proceeding, ensure you have gathered and reviewed all the necessary information and validated the warranty details. Best practices should include the following:
- Verify product warranty coverage (see Identifying Baseline Serial Numbers for proper warranty validation)
- Check for complete and accurate field notes/troubleshooting documentation, diagnostics.
- Ensure diagnostic results make sense and correspond to the parts being ordered/replaced.
- Verify you have all necessary contact/caller information.
- Contact Name
- Phone Number(s)
- Email Address
- Mailing Address
- Double-check everything before submitting!
4. In the RMA Reason field, click the drop-down arrow to choose a reason for the return from the available menu options. Provide a brief description of the issue and reason for replacement in the RMA Reason Explanation text field.
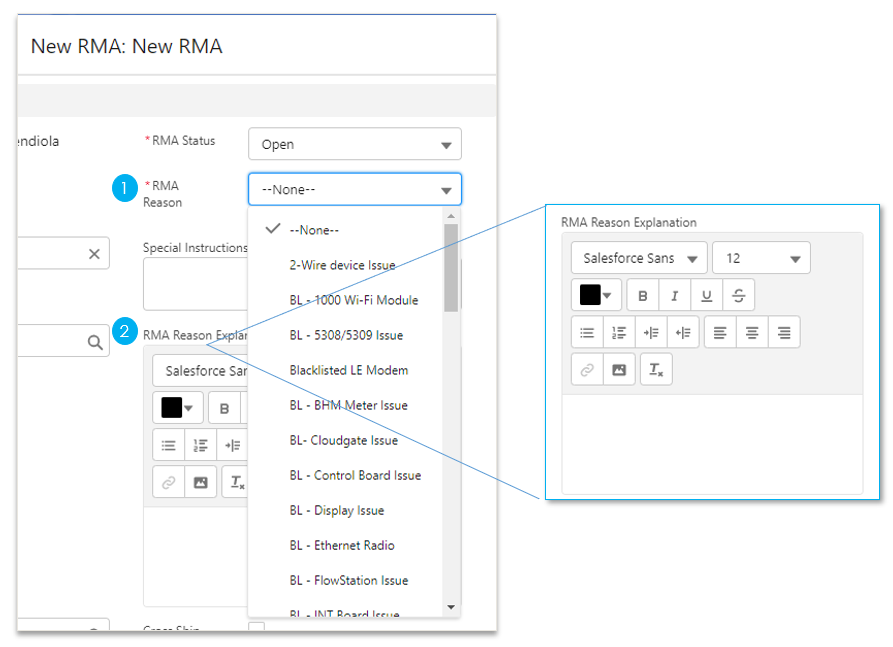
Make sure the Main Contact, Account, Site Account and all required fields outlined in previous steps are filled out, then click Save at the bottom of the page.
Data from the set-up page will be passed to the new RMA return record.
5. After saving you will be able to edit and complete the new RMA return record. In the "RMA Product" section, click New:

Select RMA Product and click Next
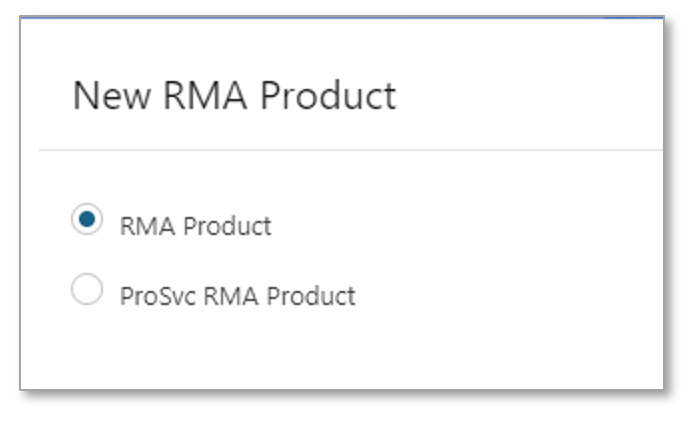
6. In the Product field, use the lookup function to locate the product part number being returned. Consult the Baseline replacement parts catalog as needed to identify the correct SKU.
7. In the Expected Quantity field, enter the number of items being returned.
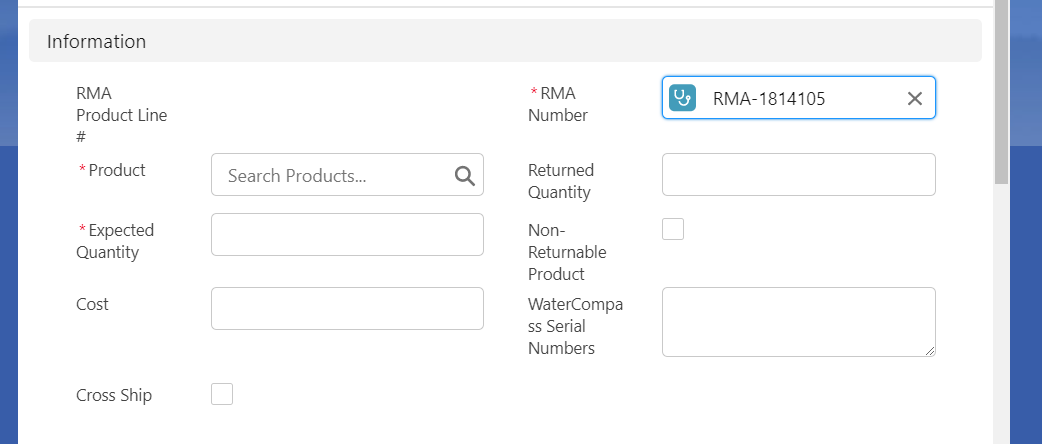
8. Click Save.
Note: If you have more than one product being returned, click Save & New and repeat the process above.
9. When finished entering return product, click on the RMA Number and Salesforce will route you back to your RMA Request.
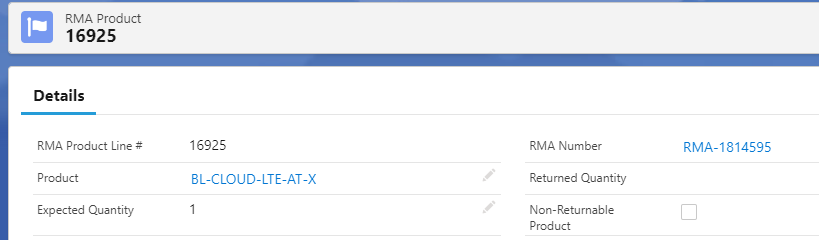
10. Review the RMA Return record and confirm that all details and product information are entered correctly.
11. The RMA Return record will remain pending in the system until the return product is received. Once received, this record will be processed and completed by the Failure Analysis Tech Team. If there are any questions or additional details needed, the FA Team will contact the Support Team to follow up accordingly.
Creating A New RMA Replacement Parts Order Record
This step will create a replacement parts sales order record and identify the product/ quantities we expect to be shipped to the customer from our warehouse.
1. From the Salesforce RMA record, click the "BL RMA Order" button from the RMA Orders section in the body of the record.

This will take you to the "New Order: RMA Order" set up page and will auto-populate the following fields based on the originating RMA record data:
- RMA number
- Initiating Service
- Order Start Date (current date)
- Status (Pending Approval by default)
- Account Name and Site Account
- Ordering Contact
- PO Number (RMA number)
2. Complete the following fields, then click Save:
- Account Name (if not populated)
- Site Account (if not populated)
- Ship To Company (if commercial use company name; if residence use Ship To Contact name)
- Ship To Contact (order recipient)
- Order Start Date (if not populated)
- Needed by Date (if applicable)
- Bill to (should be Account Name)
- Expedited Order (yes/no)
- Ship Method (select the appropriate method; if no product is being returned do not select a method with return labels)
- IMPORTANT! If the RMA order is going to any IDAHO address, it requires standard shipping method. No overnight method will be used for any IDAHO orders.
- Ship to Type (residence/commercial)
Best practices for Shipping Details should always include the following:
- Verify customer contact, billing, and shipping information is entered correctly according to the information provided.
- Validate against Salesforce & Netsuite data
- Validate shipping address against USPS.COM address lookup. Note: Do not rely on a Google Map result populating in Salesforce.
- For shipping to an address location with multiple suites, departments, buildings, etc. be sure to confirm and add the location description in shipping details. Examples: Mall Office, Grounds Maintenance Department, Suite 110
SalesForce New Order: BL RMA Order (screenshots)
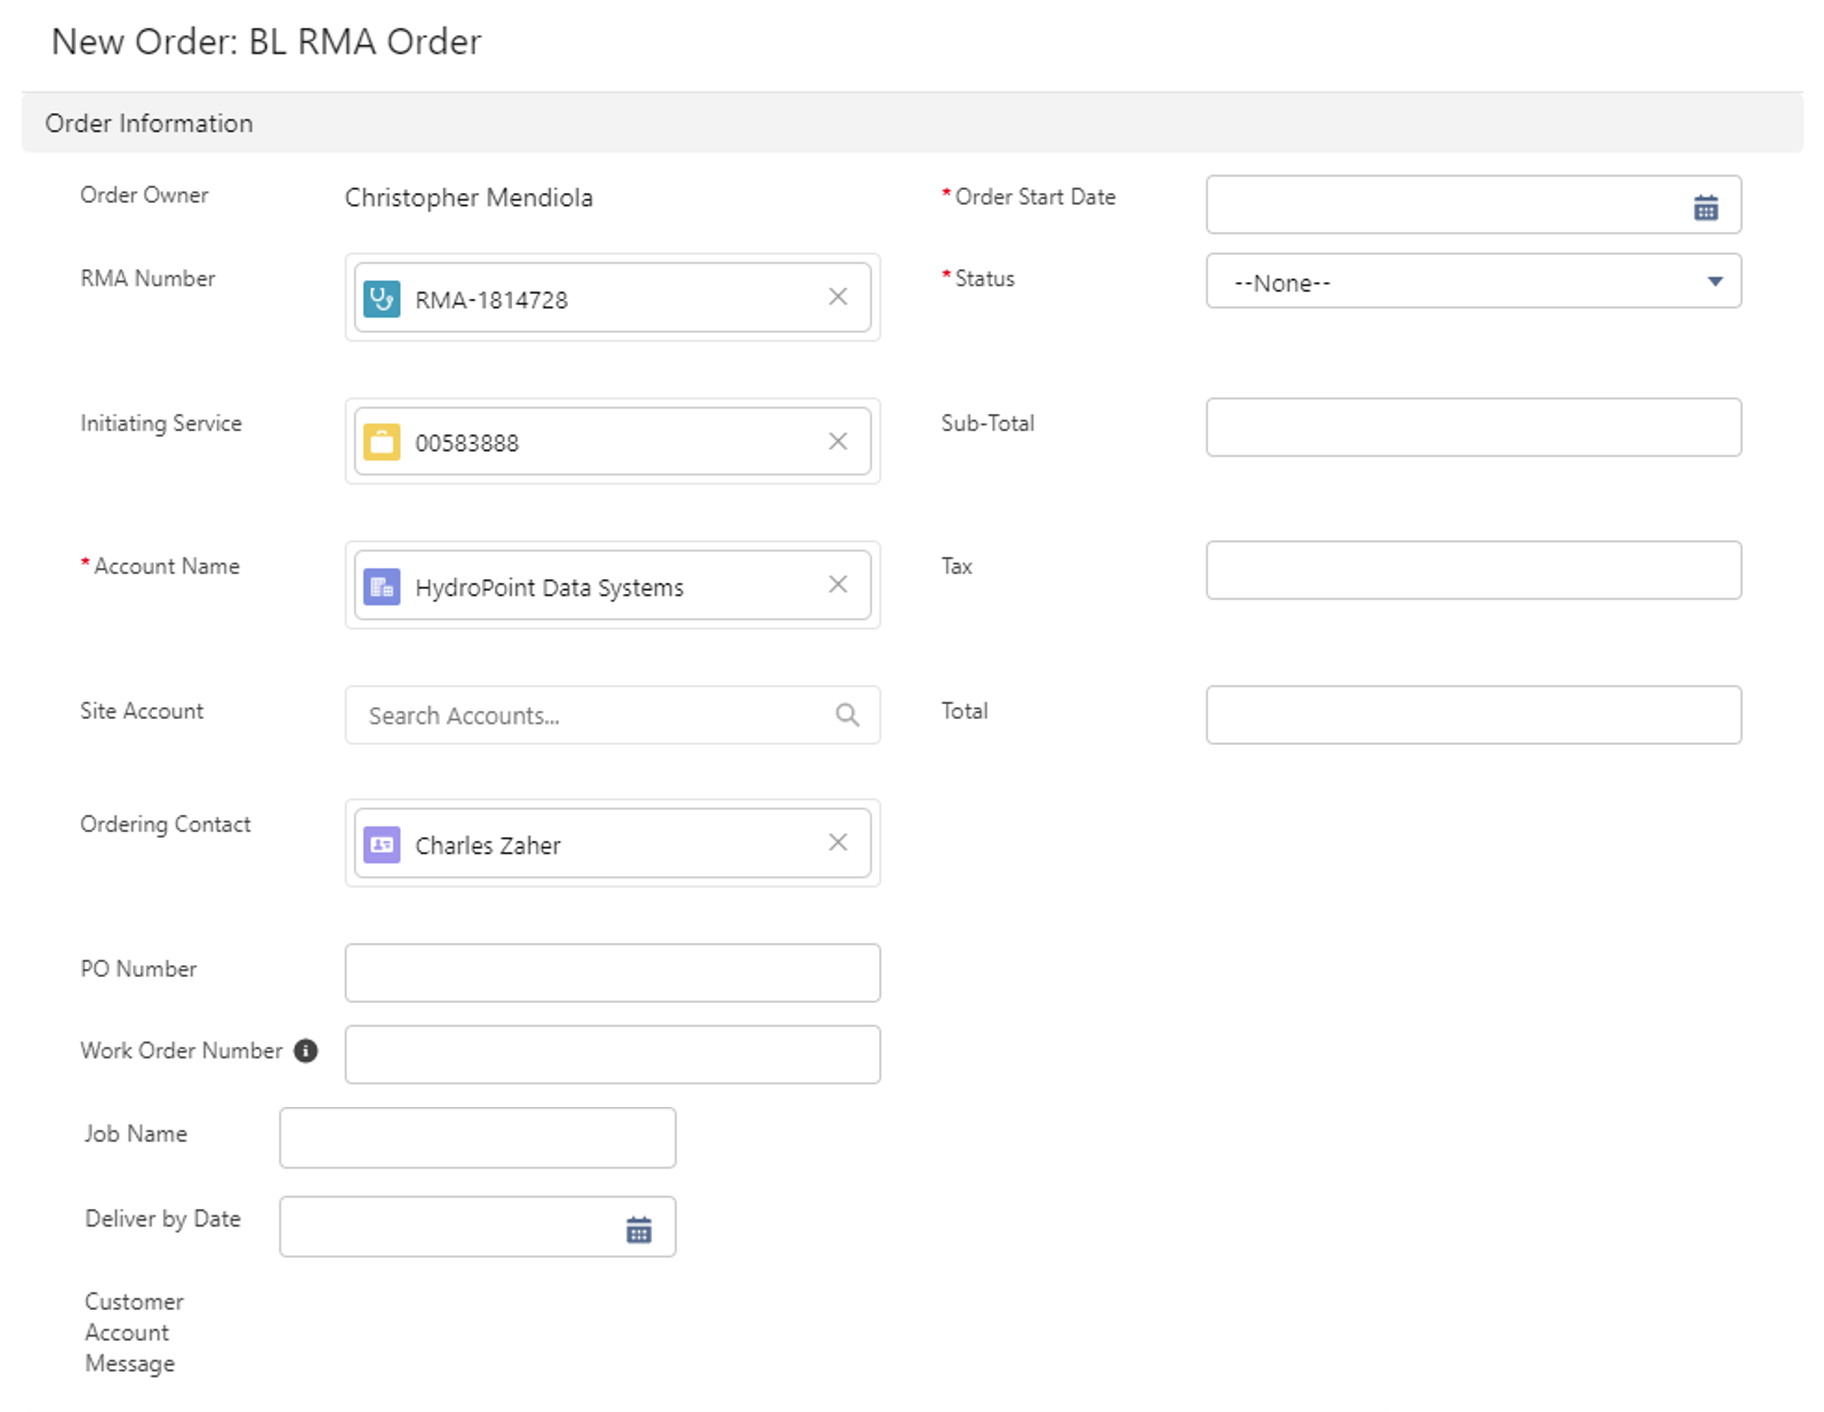
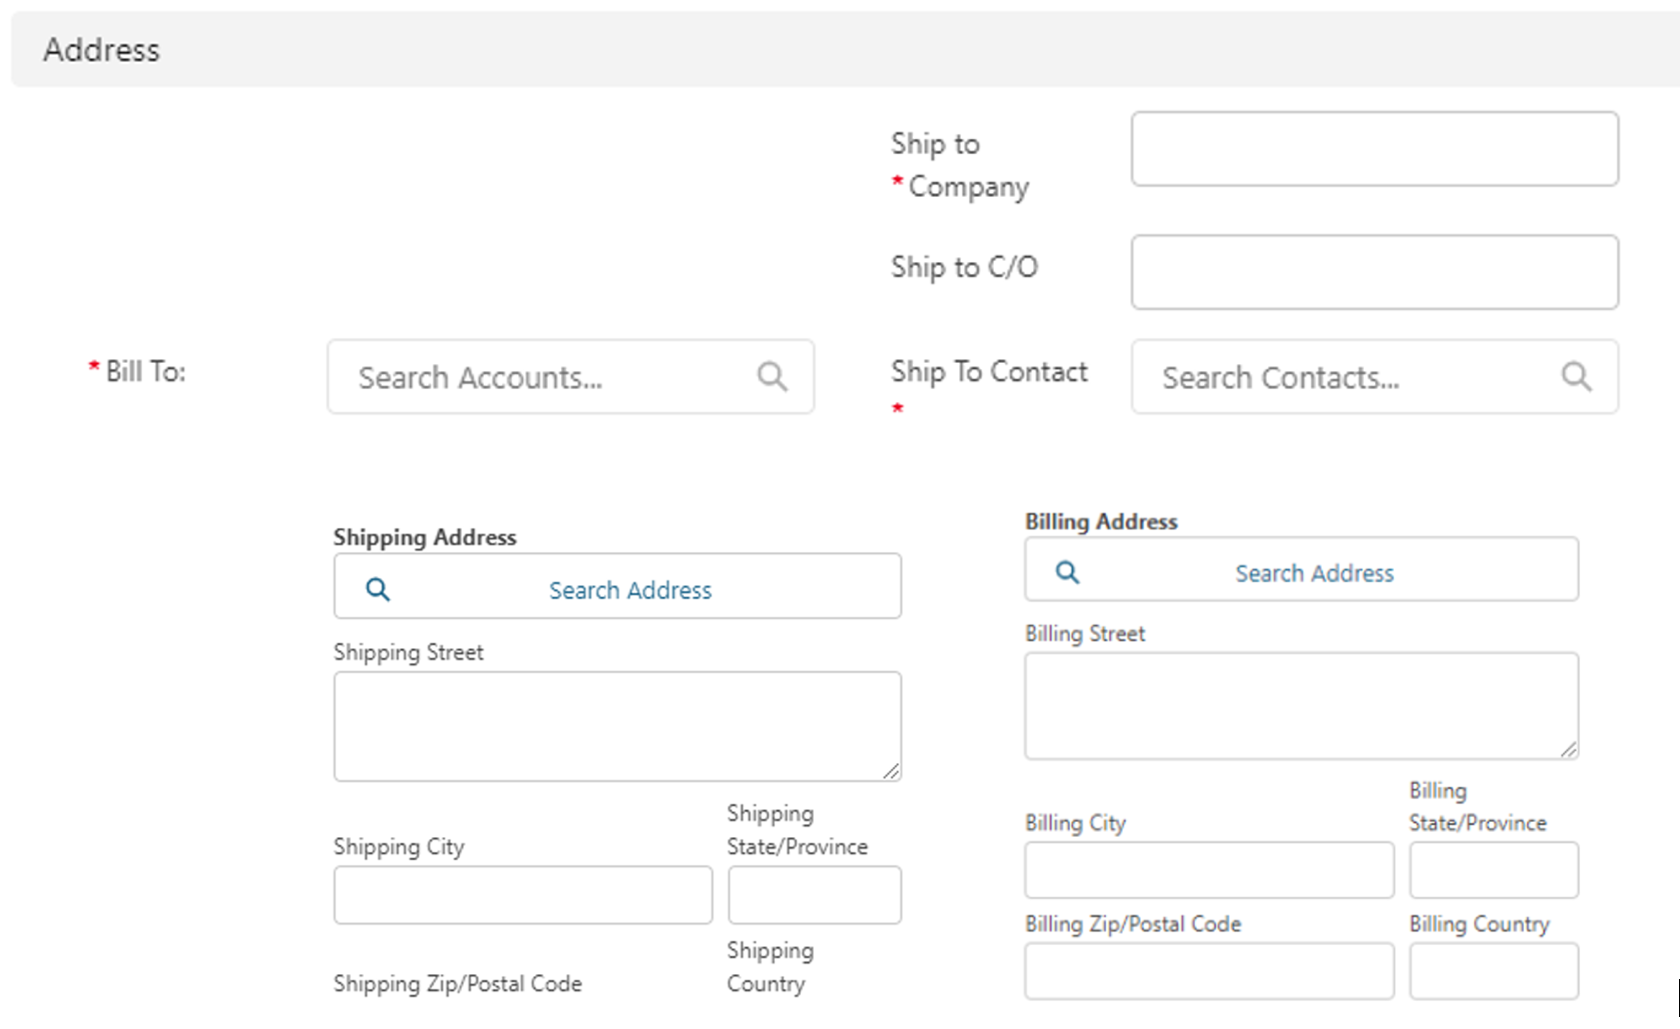
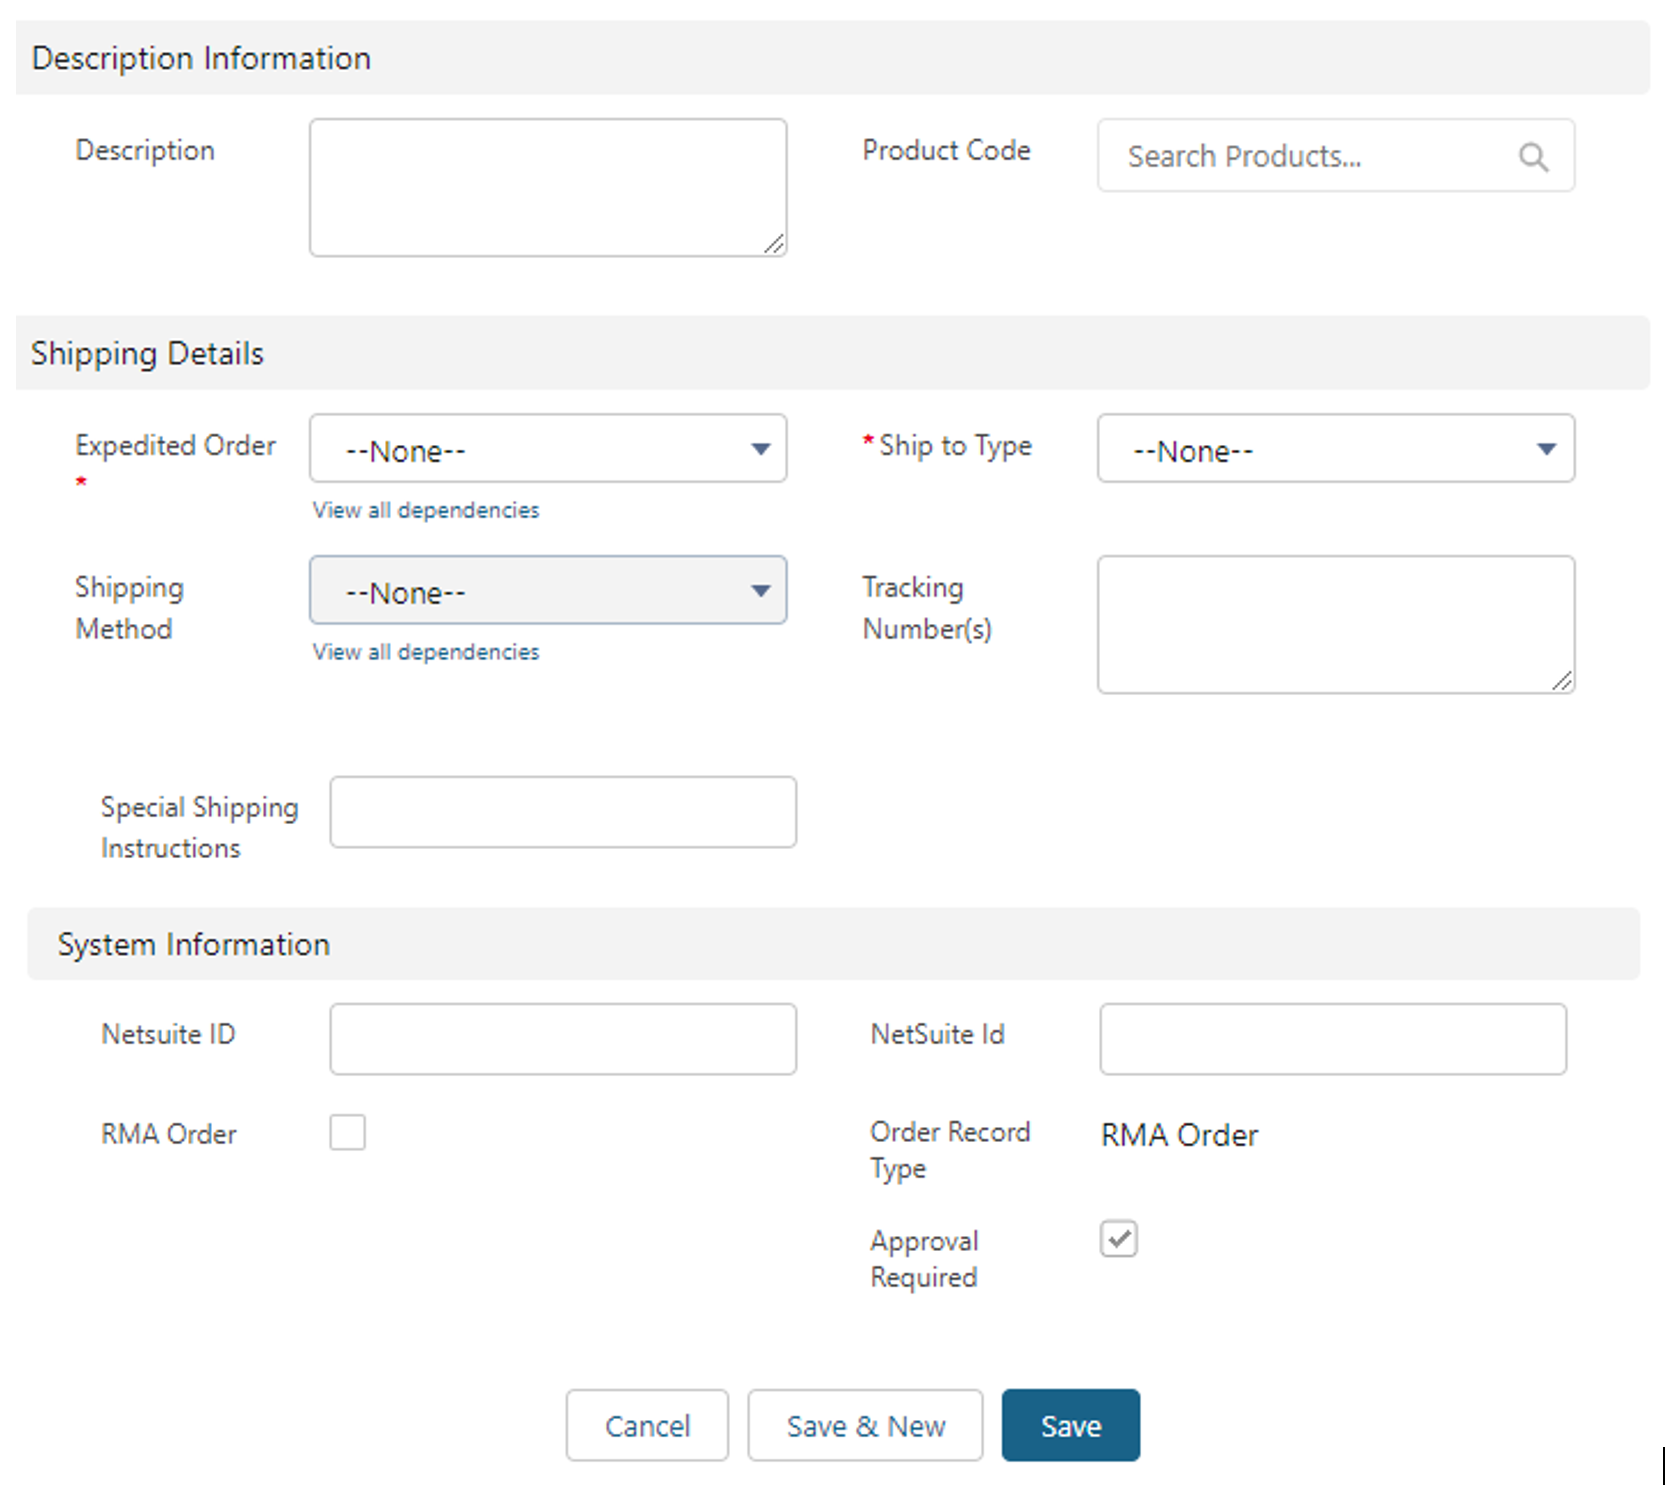
3. When finished with the set-up page, SalesForce will route you back to your Order record.
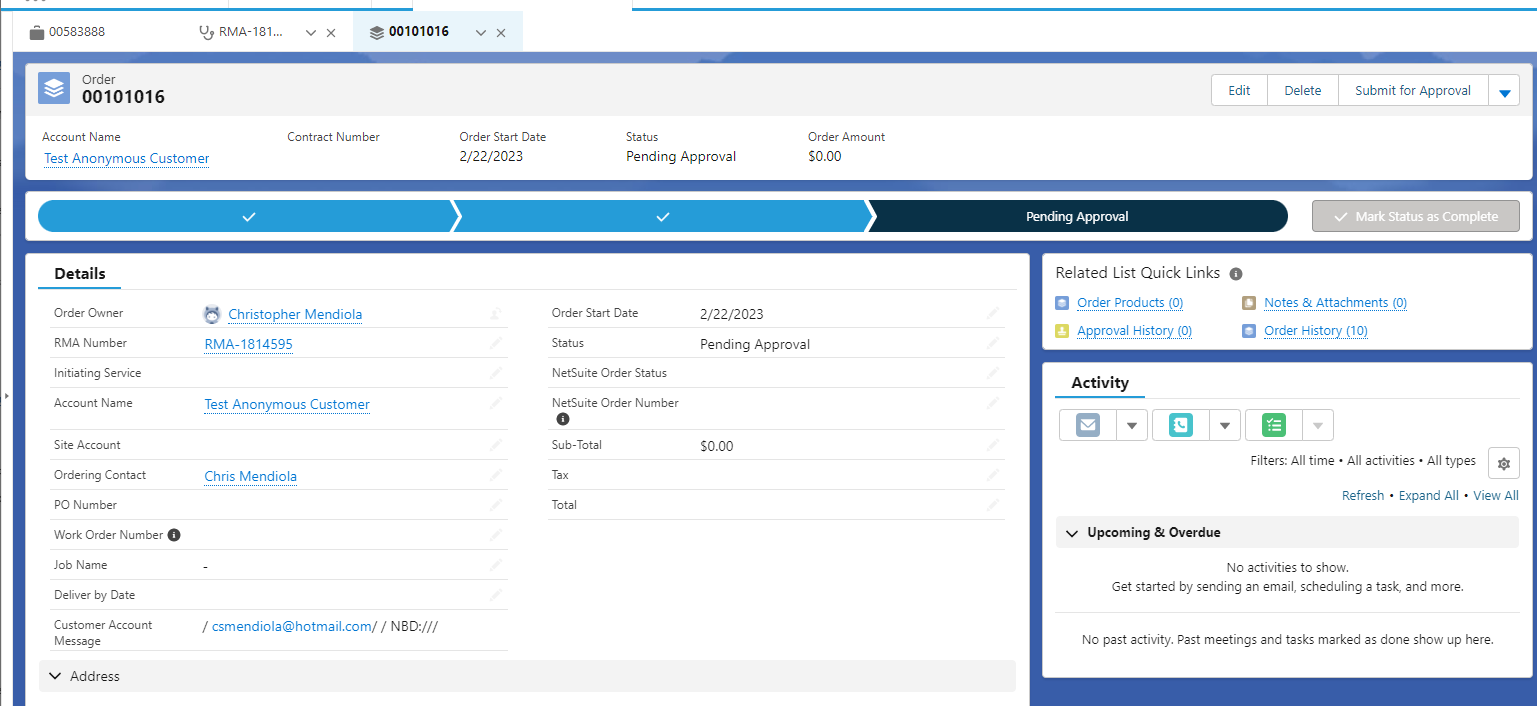
Special Instruction Changed!
For anything that would normally be in Special Instructions on the RMA such as the Unique Serial for R boards" or if "this needs to come to support for Programming" that now goes to Special Shipping Instructions in the Order.
If you have questions about this please see T2 to review.
4. Go to the "Order Product" section and click Add Product.

5. From the Price Book field, select BL Replacement Parts from the drop-down list and click Save.
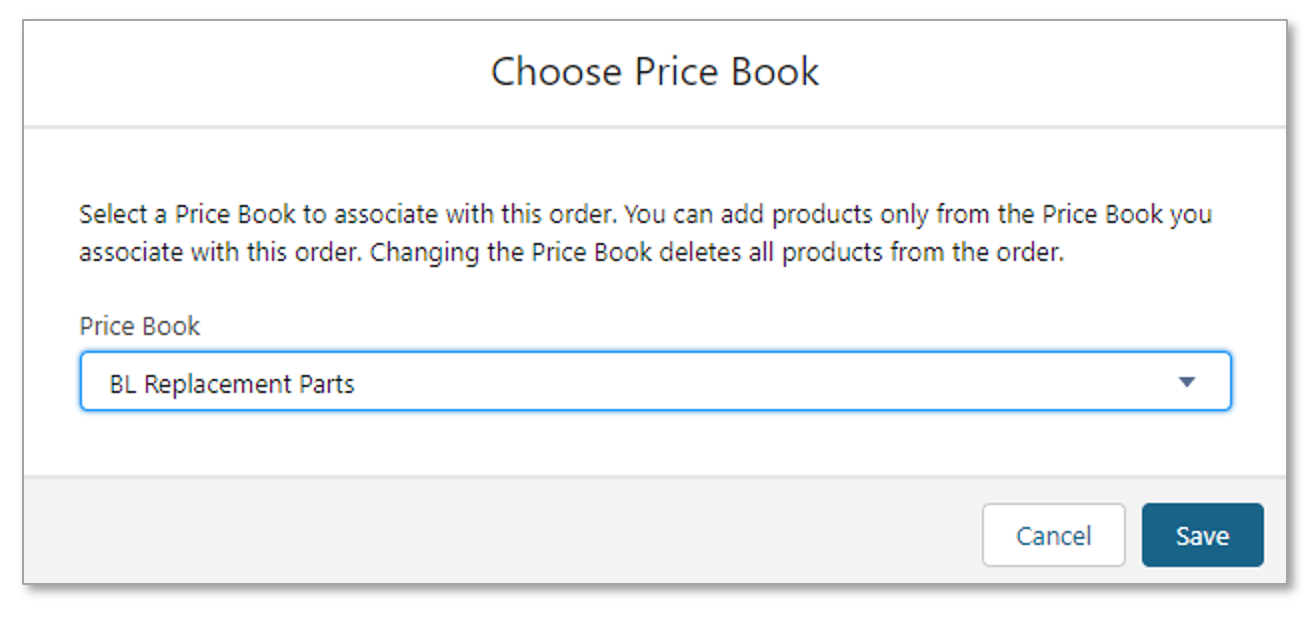
6. Select the product to be added to the order (this should be a replacement part match for the same product being returned). You can filter the options by product family, product type, or series. You can also use the keyword search and plug in the product code (or partial) if known. When all required products are selected, click Next
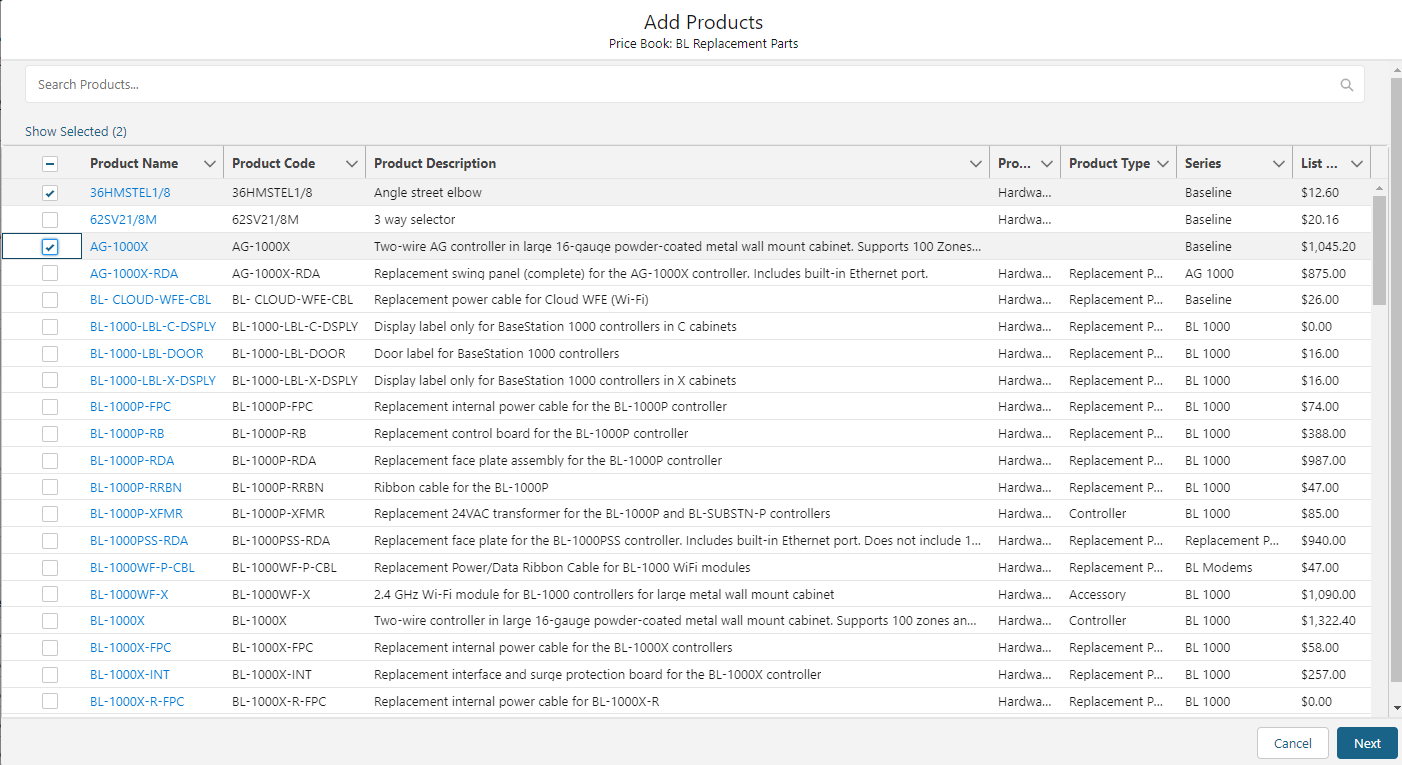
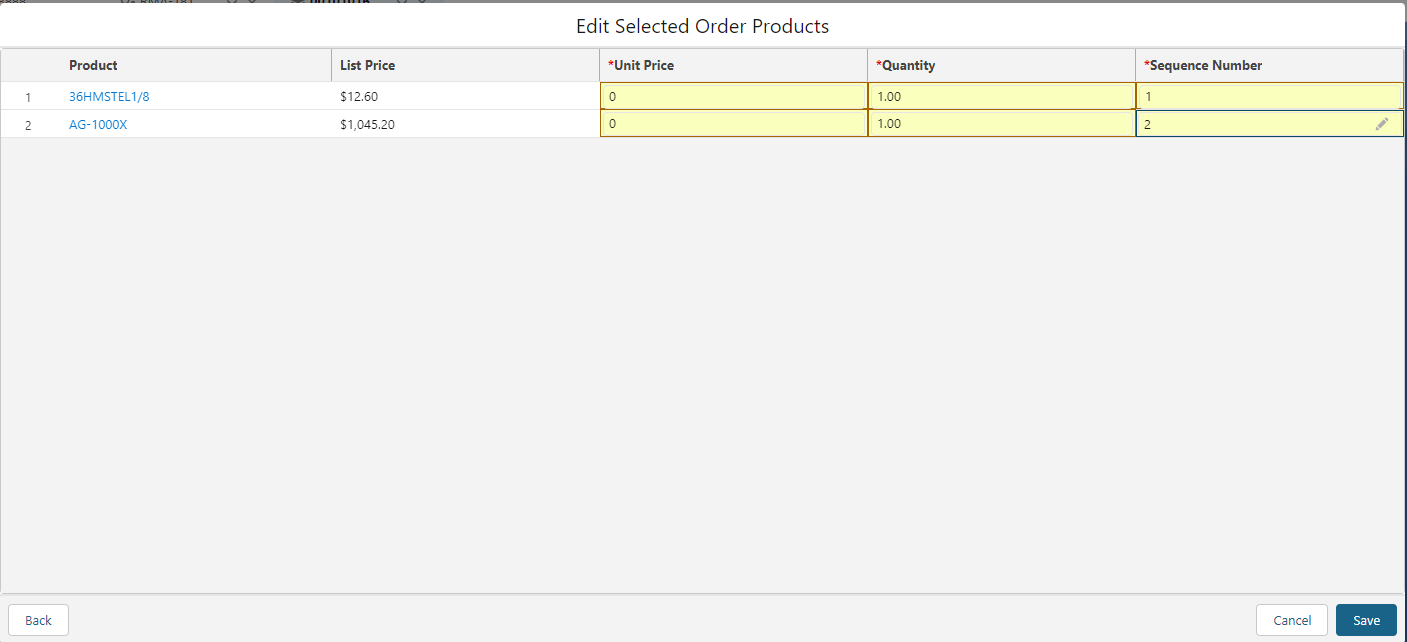
7. Enter in desired quantity, sequence number, and update sales price to $0 (Warranty replacement items are covered with no charge). Double-check everything for accuracy before submitting. When ready to proceed, click Save.
7. Review the entire Order record summary and confirm that all required fields are populated and information is accurate. Remember that missing or inaccurate data will delay order approval and processing, which in turn will delay shipment to the customer. Make sure that your orders are ready to be processed before submitting for approval.
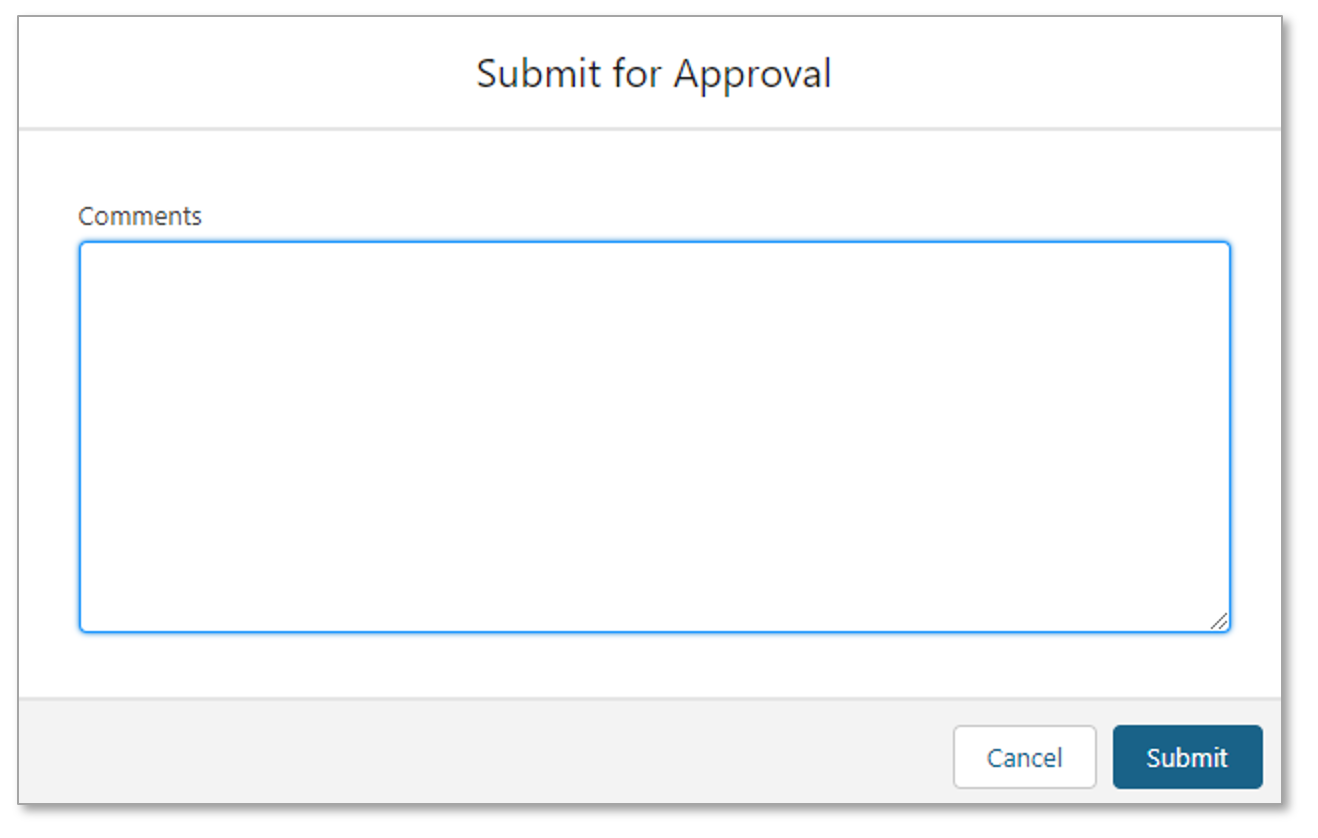
8. When the Order record is ready, go to the buttons on the upper right and side. From there click Submit for Approval to initiate the review & approval process.

Add any special notes or comments to the Approver. click Submit.
9. When the Order record is submitted for approval, an authorized CSR Approver will initiate the review & approval process. You can check status and list of approvers in the Approval History section. You will also receive email notifications with updates for orders that you submit.
(Note: Orders are normally approved periodically throughout the day. If you have an urgent order that requires immediate review & approval, coordinate directly with a CSR Approver to have the process expedited.)
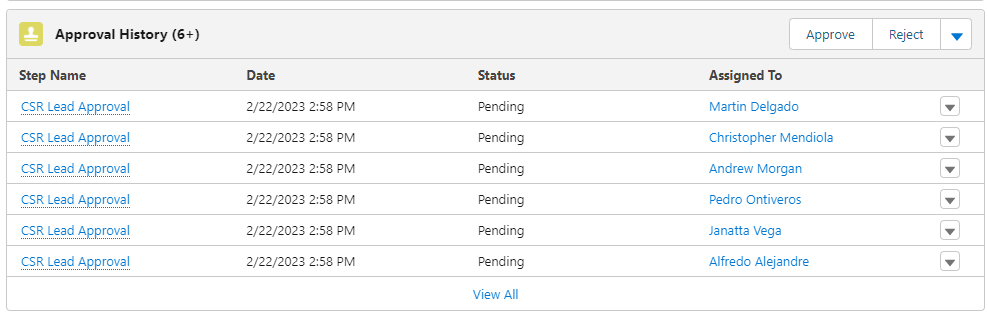
10. If there are problems with the Order record, it will be REJECTED and sent back to the submitter for correction. Once corrected, it must be submitted again for approval.
11. When the Order record is APPROVED, it will be ready to be sent to the warehouse for processing.
Legacy steps
(Legacy Steps) Submitting An Approved Order To The Warehouse
This step will create the order record and pick ticket for the product to be shipped to the customer from our warehouse.
1. Confirm with Manufacturing if there are any questions/concerns or special considerations related to the Order. This should be noted in the "Special Shipping Instructions" field of the Order record.
2. Once reviewed & approved, send an email from the Order record to Cross_Ship@hydropoint.com with David Swenson CC'd. The email should contain the following digital attachments:
- The Order record saved as a PDF (see instructions below)
- The Packing Slip (see instructions below)
*NOTE: The email subject should be The RMA number and Order Number as shown in the example below:
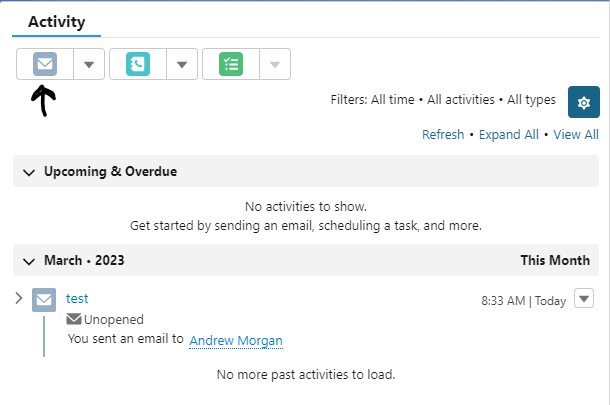
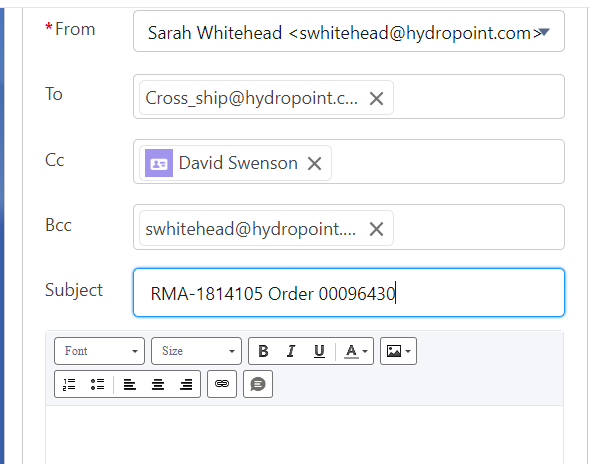
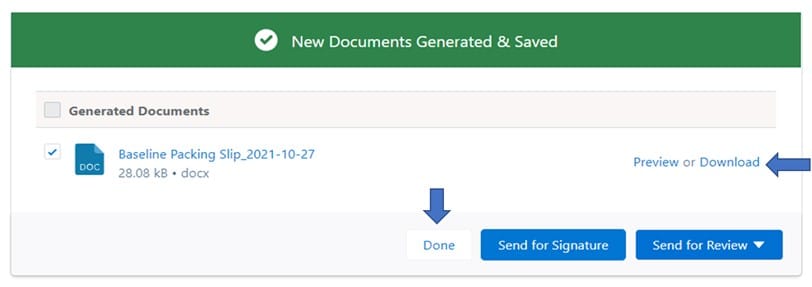
3. To create the Packing Slip attachment file, click the drop-down arrow on the upper right and side. From there select Generate Baseline Packing Slip

When you generate a Packing Slip (aka "pick ticket") it will create a Docusign file that allows you to download and attach to email.
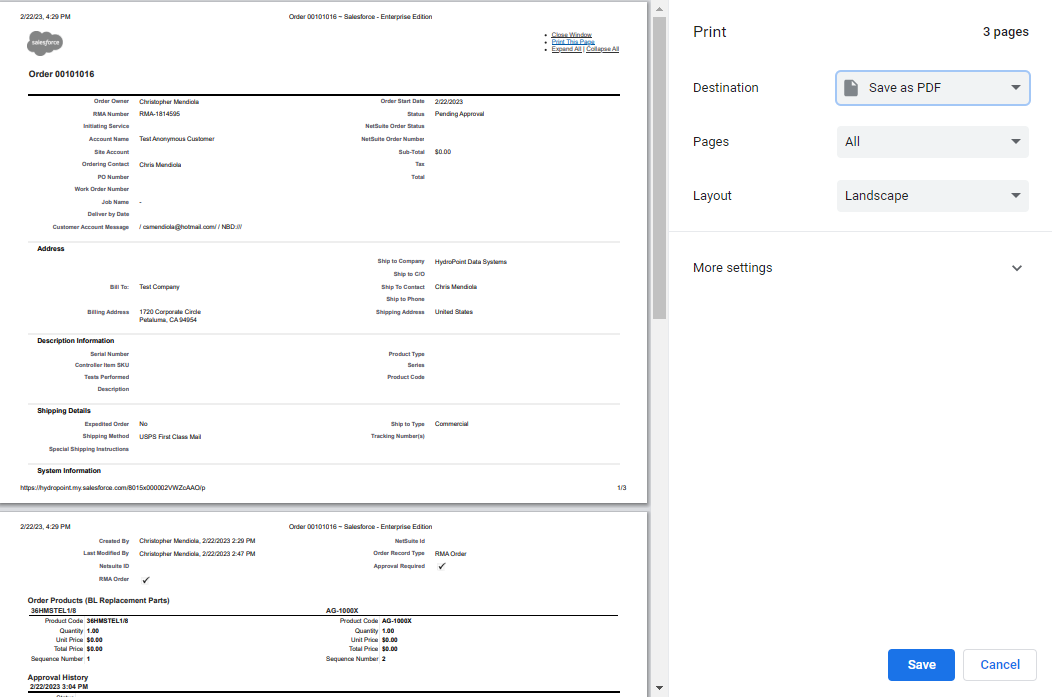
4. To create the Order record attachment file, click the drop down arrow on the upper right and side. From there select Printable View

This will take you to a printable version of the Order record. From there go to the options on the upper right and side and click Print This Page.

This will take you to a printer window that will allow you to save the file as a PDF and attach to the email.
5. Once the Order record and Packing Slip attachment files are sent to the Warehouse Team, they will begin the process of order fulfillment. Note that order processing and shipping cutoff times apply. Urgent or expedited orders should be communicated in the order details, and confirmed with the Warehouse Team once the order is submitted.
6. Order record completion status and tracking information will be updated in SalesForce after the order has been processed and shipped. Note these records are not updated in "real time" and there will be delays between actual shipping time and record updates. If you need to check status of an Order and the record is not updated, validate directly with the Warehouse Team.
Updating Customer and Case Information
Once the RMA and Order request is completed, send a confirmation email to the customer contact. This standard template below is also available in SalesForce. If there are no replacement parts expected to be returned, adjust the verbiage accordingly.
When expecting a Product Back:
|
Hello (Customer Name), This RMA is for _______. Once the RMA has been received, please test to confirm that the replacement part resolves your issue. Once that is confirmed, place the defective part in the box provided and seal it with the return shipping labels, please be sure that the RMA number is visible. Make sure that the product that was sent as a replacement is the only product that is returned. If the shipping labels are lost or cannot be found, you can use the below is the information to return the defective device. Send to: Baseline Support Attn: RMA-xxxxxx 10259 W Emerald St, STE 160 Boise, Idaho 83704 Package items securely, as items damaged during shipping are not covered under warranty. Baseline Will reject any RMA’s that include a full controller (BL-3200X/P/C or BL-1000X/P/C). Unless it has been approved by Baseline support. Thank you and have a great day. <Signature> |
When NOT expecting a Product Back:
|
Hello (Customer Name), This RMA is for _______. Once the RMA has been received, please test to confirm that the replacement part resolves your issue. If you need more assistance, don't hesitate to reply to this email which is connected to this RMA's support case. Additionally, you can call us - 866.294.5847. Thank you and have a great day. <Signature> |
7. SalesForce Support Case Update
Update all information and status in original Support case in accordance with case management processes. When created using this process, the RMA and Order records will be related to the original case for tracking and visibility.