
Cloud Network Module SIM Card Replacement
For Baseline Enclosures
Introduction
This guide is to provide directions for how to replace the SIM card in your Cloud Network Module.
Materials Provided
• SIM card
Equipment Needed
• Phillips screwdriver

IMPORTANT
Your Verizon SIM card has two size options. You will need the larger SIM size for your modem. You need to remove the large SIM that includes the small SIM inside of it. If you punchout the smaller SIM size too it will NOT work with your modem.


1. Unlock the pedestal door, remove it, and set it aside. Locate the Cloud Network Module installed on the back panel of the pedestal enclosure.
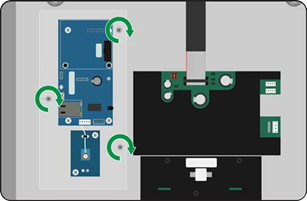
2. Locate the power cable supplying power to the Cloud Network Module from the controller.
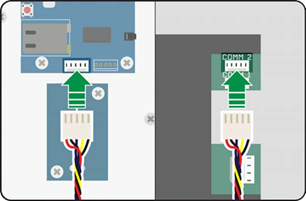
3. Unplug the 5-pin connector from the Cloud Network Module from the Comm 2 connector on the left side of the controller board as shown to ensure electricity is not supplied to the Cloud Network Module.
For Pedestal Enclosures...
4. Locate the cellular modem by identifying the SIM ID label.
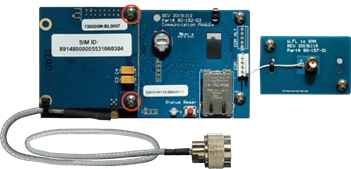
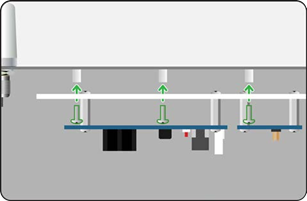
5. Remove the two screws that secure the cellular modem to the Cloud Network Module.
6. Carefully unplug the cellular modem from the 15-pin connector.
7. Locate the SIM card holder on the modem module. Slide back the SIM card cover to unlock it, and then open it. Remove the existing SIM card, as it will no longer be needed. Please dispose of the SIM card in an environmentally friendly manner.
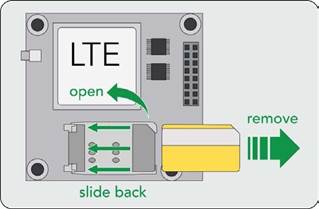
8. Insert the new SIM card into the cover. Make sure the metal side touches the contacts when the cover is closed and the notched corner fits into the notch on the holder.
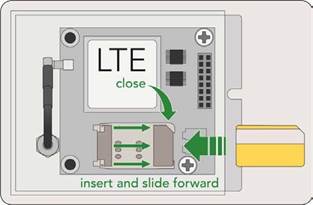
9. Close the SIM card cover to lock it in place.
10. Carefully plug the cellular modem back into the 15- pin connector.
11. Screw the two mounting screws back in place to secure the cellular modem to the Cloud Network Module.
12. Plug the 5-pin connector from the Cloud Network Module into the Comm 2 connector on the left side of the controller board as shown.
13. Allow approximately 3 minutes for the Cloud Network Module to reboot and reconnect to the cellular service provider.

1. Unlock front cabinet door and open the door to access the controller display panel and the controller swing door.
2. Pull open the swing door to access the inside of the controller.
3. Locate the Cloud Network Module inside the enclosure (on the top of the enclosure for X-cabinet and XS-cabinet enclosure types).
4. Locate the power cable supplying power to the Cloud Network Module from the controller.
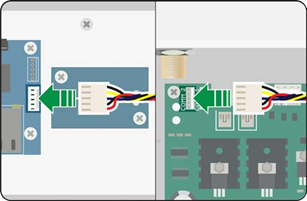
5. Unplug the 5-pin connector from the Cloud Network Module from the Comm 2 connector on the left side of the controller board as shown to ensure electricity is not supplied to the Cloud Network Module.
For Wall-Mount Enclosures Cont...
6. Locate the cellular modem by identifying the SIM ID label.
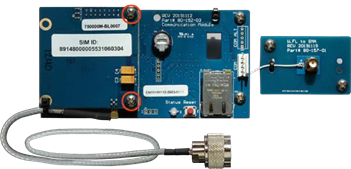
7. Remove the two screws that secure the cellular modem to the Cloud Network Module.
8. Carefully unplug the cellular modem from the 15-pin connector.
9. Locate the SIM card holder on the modem module. Slide back the SIM card cover to unlock it, and then open it. Remove the existing SIM card, as it will no longer be needed. Please dispose of the SIM card in an environmentally friendly manner.
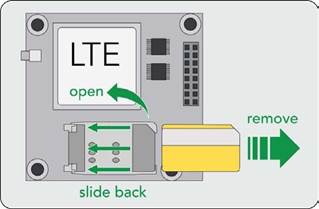
10. Insert the new SIM card into the cover. Make sure the metal side touches the contacts when the cover is closed and the notched corner fits into the notch on the holder.
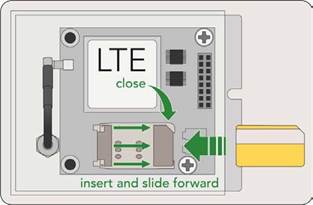
11. Close the SIM card cover to lock it in place.
12. Carefully plug the cellular modem back into the 15- pin connector.
13. Screw the two mounting screws back in place to secure the cellular modem to the Cloud Network Module.
14. Plug the 5-pin connector from the Cloud Network Module into the Comm 2 connector on the left side of the controller board as shown.
15. Allow approximately 3 minutes for the Cloud Network Module to reboot and reconnect to the cellular service provider.

1. Check the controller network status to verify the controller has reconnected to the network.
a. For a BaseStation 3200, turn the dial to the Run screen and then reference the BaseManager connection status in the top right corner of the screen. If the controller shows a Connected status to BaseManager, the SIM swap process is complete and successful. If the controller does not show a Connected status to Base Manager after approximately 3 minutes, contact Baseline Support.
b. For a BaseStation 1000, SubStation, or FlowStation, press the System Setup button. The System Setup menu displays.
i. Press the down button to highlight the Network Setup option, and then press the OK button to select it. The Network Setup menu appears.
ii. Press the down button to highlight the BaseManager Info option, and then press the OK button to select it. The BaseManager Info screen appears.
iii. Review the Status field, which indicates whether the controller is connected to BaseManager.
• If the controller shows a Connected status to BaseManager, the SIM swap process is complete and successful.
• If the controller does not show a Connected status to Base Manager after approximately 3 minutes, contact Baseline Support.