
When activating devices, proper account setup in NetSuite and Salesforce is vital to maintaining clean data. Note: All departments at HydroPoint use Salesforce and/or NetSuite. Any data added to either system is used in different processes or parts of the customer journey.
Note
While the following info is represented in salesforce screenshots, the concepts also apply to creating these records in NetSuite.
References: HydroPoint Company-Wide Policies & Procedures
Creating New Accounts
Baseline Customer Accounts
Salesforce set up process for baseline customer accounts can be found in this document.
Prior to adding a new account to Salesforce, please search for the Account or Company name first. This will help prevent duplicates.
1. Start by searching the name of the company or property then click on “view hierarchy”.

2. Once you click, you will see the list:
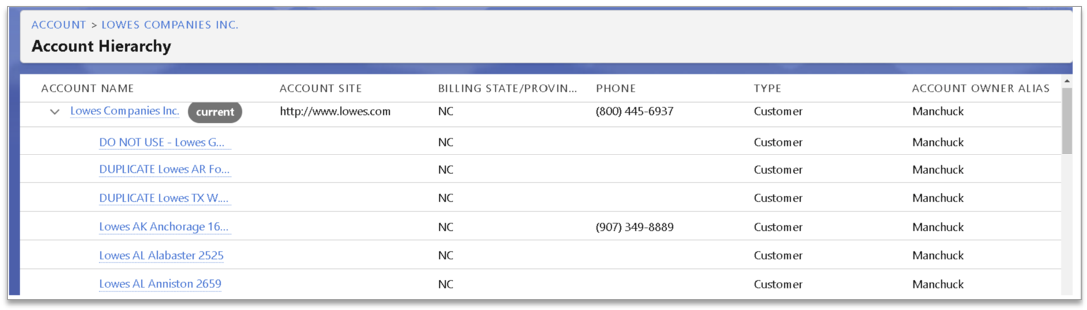
3. If your properties are not on the list, please do a search for the property name. For example, If searching for Fowler Property Acquisitions, try searching Fowler* or by the nickname FPA*. The asterisk will act as a wildcard or a fill-in. You can use the * in front or behind a keyword. The idea here is to cast a wide net, often the use of longer names could result in an account not being found.
Once you have searched a few ways and you determine there is not an existing site account, please create a new account.
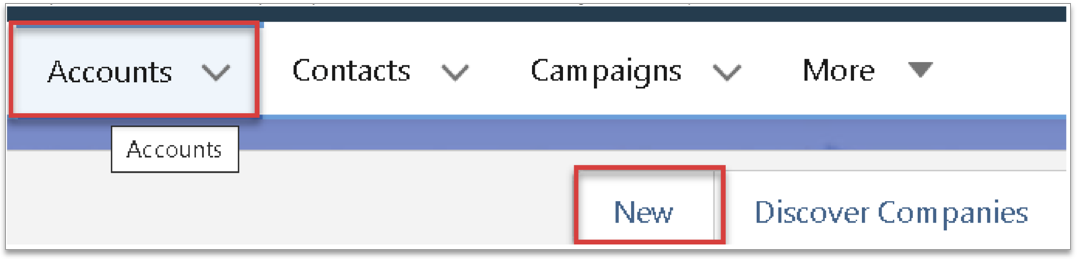
4. From the Account Tab, press the “New” button.
Populate as much information as possible, including the following required fields:
- Account Name *
- Industry
- Account Status (for data to pass to NetSuite Active Customer must be selected)
- Account Sub Status (Standard is preferred, update as applicable)
- Address(es)
5. Once complete, press Save.
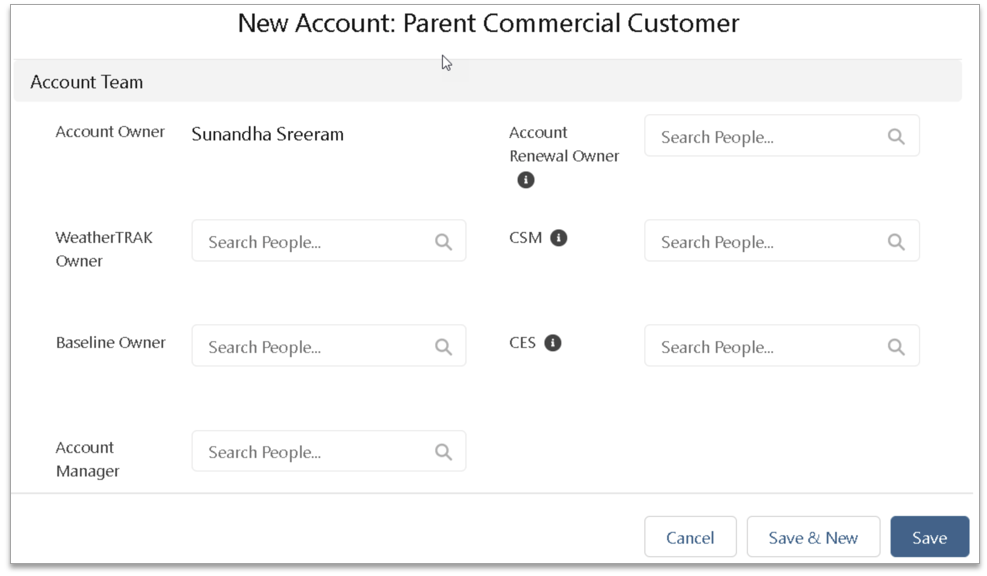
Understanding Account Ownership
A Salesforce Account should always be owned by a WeatherTRAK and/or Baseline Sales Rep (not Customer Support or Customer Success). The reason for this is our marketing Automation (Pardot) automatically sends emails or marketing content on behalf of the Account Owner. Usually, these marketing emails are suggesting new products and are best responded to by Sales Directly.
***If you are unsure of who should be listed in these fields, please reach out to Sales for territory assignments.
Incomplete Data
Incomplete information includes missing addresses (both shipping & billing), phone numbers, and industry. These fields are important for many processes across various departments. These fields will now be required upon setup in both Salesforce and NetSuite. The last field that will be required is Account Status (and Sub Status when applicable).
Naming Conventions
If a Child or Site account already exists, mirror the naming convention of those accounts. If a child or site account does not already exist, please follow this naming convention:
Company Name or Nickname (space) – (space) State (2 letter Abbreviation) (space) – (space) Property Name.
Example
- FPA – AL – 100 Inverness
- Lowes - AK - Anchorage 1633
Site Accounts
A site is defined as a separate physical location and/or a site that is managed individually. The general rule: if a site is visible as a specific location with a name and an address on a map, it gets its own site in NetSuite. Each site is set up as an individual account.
Site accounts should only be added as children if the parent directly owns the property. If the account relationship is indirect (i.e.: Distribution, Landscape Maintenance Firm, or Water Agency) then the accounts should be associated as Partners.
A Partner is a Distributor. If the ownership of a site has not been established, then the accounts should be listed as partners and not set up using the parent-child relationship. Partner accounts should not have "child" accounts linked to them even if the site location or end-user account uses said partner.
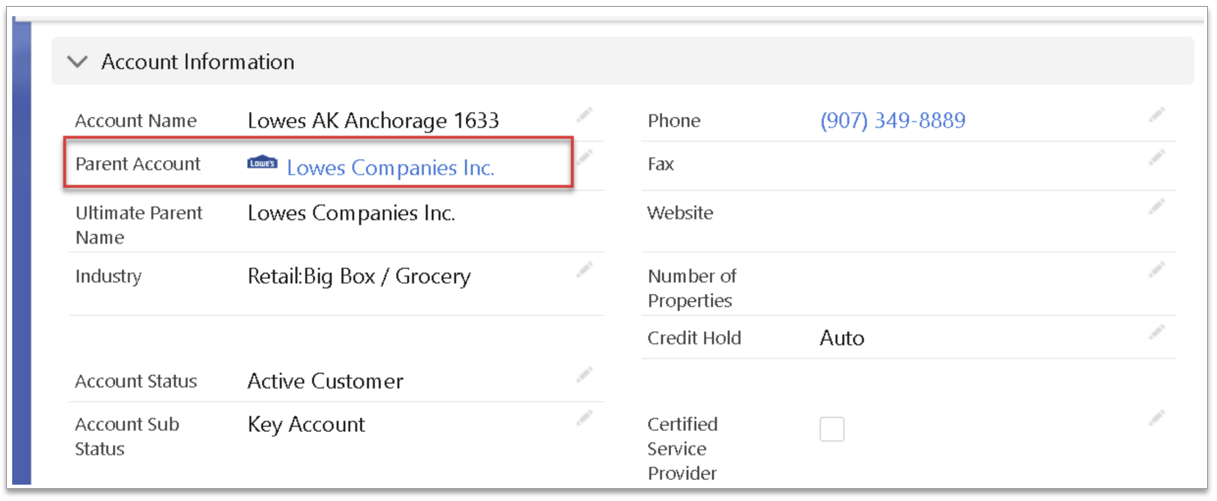
If the new account is a site account, please make sure to populate the Parent Account field so that the New Site account is listed in the Parent Account Hierarchy.
For a large site with multiple devices within it, they can all be grouped under one account.
- 10 devices on "island on Washington Street at Payran" in City of Petaluma doesn’t get its own site. The devices are grouped under City of Petaluma parent account.
- 15 devices in Crystal Springs HOA don’t each get their own accounts, even though they are at different locations. All of them can be grouped together under HOA parent account. It’s fine to use the leasing office or a central location as the “shipping” address, just so we have a record of where the devices really are.
Understanding Relationships: Parent vs. Partner
A Parent means that the “parent” owns the site location (ie: corporate campus or national footprint). Lowes, Walmart, Kimco are examples of properly set up Parent / Child relationships. A Parent is never a distributor.
Correct Setup Example
- Site Account Name: City of Gillette – Sunflower Park
- Parent Account: City of Gillette
Incorrect Setup Example
- Site Account Name: CPS – Sunflower Park
- Parent Account: CPS Distributors
CPS Distributor added as a Partner on the account.
Distribution Only:
Correct Setup Example
- Site Account Name: SiteOne Region 10 - South West
- Parent Account: SiteOne Landscape Supply (Corporate)
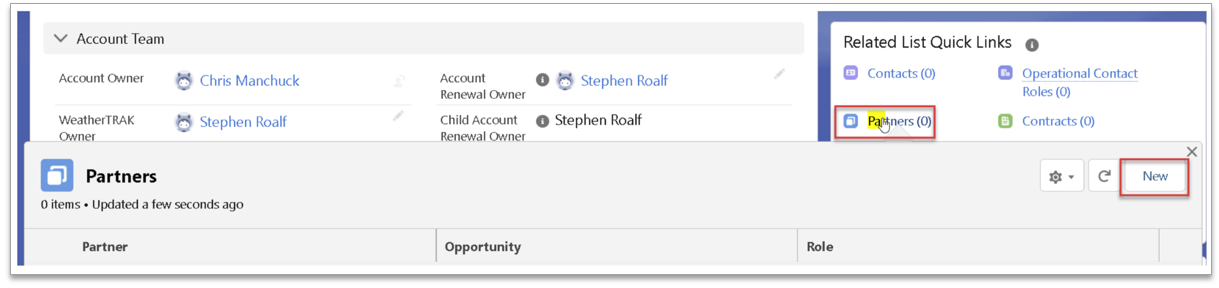
Adding Partners to Accounts:
1. From the Account record, scroll to the Partners section and press “New”
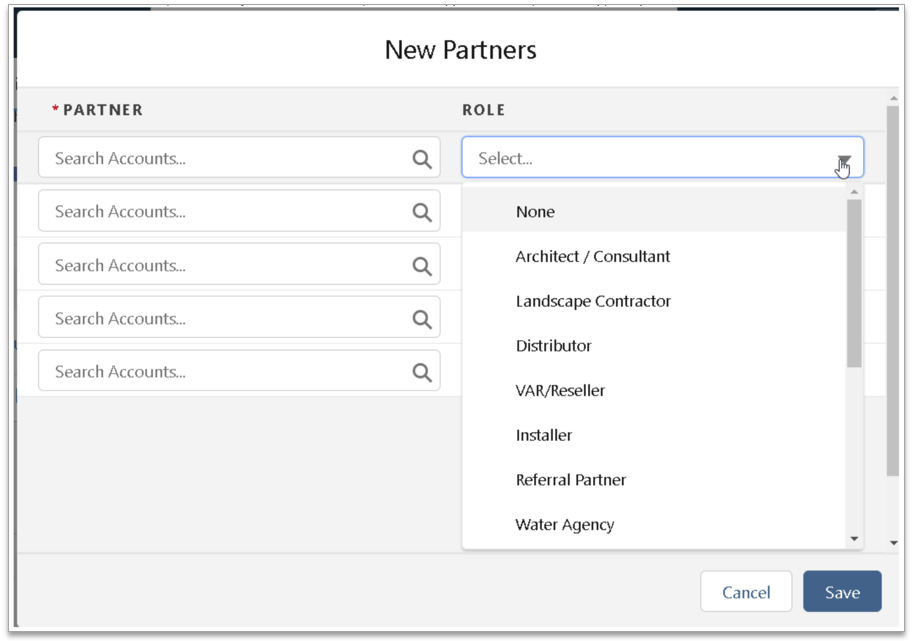
2. Add the Partner account (must already exist in Salesforce), select the applicable role (relationship) and press Save
Creating Contacts
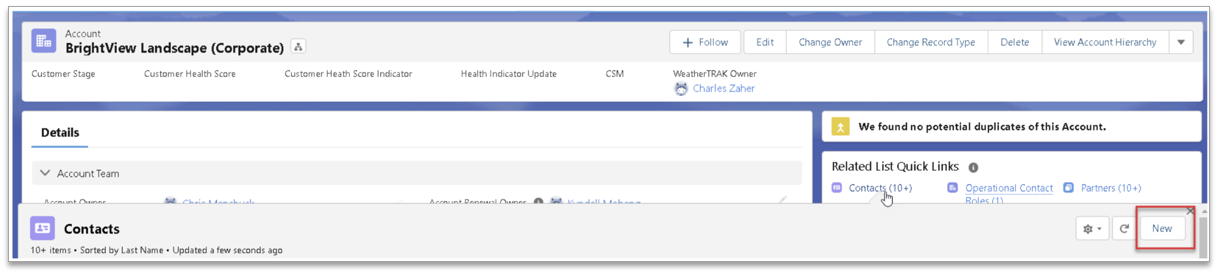
Starting from the Account where you need to add the contact, scroll down to the Contact Section and press the 'New Contact' Button.
**best practice: contacts should always be attached to the Parent or Headquarter account Contacts should be attached at the site level using contact roles.
Salesforce will auto-populate the Account Name, Phone, Mailing Address. Populate as much information as possible, including the following required fields:
- First & Last Name
- Phone Number
- Address(es)
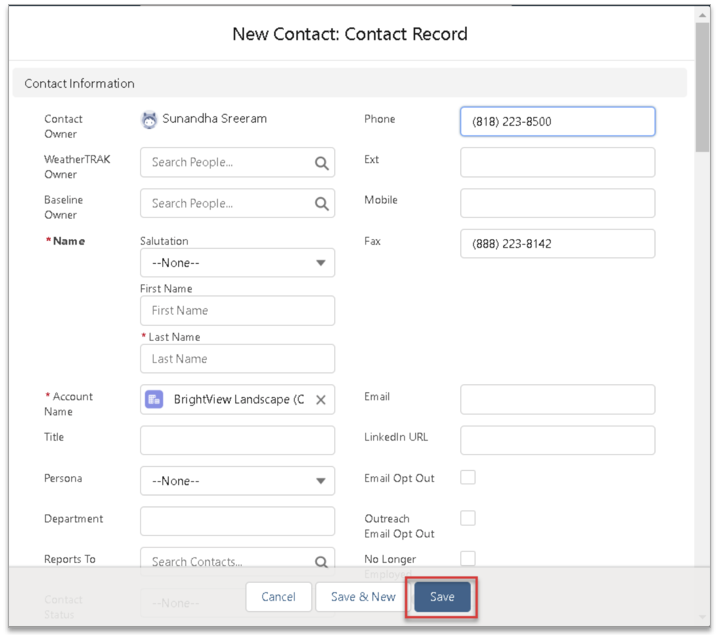
Once completed, press Save.
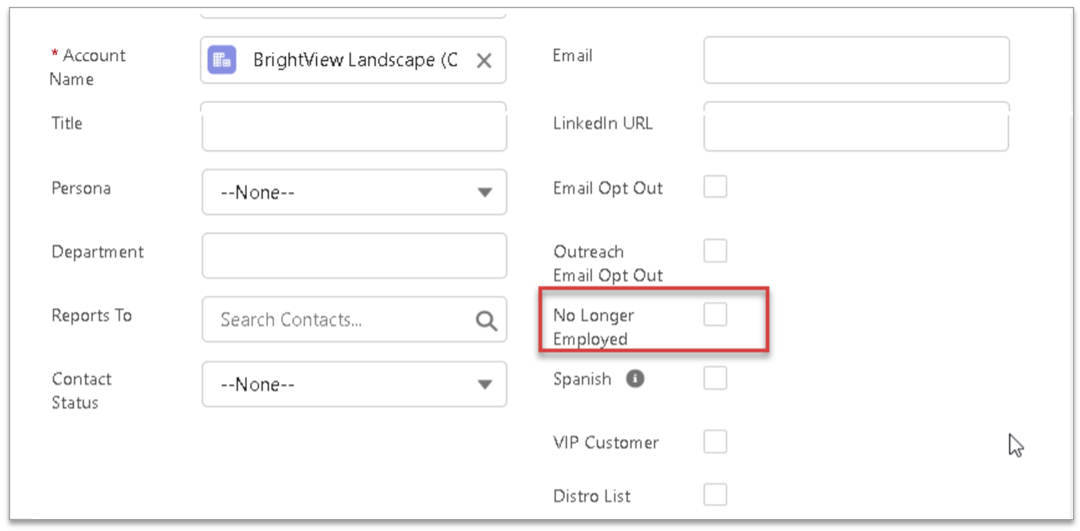
Contact no longer employeed with the company? When a contact becomes a former employee, please start by removing all site/contact role connections. Next populate the 'No longer Employed' Checkbox. Finally, add a brief note in the description section stating the reason for change. Do not delete the contact. Do not change the name to 'No Longer Employed'.
Creating Operational Contact Roles
Operational Contact Roles
To learn more on the definitions, when / how to use these contact roles, reporting and more, see this document.
Operational Contact Roles should be used when a contact needs to be associated to several accounts (rather than creating duplicate contact records).
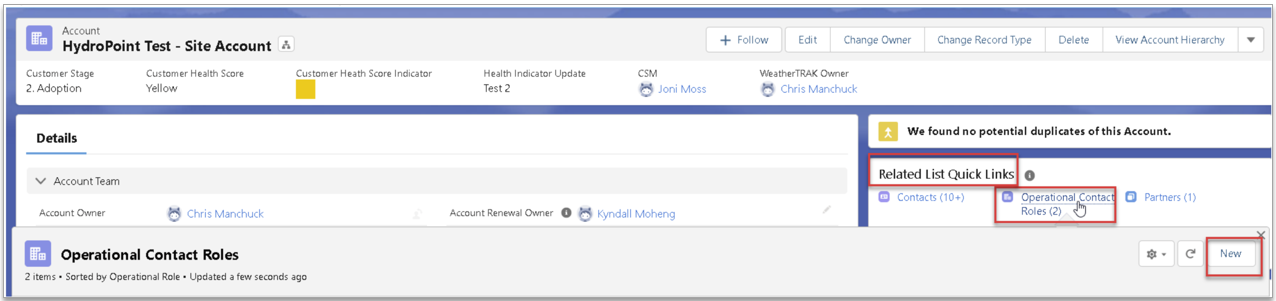
To add a contact to an account using Operation Contact Roles, start from the Site Account Record. Under Related List Quick Links, click on Operation Contact Roles button and press 'new'.
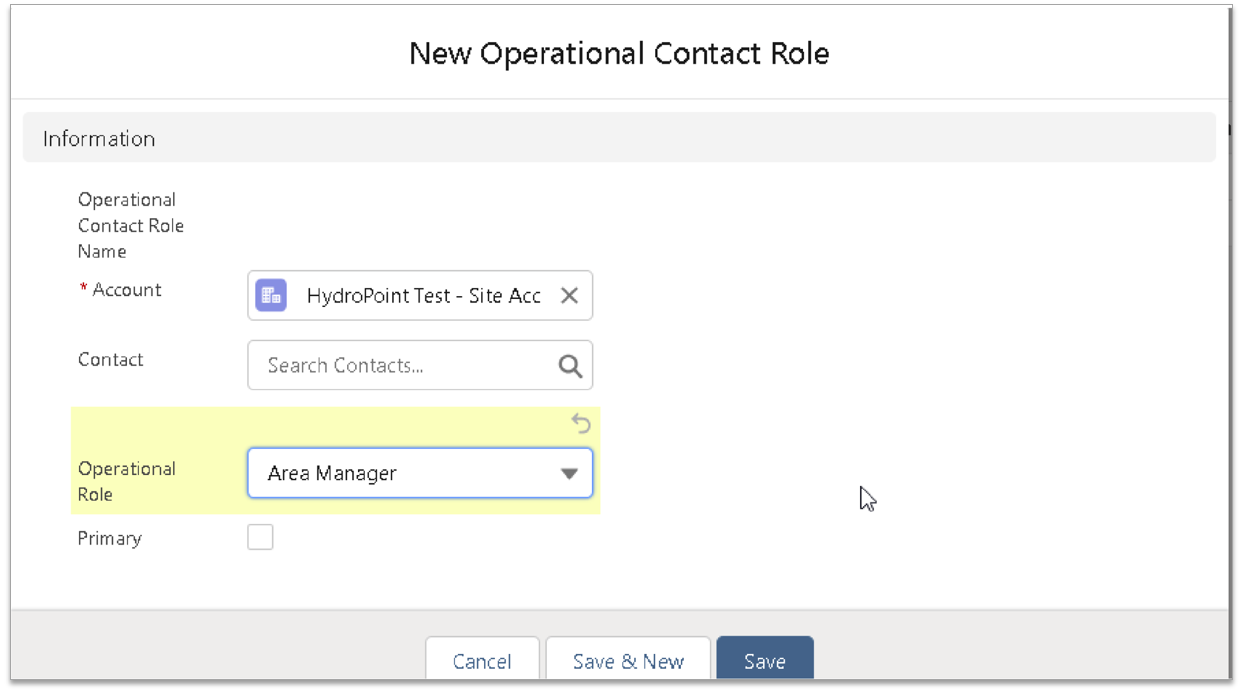
- Populate Contact
- Select the applicable role.
- Select primary (when applicable)
- Press Save.
Accounts can have more than one contact added to the Operational Contact Role section. Contacts can have more than one role per site and be attached to as many site accounts as applicable.
Assigning Main Account Contacts
Main Account Contacts are assigned by selecting 'Primary' when adding Operation Contact Roles. The Main Account Contact fields are restricted from modification because they pull directly from Operational Contact Role section.
To update a Main Account Contact, simply uncheck the primary box on the listed contact and check the primary box on the new main contact:

The definitions of the Account Status field values can be found on page 55.