
Setting up a WeatherTRAK Controller or WaterCompass Flow Monitor
Devices need to be set up consistently across NetSuite and WeatherTRAK.net using accurate customer data. We rely on this information to later tell us which device belongs to which customer, where it is installed, and who to bill for renewals.
This document details the process for setting up a WeatherTRAK Controller or WaterCompass FM200 or FM300 Flow Monitors (referred to in this document collectively as “devices”) with (a) cellular provider (b) NetSuite and (c) WeatherTRAK systems.
This document goes over the following steps:
- Activating the SIM card (WeatherTRAK controllers only).
- Creating a customer in NetSuite.
- Activating the device in NetSuite.
- Activating the device in WeatherTRAK.net (WeatherTRAK controllers only).
⚠️Note: If you are doing a replacement of a deactivated controller, this is not the proper document. Please refer to the Deactivation and Replacement articles. The Pro Services should be the team that activates WaterCompass devices.
When is activation necessary?
This process triggered by:
Activation is a prerequisite for other tasks such as finalizing an installation project or monitoring controller performance. Any time that NetSuite setup or device activation is needed it should be triggered by creating a case in Salesforce:
- When Pro Services is organizing an installation for a customer, the Project Manager sends an e-mail to support@hydropoint containing the information needed to set up the NetSuite accounts.
- When a WeatherTRAK controller is installed, an activation request is submitted via phone, e-mail, or web form, often by an installer in the field or Professional Services.
- When a WaterCompass FM200 or FM300 flow monitor installation is approved by the Contractor Support group, they will use their Installation Service case in Salesforce to create a related case and assign it to Professional Services.
⚠️Note: Information on Activating WeatherTRAK Controllers is also available online, view Activating WeatherTRAK Controllers.
This Process is a Trigger for:
- Renewals: Devices must be set up in NetSuite in order to prompt subscription renewals.
- Professional Services: Need to know that devices were activated and set up to mark their project complete.
- Customer Success: Depends on proper device set up so that they can monitor the devices for customers.
- Customer Support: This group needs systems set up properly to provide support and process RMAs, upgrades, etc.
- Sales: This group looks for activations to track statistics and verify that projects are completed.
- Customer: If this doesn’t get set up correctly, they will have difficulty using the product and paying for or renewing the service.
Acceptance Criteria:
- SIM card is activated (WeatherTRAK controllers only).
- Device is associated with the correct customer Account in NetSuite.
- Device’s subscription status is set to Active in NetSuite.
- Device is associated with correct customer Account and Site in WeatherTRAK.net (WeatherTRAK controllers only).
What information is required to activate a SIM?
With any activation it’s important to ensure the date/time is set correctly on the controller. If the request is done over the phone, this should be verified on the call. Otherwise this should be included as a reminder in email replies.
Activation requests, regardless of how they are submitted, must provide all the required information listed below.
If you’re missing any of this information from the activation request, don’t hesitate to ask the submitter. If it’s unknown, don’t guess. It is their responsibility to provide information up front.
- Purchaser’s name, email and phone number
- Billing information (company name, address, billing contact name, email, phone)
- Installer’s company name and address
- Installer’s name email and phone number
- Location of controller (Street and site name)
- Your controller’s serial number (accessed through the HELP menu)
- Your controller’s SIM card number (accessed through the HELP menu)
Step 1: Activating the SIM Card
Activating a controller’s SIM card is needed for the controller to communicate with our servers through the cellular network allowing us to provide wireless services. If you are setting up an FM200 or FM300 device, go to directly to Step 2. WaterSignal activates the SIM cards inside the devices before shipping them to our warehouse.
Your activation request should include the SIM card number for you to activate. If you don’t have that information, it is also accessible in NetSuite by searching for the serial number.
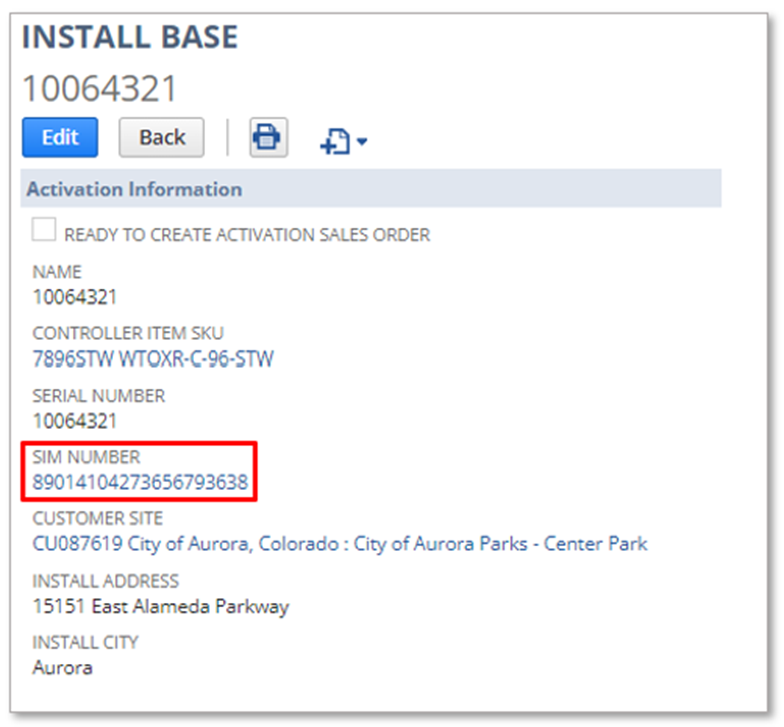
Note: If you are unable to find the SIM number for AT&T accounts: 1. Check with the customer/contact to ensure the correct SIM number was provided 2. Create an AT&T support case.
1. Log in to the AT&T Portal:
https://iotcontrolcenter.att.com/
2. Select Devices.
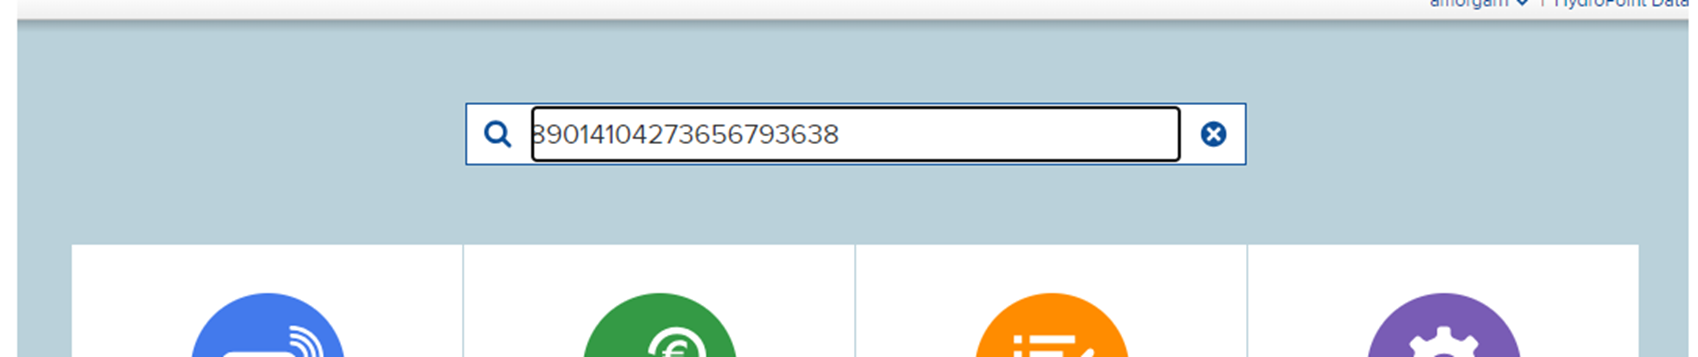
2. Click on the SIM card serial number.

3. Click Edit.
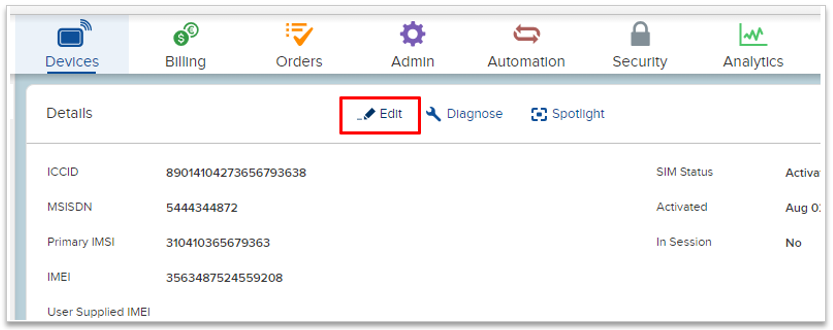
4. Validate that the SIM status, the Communication Plan, and the Rate Plan fields are populated:
WaterCompass: (not ultrasonix/nex-gen) Rate Plan: Hydropoint Data Systems - 1MB Tb 6 Plan
Communication Plan: Hydropoint Data Systems - LTE_WaterCompass NA
Baseline: Rate Plan: Hydropoint Data Systems - 1MB Tb 6 Plan
Communication Plan: Hydropoint Data Systems - LTE_baselinesystems NA
WeatherTRAK: Rate Plan: Hydropoint Data Systems - 1MB Tb 6 Plan
Communication Plan: Hydropoint Data Systems - LTE_WeatherTRAK NA
NOTE: Plans that include INTL are for international devices. These examples may be rare. Example: Air Force Base in Spain. For international device rate plan, choose “250MB IntlPlan”
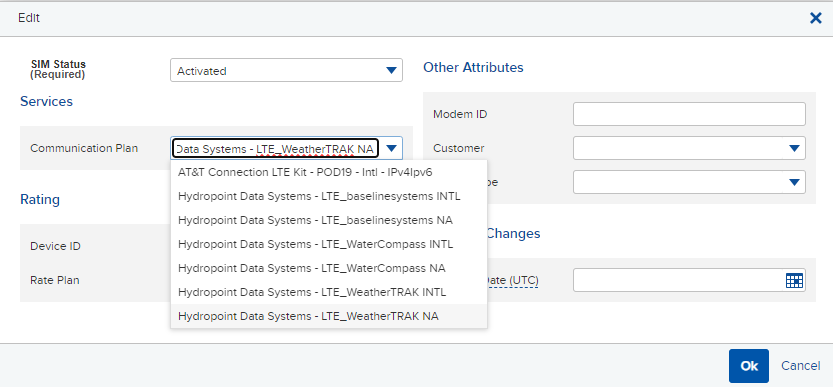
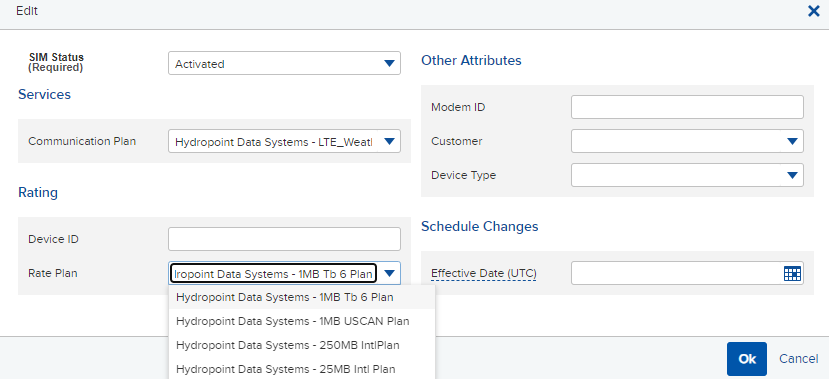
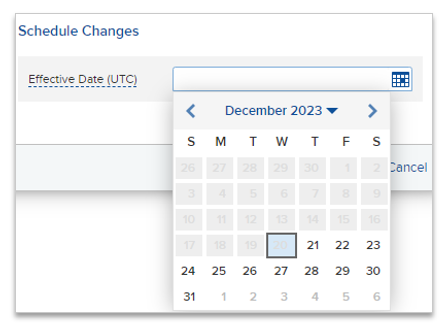
Activation Date: If not date is picked, it will use today's date by default (which is why it is grayed out).
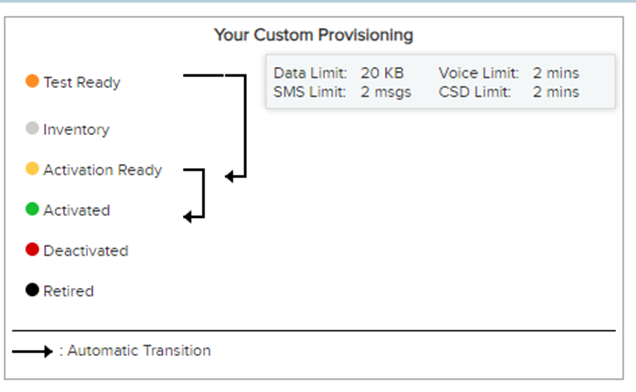
Click “OK” to Activate the SIM.
Step 2: Creating a Customer in NetSuite
Important
Before Proceeding, please review the following article for guidance on Account Creation and Naming Standards
Customer Support receives an e-mail from Pro Services with the necessary information when a project is ready for installation. This means most Accounts, Sites, etc. will be set up in NetSuite by the time you are ready to setup and activate the individual devices.
These e-mails contain the following info:
- Customer Account
- Site Name
- Site Address
- Device Serial #
- Account Sold To
- Account Subscriber
- Installer
Account Creation
To begin, ask the question: Does the site exist in NetSuite? If the answer is no, create a site.
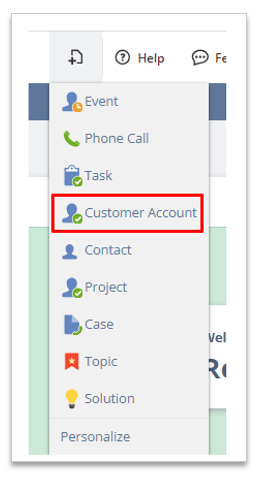
1. From the home page on NetSuite, hover your mouse over the page icon. A drop-down display. Click Customer Account.
2. Account Naming best practices
- If the account being created has multiple sites or “child” accounts, then those “children” should be names as follows:
- Parent Account – State Abbreviation – Unique Identifier (ie: site name and/or number)
- So, the Child Account would be: Kimco - AZ - Metro Square #553
- Parent Account Ex: A city park will have the municipality or the city's Parks & Rec Department as the parent account. HOAs will usually not have a parent account, and a residence almost never will.
Here is what the individual account looks like in NetSuite:
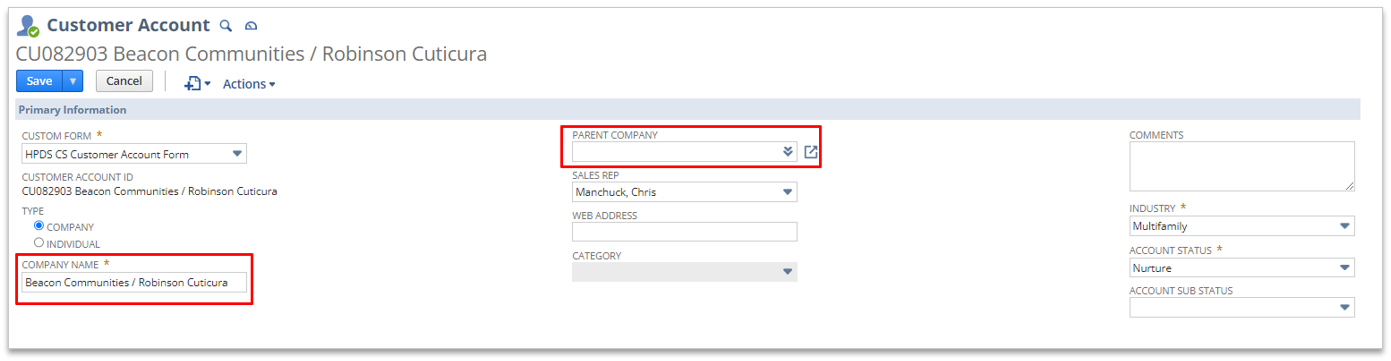
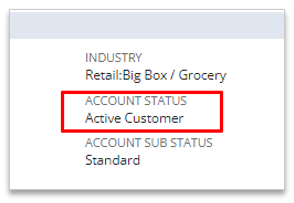
Ensure that the "Account Status" is set to active customer. Otherwise, critical information in the system will not trigger which feed into other systems and tools for other teams.
3. Scroll down to enter in the address(es) of the site (required).
- Be sure two addresses are listed here: the address of actual site location and the billing address. Occasionally this is the same address.
- We want to set up the billing address to the site, but care of the billing party. Sometimes the billing party is the landscaper, sometimes it’s a property maintenance company, or if the device is in a public park, it might be at city hall or the parks & rec department. This is why it is critical to discuss this with the activation requestor

HOA as an example:
- Crystal Cove HOA has many devices so, instead of an address, we have the location as “Multiple Sites” and Newport Beach. The billing address is at a property management company office in Irvine. We want to send our bills to that office, not to the spot on the side of the road the device is located.

Step 3: Activating the Device in NetSuite
Now that we have our customer set up, we can activate the device.
Important
If it is an FM200 & FM300 Activation, go to the Appendix for instructions on how to activate a Water Compass device. FM200 and FM300 device activations are managed by Pro Services.
If you are activating a controller that is replacing another one, use the support article Copying Data from an Existing Controller to a Replacement Controller in NetSuite
Install Base Steps
1. Type in device serial number:
- For WeatherTRAK devices make sure to include the leading 0 or 1.
- For WaterCompass devices making sure to include the leading P.
2. Verify the details in install base makes sense.
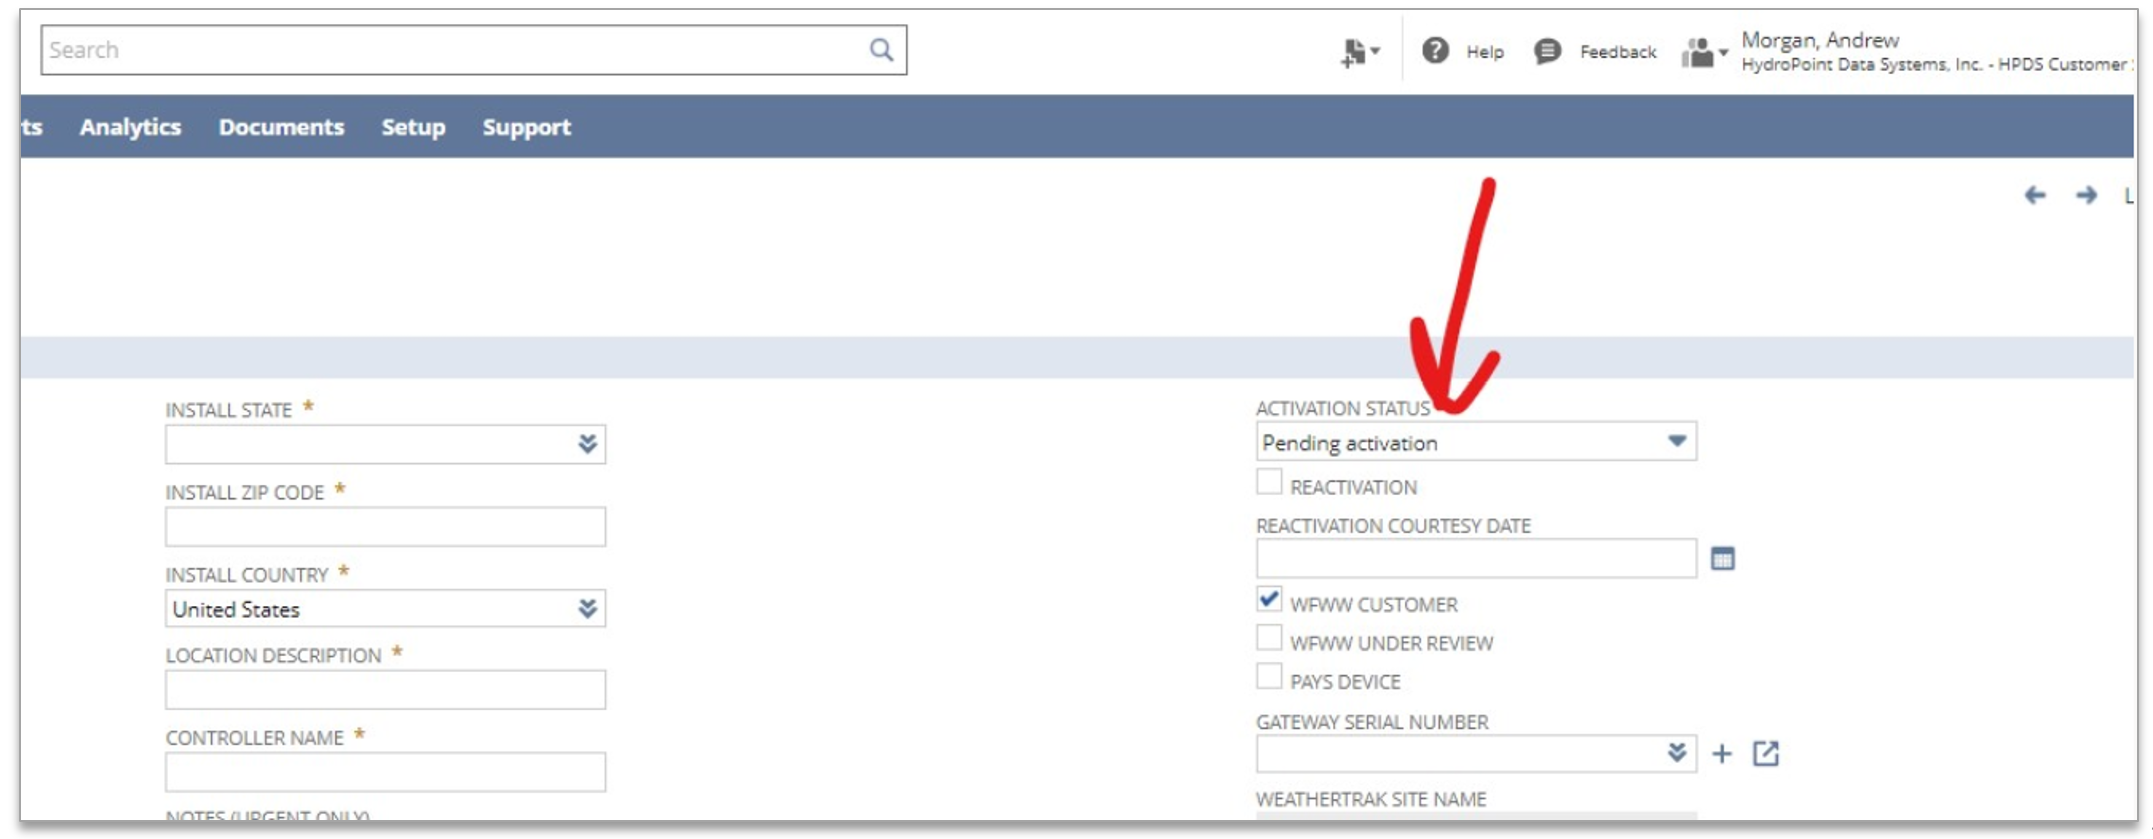
- If you’re activating a new device, it should be mostly blank. The status should be in “pending activation.”
- The Sold-To should match up with the customer. The device should have either been sold directly to the customer OR it should have been sold to the local distributor.
- To find a distributor authorized to a specific region, ask your colleagues, or contact Sales, or use HydroPoint Distributor Information
- Verify logical Name/ Location: If there appears to be a mismatch, ask the person who submitted the activation request to double check the serial number.
- ex: If the device was sold to Watersavers (our distributor in Northern California), the device shouldn’t be in Florida, Colorado or Texas. If the device was sold to Wal-Mart, it shouldn’t be activated at a Lowe’s.
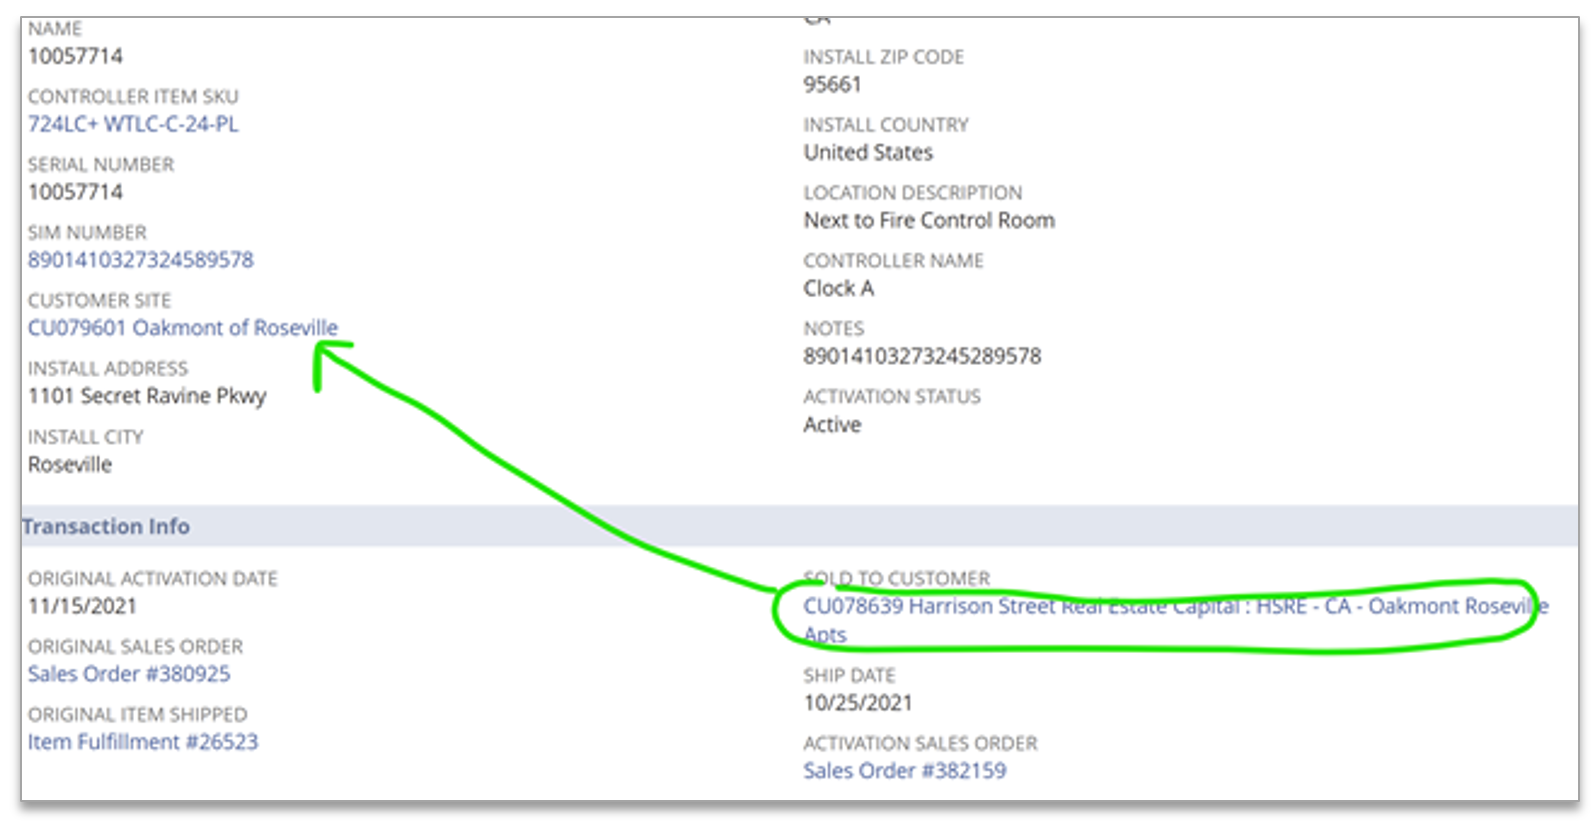
- important: If it is a HPDS project/sale, make sure the SOLD TO CUSTOMER info matches CUSTOMER SITE info. 'Sold to' tells us whether it was sold by HPDS or a distributor. If it is a HPDS project/ sale, the two must match as this will initiate a background process for Proservices. The example picture below does not match but it should:
- Pay attention to the SKU - we need to be able to identify if a SKU is "new" or a "replacement". If the SKU is new it should be a new activation. Consult tier 2 if unsure.
NOTE: Never assume that the information you’re provided is correct. A lot of the time we are getting information filled out on a phone from someone on site, and typos are absolutely possible. It’s important to double check the information you’ve been given to make sure it makes sense. Don’t be afraid to ask the landscaper/submitter to clarify anything that you don’t understand. It will make things easier in the long run if we get it right at the beginning.
- Talking points to help with this include: Who owns vs maintains the controller? To activate the controller, we need to use the owners. This keeps the integrity of the controller's data, warranty and access permissions. Maintainers occasionally are contracted/ hired and get replaced.
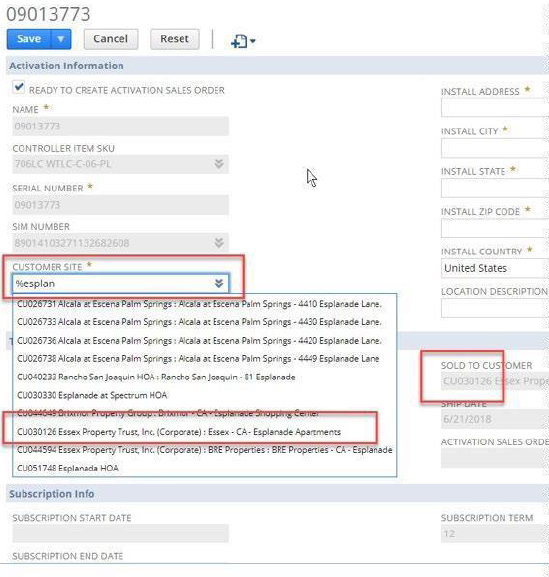
4. Assign the install base to a customer. It might be one you’ve just created or one that already existed in the system. You can search through the customers by entering a % and start typing. NetSuite will filter out excluded accounts as you add more letters to your search.
- In looking for “Esplanade Apartments”, it takes several letters to find the correct account. There are several accounts which include the word “esplanade”, but we can see the correct one is the account the device was also sold to.
6. Fill in all the fields provided (address, the location description, the name of the device) and change the status from Pending to Active.
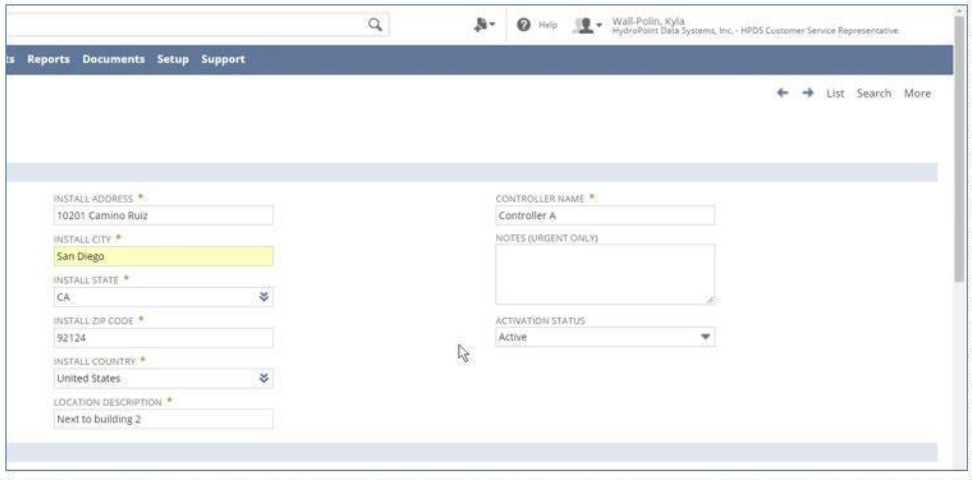
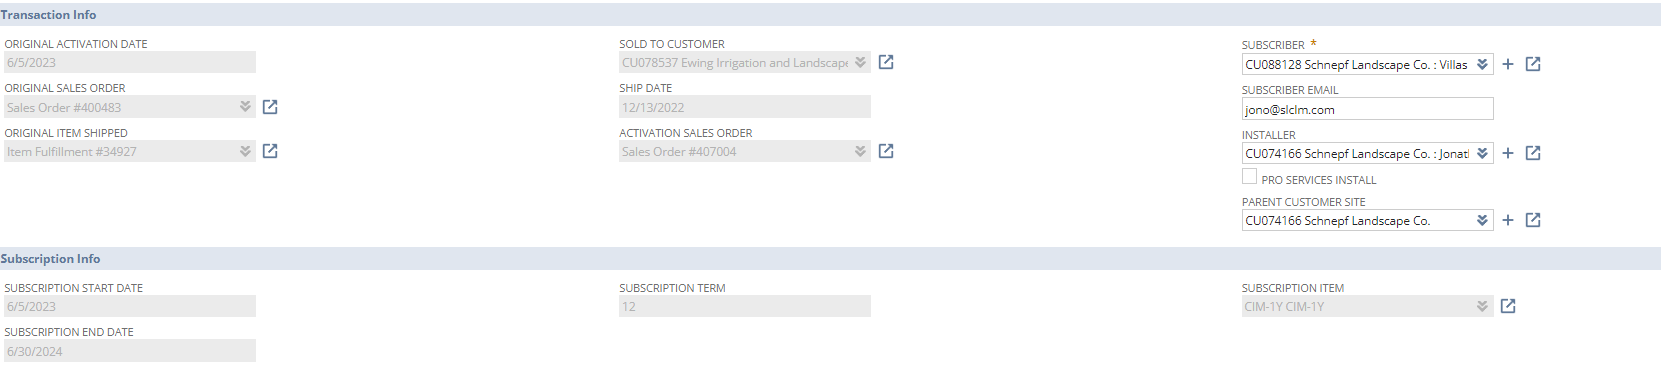
7. Fill in the subscriber, installer and parent company. Compare this info on the Jot form with what already exists if applicable.
- The subscription term is in months, so 12 indicates one year of service. When you click SAVE subscription start and end dates will fill in automatically.
- If you are missing any of this information from the activation request, don’t hesitate to ask the submitter. Don’t guess – it is their responsibility to provide information up front.
8. Change Activation Status to Active before continuing. If we move to the next steps without doing this, it will not sync the information to other necessary systems and create problems with the controller's data later.
Step 4: Activating the controller in WeatherTRAK.net
Note: If you are setting up an FM200 or FM300, you will not need to activate it in WeatherTRAK.net. This step is performed by the Contractor Support group, who also sets up the device in the WaterSignal Admin Tool. Just make sure that you select the “Ready to Submit Activation Sales Order” checkbox and click save.
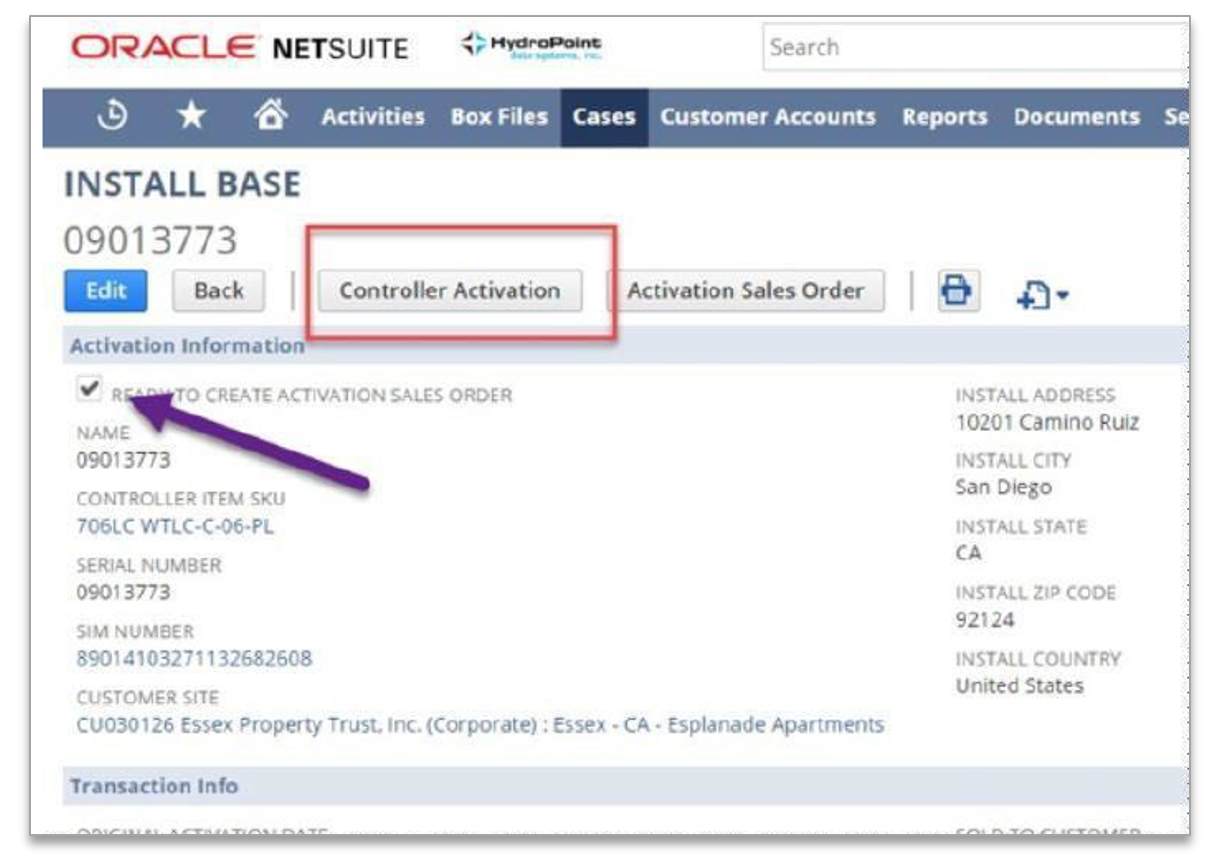
1. Now that the controller is activated in NetSuite, activate it in WeatherTRAK.net. Make sure the READY TO CREATE ACTIVATION SALES ORDER box is checked then click Controller Activation.
2. A pop-up displays. Weathertrak.net will try to find the point on the map indicating the address you’ve provided. Take a look to make sure that the address looks right and that a Good – Address geocode message appears.
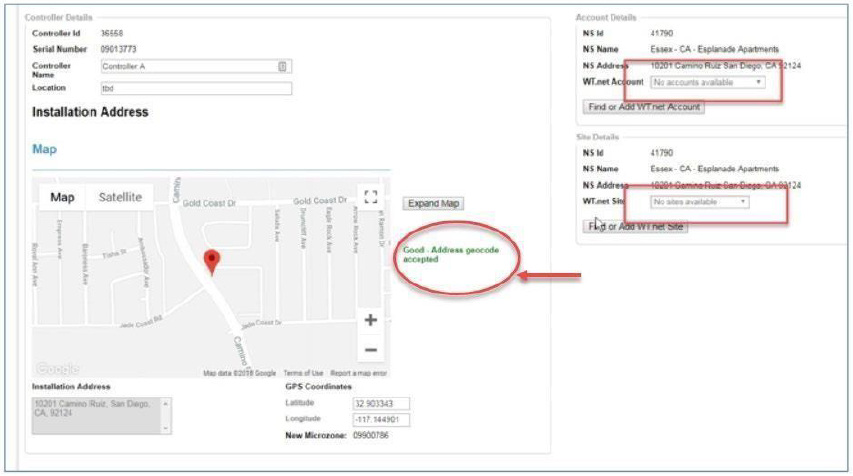
- If you get an error message, double check the address you’ve typed in or ask the submitter if they could have made an error.
- If the address was built after the map was created (which is possible with very new developments) it might be better to ask for the nearest intersection. Our goal is to find the point on the map closest to the physical location of the controller.
- On the right-hand side, you can see that you can now associate the controller with an account and a site. The button is allowing us to Find or Add WT.net Site account. This means you can find an account that already exists and associate the controller with that account, or, if no account exists, you can add it. If you’re not sure whether or not the account already exists, you don’t have to guess. You can use the Admin Tool in weathertrak.net to search for it.
How to search for an account in WeatherTRAK.net using the Admin Tool
1. Search for the name of the account for the controller you are activating. In this example, the controller belongs to is Essex Property Trust, so let’s type Essex.
- The account already exists. You don’t need to create a new one.
- Click on Find or Add WT.net account and take a look at the popup.

2. Associate the controller to either an existing or a new account. In this case, we want to use the existing account – there is no need to create anything new since the account exists already in the system.
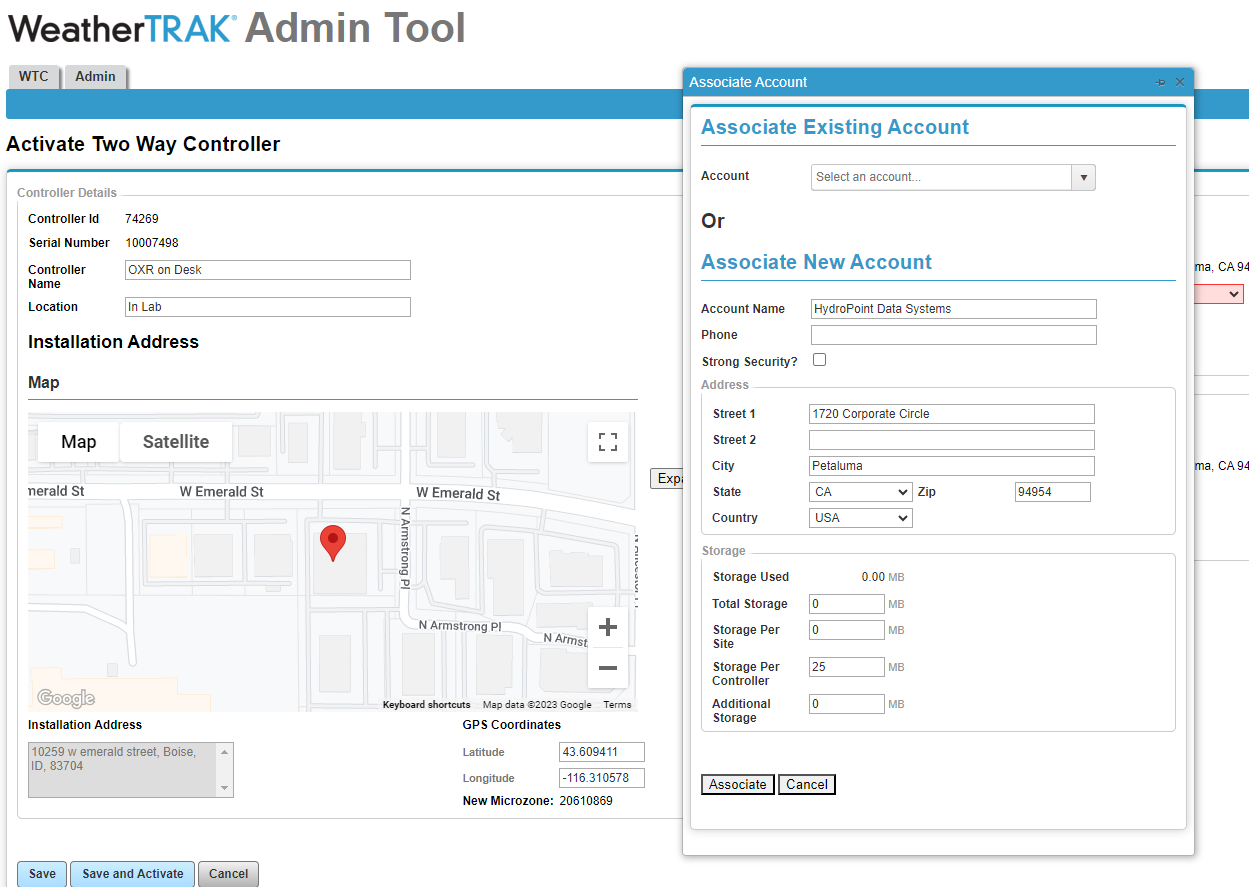
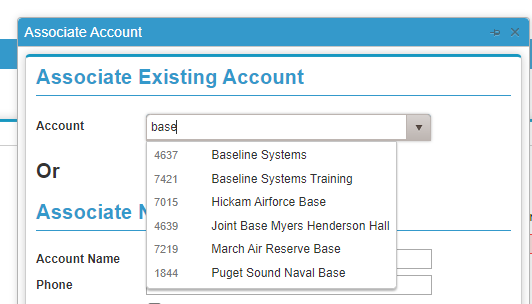
In the Associate Existing Account field, type in the first few letters of the existing account. Make sure the account is correct, then click Associate at the bottom of the pop-up window.
3. Next, Associate the controller with a Site within the Account. Using the same exact method as we did for the Account (Parent company)
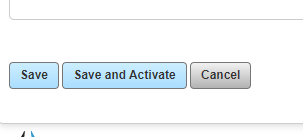
4. Verify the controller and site. Click Save and Activate.
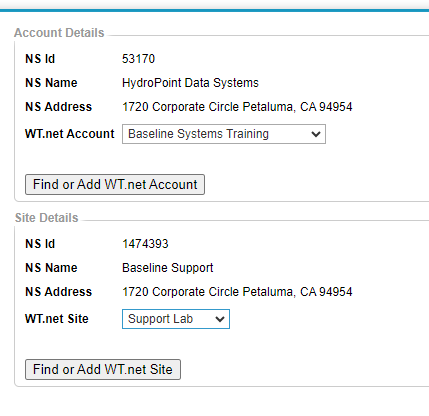
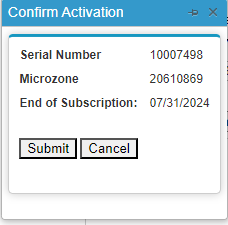
5. Confirm Activation window displays. Verify that the correct GPS coordinates were applied. Double check all information. Click Submit.
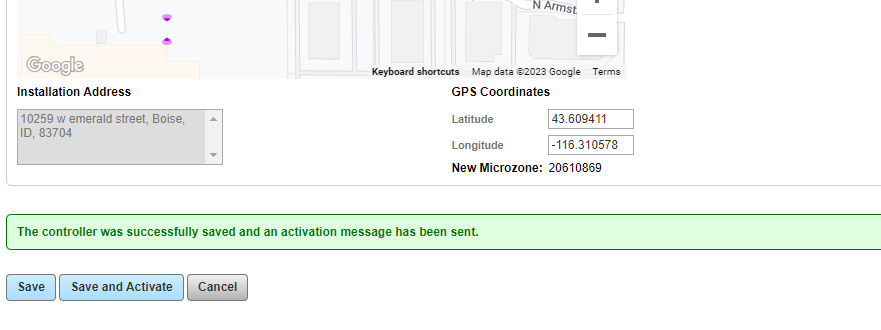
6. A confirmation message will display, letting you know that the controller was successfully saved and an activation message has been sent.
7. Go to WeatherTRAK.net for final verification. Use the Admin tool to search for the controller you just activated. Ensure the following:
- The controller is active
- The controller is online, if applicable (sometimes activations happen before installations). If the controller is not online, escalate the situation to Customer Support for troubleshooting.

8. Go to the Manage Controller page and verify that the Microzone, subscription, and ET information has been updated properly. Make sure the values are not the defaults.

Step 5: Verify the Activation Sales Order Was Created
Creating the Activation Sales Order (ASO) is now an automated part of the activation process.
Activation Sales Order Process
The Activation Sales Order (ASO) button is located in the Install Base section of...
[insert-question 967062]
WaterCompass Flow Monitor Activations
All Watercompass device activations are managed through Pro Services.
1. Pro Services Project Installation Support Case Creation:
- For all WaterCompass Flow Monitors, the trigger for this step will be a WCIR (WaterCompass Installation Report) approved by Contractor Support, which gets converted into a case in Salesforce. The Project Support Specialist team uses a “Pro Services Support” service case to manage and approve installations of all WaterCompass flow monitors
- When all installed products are added to the Pro Services project support case by the project support specialist team, a service request for WaterCompass device activation will automatically open in Salesforce.
- The activation request will only be generated once the Pro Services support case opened during the submission of the WCIR is closed.
2. Salesforce Activation Case Identification:
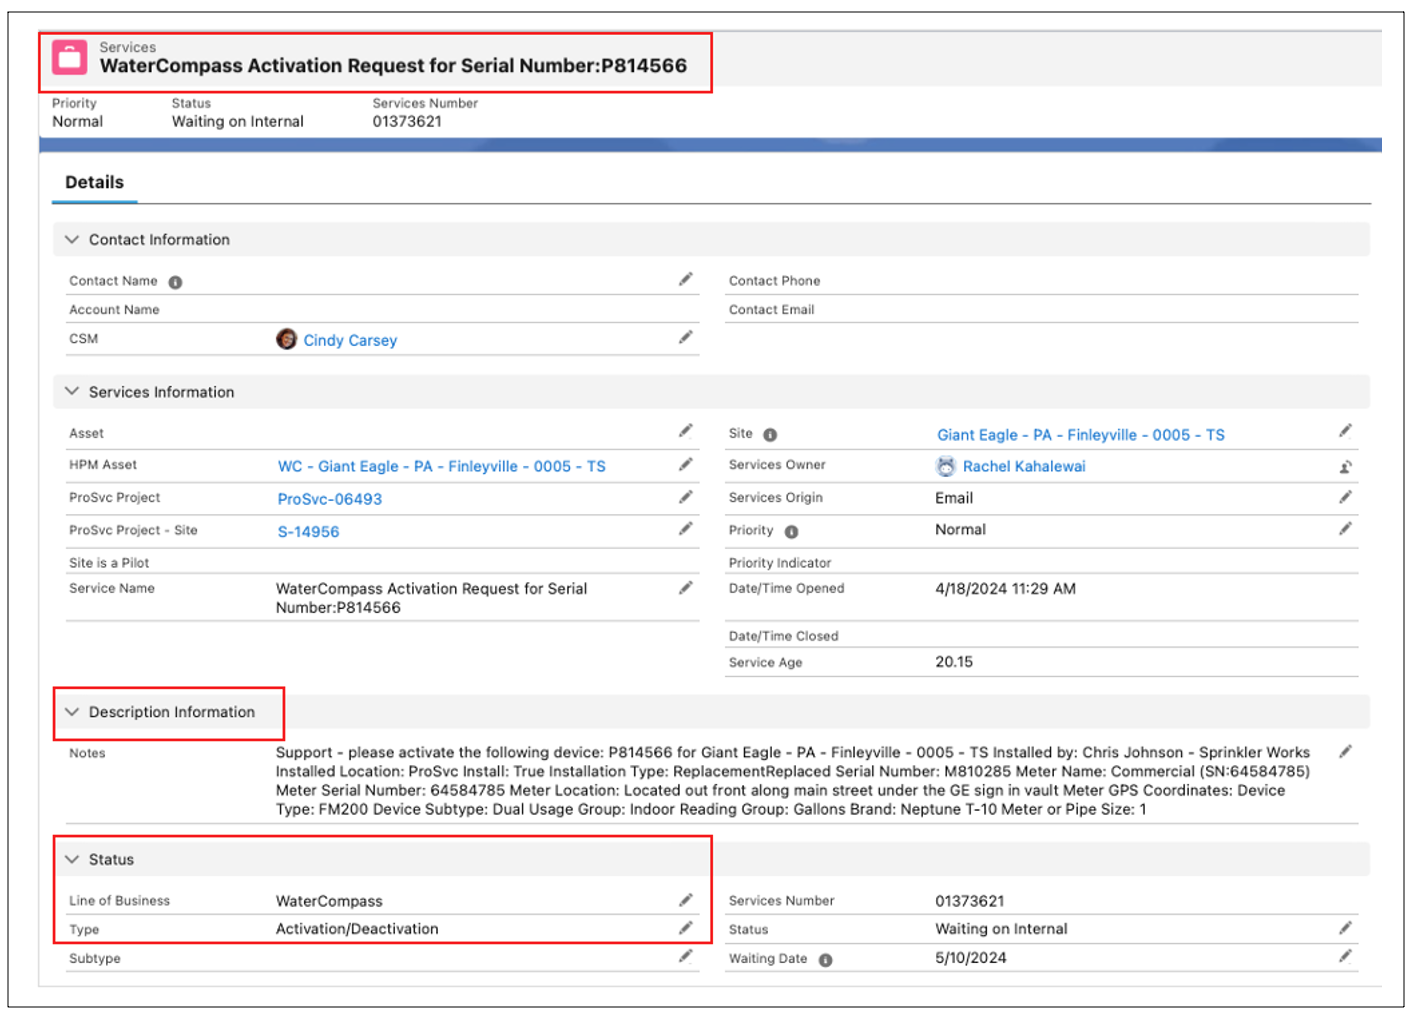
- Upon approval of installations, Salesforce will automatically create a WaterCompass Device Activation Request service case. This case can be found in the case queue with the following categorization:
- Line of Business: WaterCompass
- Type: Activation/Deactivation
3. Review Case Description Information:
- Upon receiving the SF case, focus on the description information notes located just below the services information. This section provides the necessary details of the WaterCompass device necessary for filling in the required fields in NetSuite (NS).
4. Activation Process in NetSuite:
- Follow the steps outlined in Step 3 in the main document – Activating the Device in NetSuite to set up the install base record for the WaterCompass asset.
- Most of the customer data should have been filled out during Step 2 – Create a Customer in NetSuite.
- Verify customer site and subscriber information. Sometimes duplicate or similar named accounts in NS, verify correct account number. Extremely important to ensure the asset is activated on the correct customer.
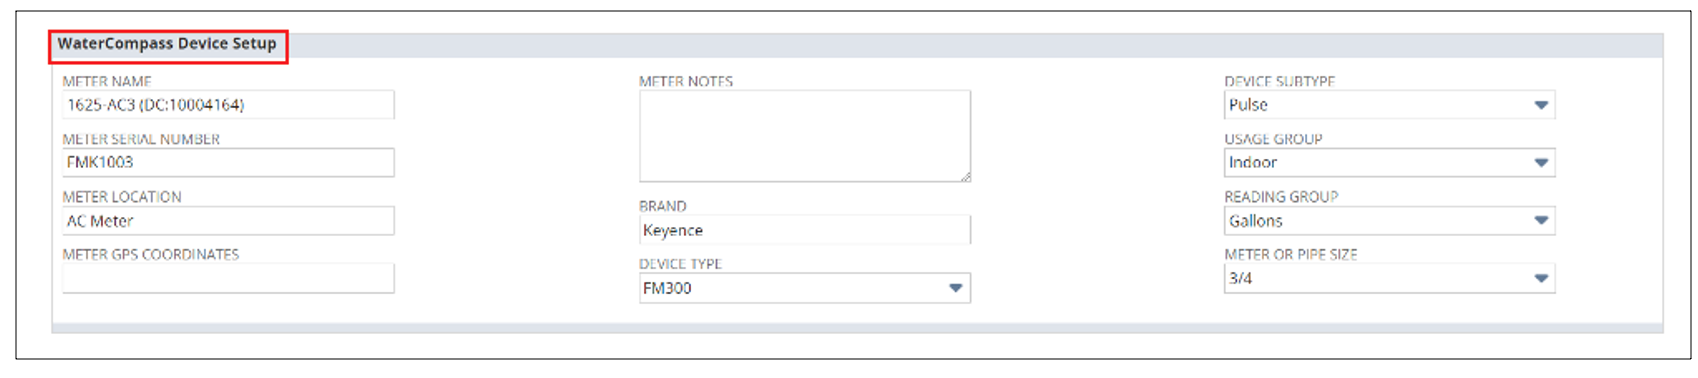
5. Fill in Device Setup Fields on the Install Base Record:
- Complete the required information in the WaterCompass device setup fields on the Install base record using the details provided in the Description Information notes from the WaterCompass device activation request.
Note: It is important to select the correct device type from the device subtype dropdown menu.
Connecting the FM300 Flow Sensor to a Data Collector
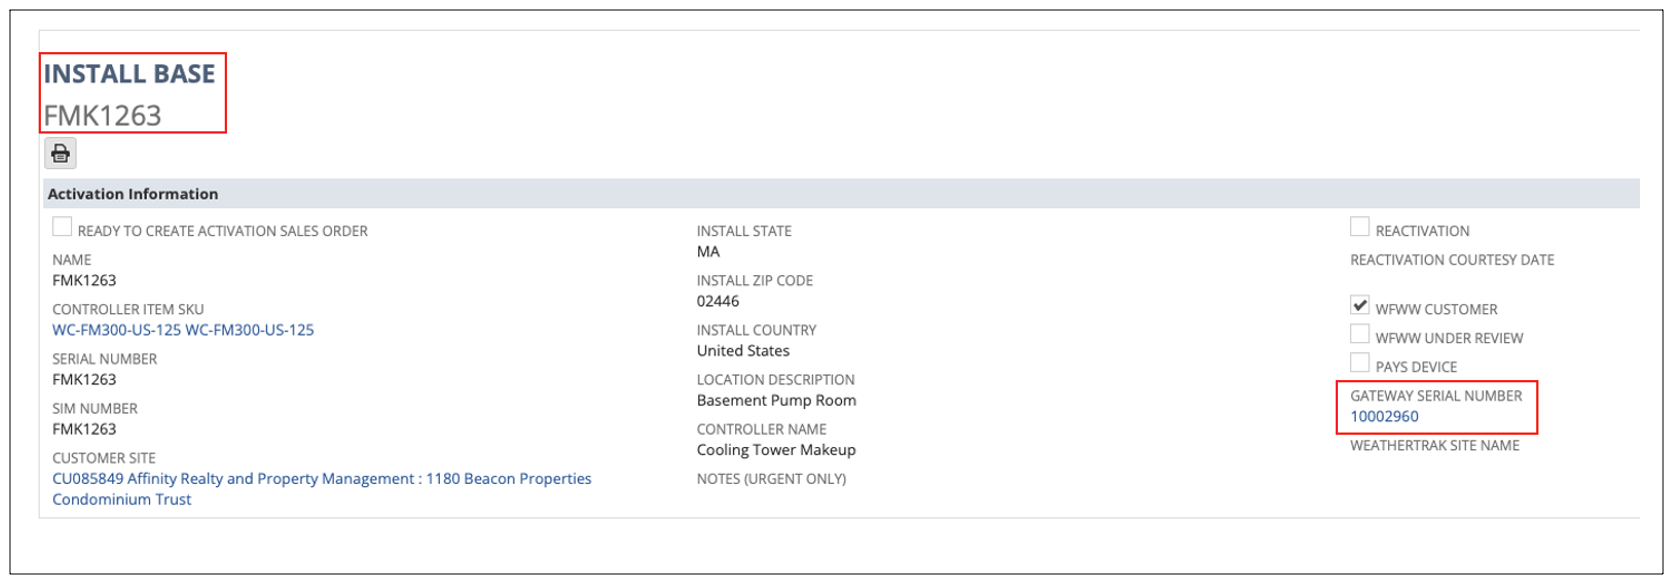
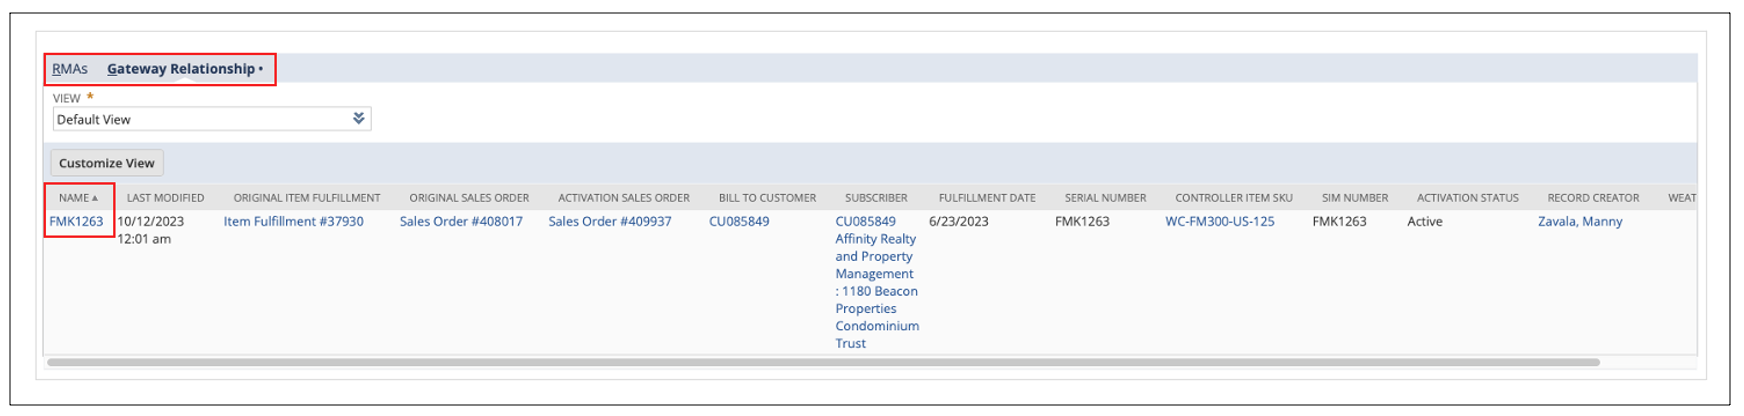
6. Connect the FM300 Flow Sensor to a Data Collector (if applicable):
- Navigate to the Data Collector Install Base Record in NetSuite.
- In a separate tab, navigate to the Flow Sensor Install Base Record in NetSuite.
- Click Save
- Navigate back to the Data Collector and scroll down to the Gateway Relationship tab to see the connected Flow Sensors.
Add the serial number from the Data Collector to the Gateway serial number field on the FM300 flow sensor Install Base Record only
7. Activation Sales Order:
- Follow the steps outlined in Step 5 – Activation Sales Order Process in the main body of the document.
What if replacing an existing controller with a new controller? See this article