
Update
Table of Contents
Step 1 - Collect Historical DataStep 2 - Copy Controller ConfigurationsStep 3 - Transfer and ReplaceStep 4 - Do any Necessary Manual Transfers. Step 5 - VerifyStep 6 - NetSuite Activation/Deactivation
Important!
Read the following order of operations descriptions to ensure you understand the importance of completing these steps in order.
What is the Transfer and Replace Process? This procedure transfers the existing controller's programming and historical data to a new or replacement controller. The transfer and replace procedure eliminates the need for the customer to reprogram the controller from scratch.
When is it used? when a controller either replaces it's command panel (module) or when a controller is upgraded.
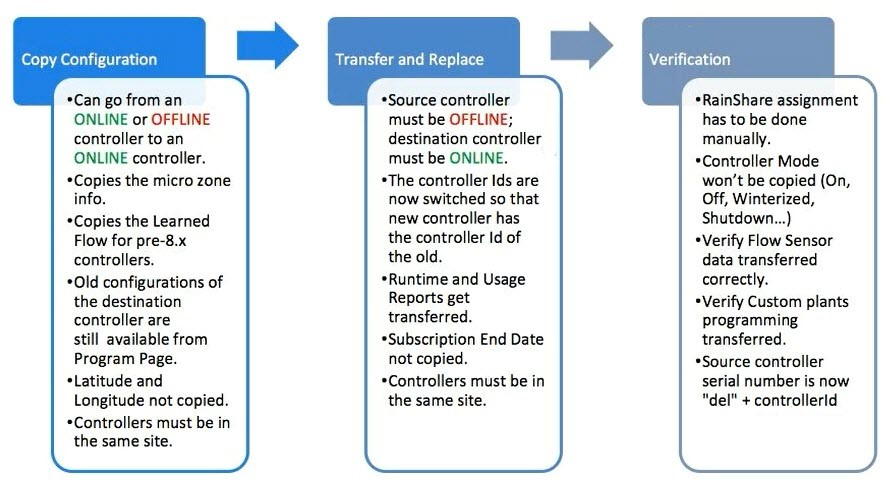
Note: This procedure can only be done between controllers that are on the same site. Do not transfer and replace data between controllers that are not on the same site. Additionally, if the controller's firmware is the not the same or newer, it won't work.
Step 0 NetSuite Device Activation
1. Ensure the SIM Card is activated, and NetSuite Install Base Transfer has been completed: NetSuite Device Activation. If you have an issue, go to WeatherTRAK Activation Process.
2. Ensure Copying Data from an Existing Controller to a Replacement Controller in NetSuite
3. Once completed, check if the Subscription End Date is past due. If it is, check off the reactivation box in the install base record, and send an e-mail to Account renewals <Renewal@hydropoint.com> to let them know so they can follow up with the customer.
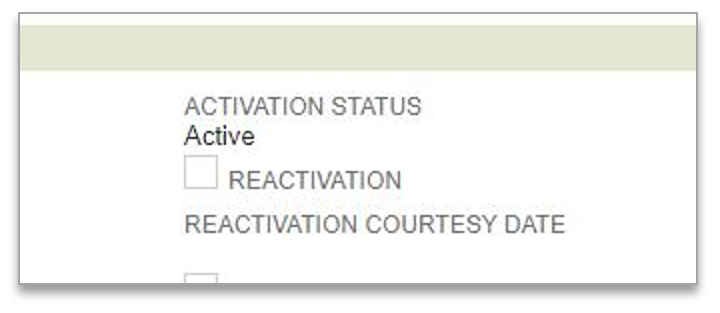
Ensure that the ASO Button has been clicked.
Step 1 Collect Historical Data
1. Collect historical data on the source controller (the old controller) to use as backup in case data gets lost or is not transferred correctly. Choose "WEEKS" for the timeframe option. Run the following two reports:
- Controller Usage Reports: Single Controller Runtime History Report for 1 years ago to now. Save as PDF and name with serial number followed by configsettings.
Example: 091234567usagereport - Controller Settings Report: Controller Settings Detail Report with today’s date or the last date the controller was online. Save as PDF and name with serial number followed by usage report.
Example: 091234567uconfigsettings
2. Then save the historical files under the New controller in the "manage controller page" in WeatherTrak.net. This will require you to complete the NetSuite Install base transfer and activation first so that the controller manage page is available. (This is because the transfer and replace process will move everything from the old controller to the new one, including documents, which deletes the old controller from the database so that the serial # can be reused later.)
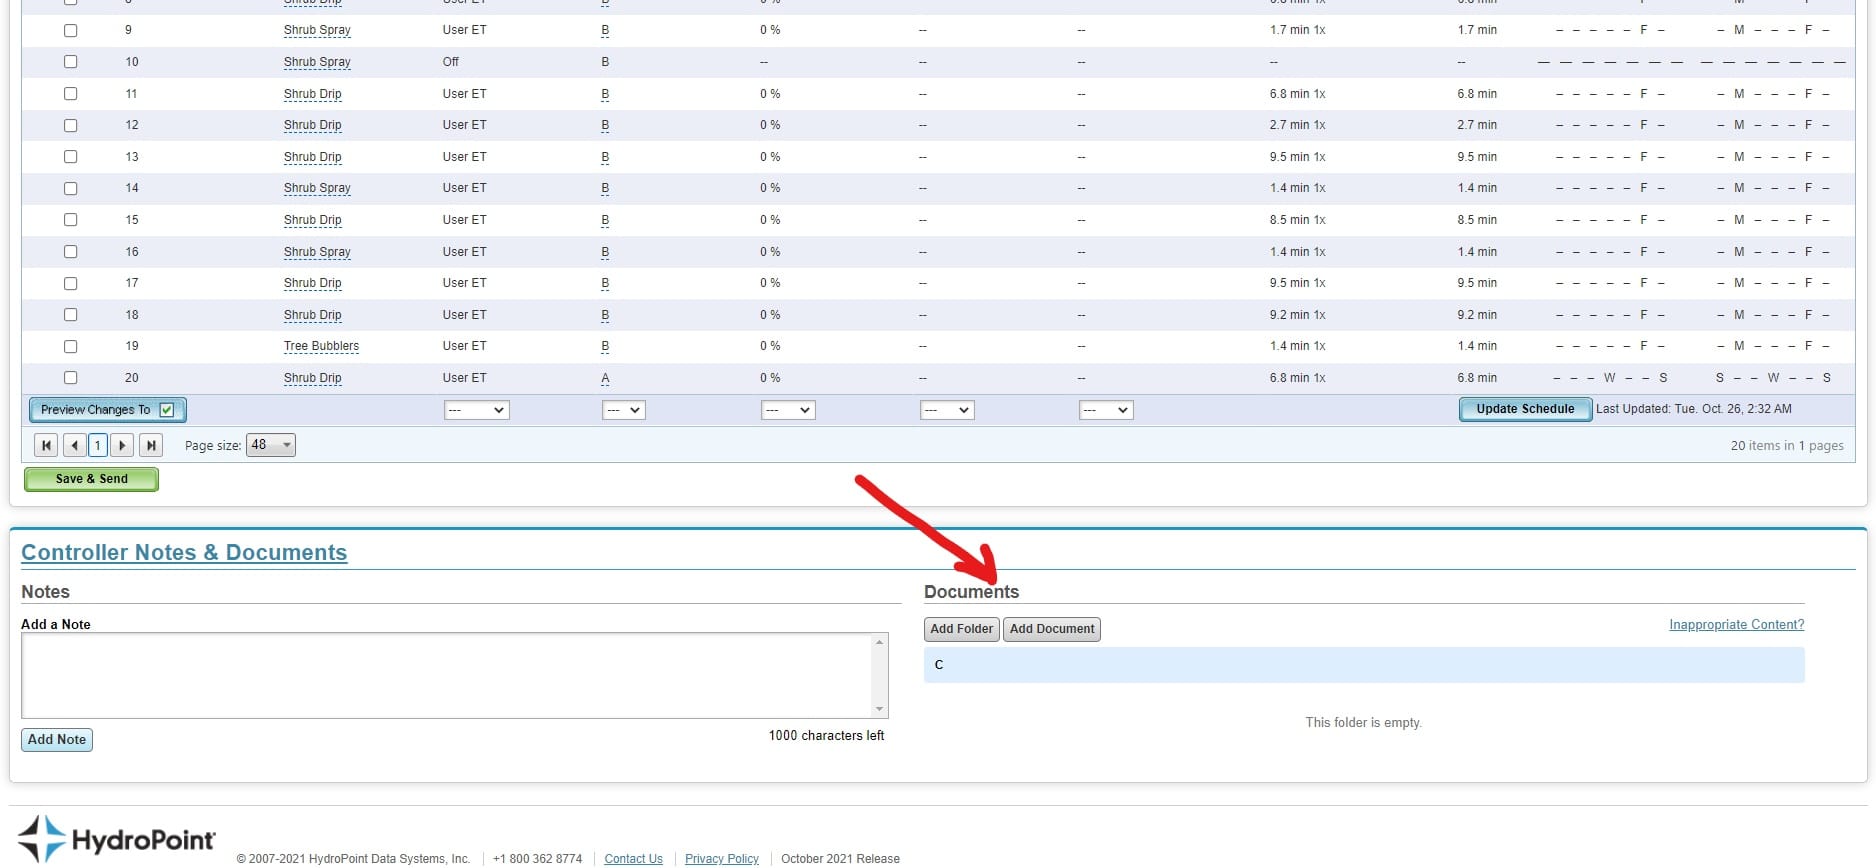
3. Upload another copy of the historical PDF files to the originating case in Salesforce for the replacement request.
Note
Before moving to the next step, review the settings on the old controller. If the configuration looks odd or questionable (ie. default settings) be sure to verify with the requestor before proceeding. It may be necessary to review the setting change history report and validate with the requestor that we have the correct last known configuration before continuing the process. When in doubt, ask to be sure.
Step 2 Copy Controller Configurations
Micro zone information, learned flow (for pre-8x controllers), flow sensor information, POC’s and most of the configurations in the controller get copied so they can be transferred into the new controller.
Note
Location information (latitude and longitude) is not copied. Location information will be manually entered during the activation process. Additional items not copied are listed below and will require manual updates as applicable.
Important!
If the new controller is not online it will not be able to receive the copied configurations. The modem may need reset in order to establish connectivity.
Items not copied over include:
- ET Subscription & Microzone (should be set as part of activation)
- Scheduled Event Pause
- Scheduled MVO
- Current MVO state
- Rain Pause (days & WT ignore setting)
- Rain Share settings
- Controller Mode
- Depletions on 7.x
- Controller’s local runtime & flow history
- Controller’s local alerts (Will come back if they still exist)
- Manual or learn flow queues
1. Go to WeatherTRAK Central> Admin tool > Controllers.
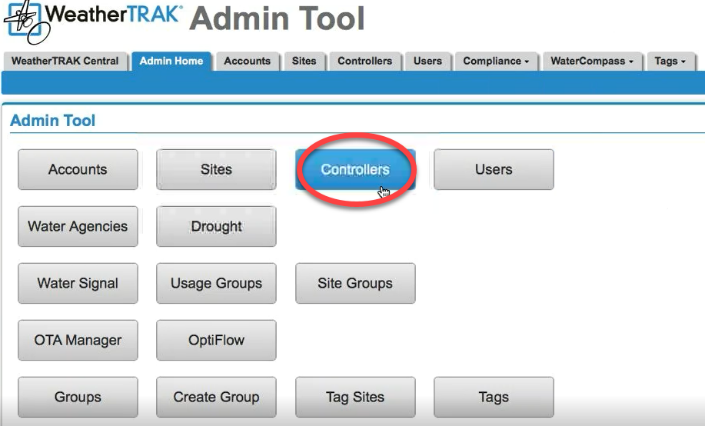
2. Put existing controller (the source controller) into OFF mode. Make sure to tell anyone that might be at the controller not to touch any buttons unless told to do so.
3. In the Serial Number field at the top of the page, enter the serial number of the source controller. Make note of the location.
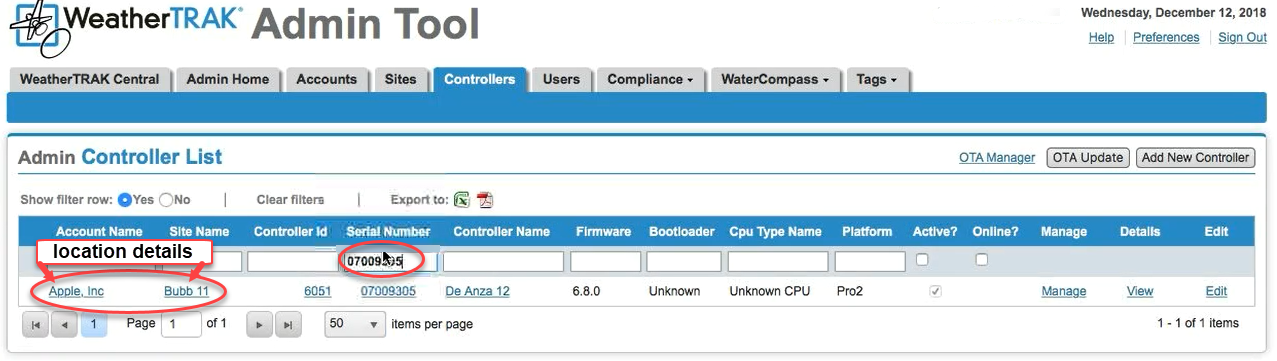
4. In the Serial Number field at the top of the page, enter the serial number of the new controller. Make sure both the source and new controllers are at the same locations. Additionally, ensure the Destination Controller is online.
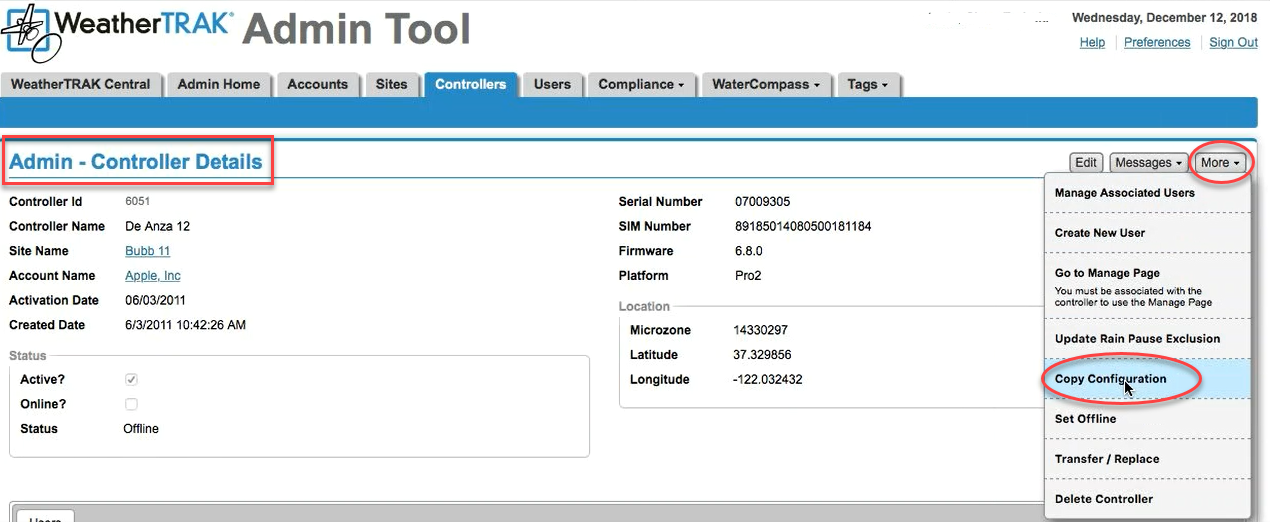
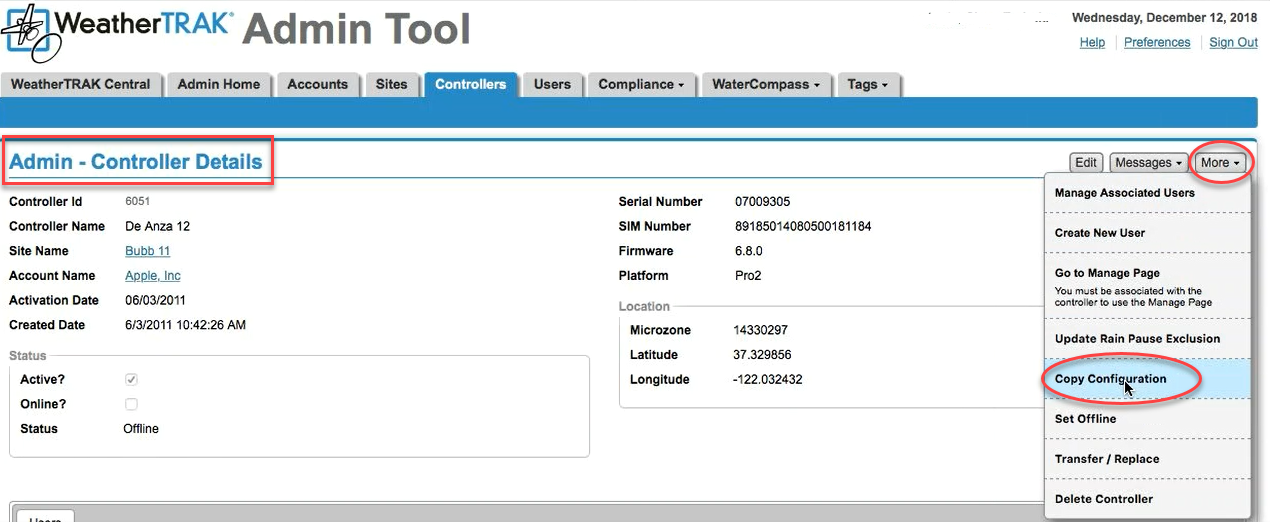
5. Now that the location for both controllers has been verified as being the same, enter in the serial number of the source controller again. The Admin-Controller Details page displays.
6. Click More. From the drop-down tab select Copy Configuration.
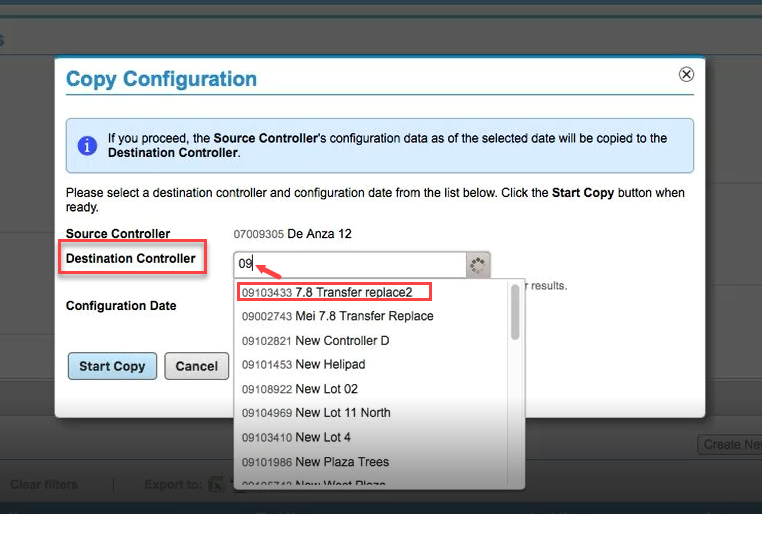
7. In the Destination Controller field, enter in the serial number of the new controller (the destination controller). You can also select the controller from the drop-down list.
8. In the Configuration Date field, use the calendar to select the most recently known valid configuration date. This should typically be the day before, rather than the current date, as the configurations are saved nightly. In some cases it may be necessary to use older dates if changes were recently made. As a general rule, up to 2 weeks in the past should be a sufficient window to select a usable date. Again, if you are unsure or the old programming looks questionable (ie. default settings, multiple configuration changes, etc.), check with the requestor and review the setting change history report in order to validate.
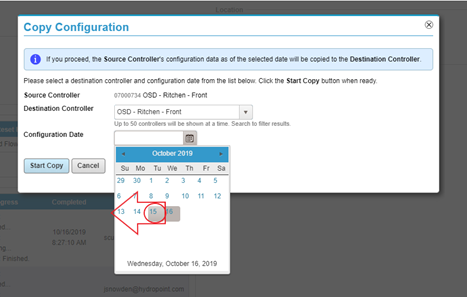
9. Click Start Copy. A confirmation window displays. Validate everything looks correct (source, target, date), then click Close to return to the Controllers Details page and verify the Copy Config Log is correct.
Note
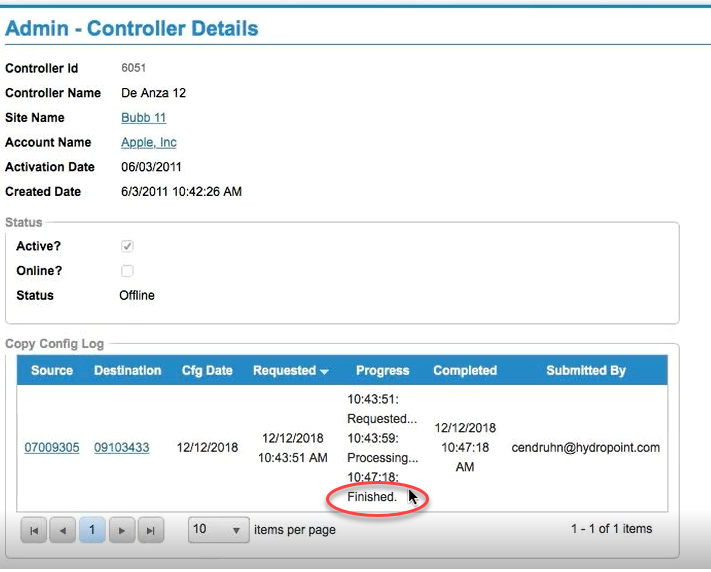
Make sure the Cfg Date does not show a date in the future. If it does, your copy/config process will likely hang. As mentioned in the previous step, the Cfg Date should be in the past.
10. There will be a wait time while the information copies (typically under 10 minutes). Monitor the Copy Config Log and confirm that the information has copied. You will need to refresh your browser to see the latest readings. You should see “Finished” in the Copy Config Log. You can now proceed to step 3. If the process is not completing in a timely manner as expected, verify your settings and restart the process if necessary. If the process is stalling and showing partial completion with an actual Microzone rather than "12345678", try the following steps:
- go to the admin tool and clear the queue on the NEW controller
- wait 10-15 minutes then restart the NEW controller
- wait another 10-15 then try the copy/config again
If the problem persists, it may be necessary to escalate and investigate further with Engineering to determine the issue.
Step 3 Do any Necessary Manual Transfers.
1. Transfer RainShare controller information to the new controller if applicable.
2. Update the mode on the new controller. The customer or support person will need to put the controller in the proper mode (on, off, winterized, shutdown) as the mode does not get copied and transferred.
IMPORTANT REMINDER:
Items not copied over include:
- ET Subscription & Microzone (should be set as part of activation)
- Scheduled Event Pause
- Scheduled MVO
- Current MVO state
- Rain Pause (days & WT ignore setting)
- Rain Share settings
- Controller Mode
- Depletions on 7.x
- Controller’s local runtime & flow history
- Controller’s local alerts (Will come back if they still exist)
- Manual or learn flow queues
All applicable items listed above should be verified as part of this step.
Step4 Verify
A final, visual inspection is necessary to verify the changes, especially with Flow Sensor and custom plants. The source controller serial number is “del” for deleted + the controller ID.
1. Verify that flow sensor data has been transferred. If the flow sensor data has not transferred, go to the old controller history settings and manually add in the data.
2. Verify custom plants data gets transferred. If custom plants data has not transferred, go to the old controller history settings and manually add in the data.
3. Check all work and do a final comparison between the old and new settings to check for any errors. Reset depletion and update schedule if necessary.
4. After final review, update the case notes and notify the requestor that the transfer and replace request has been completed. Ask them to validate and notify Support of any concerns.
Step 5 Transfer and Replace
This step swaps the controller identification on the server side. The controller identifications are switched so that the new controller has the id of the old controller. Historical data gets transferred to the new controller, along with runtime and usage reports and alerts. Flow data for 8X+ controllers gets transferred as well.
Note
Subscription end dates are not copied. These will need to be entered in manually during the activation process.
1. Ensure that the destination controller (the new controller) is online.
2. From the Admin Controllers Details page click More and select Transfer and Replace from the drop-down menu of the old controller.
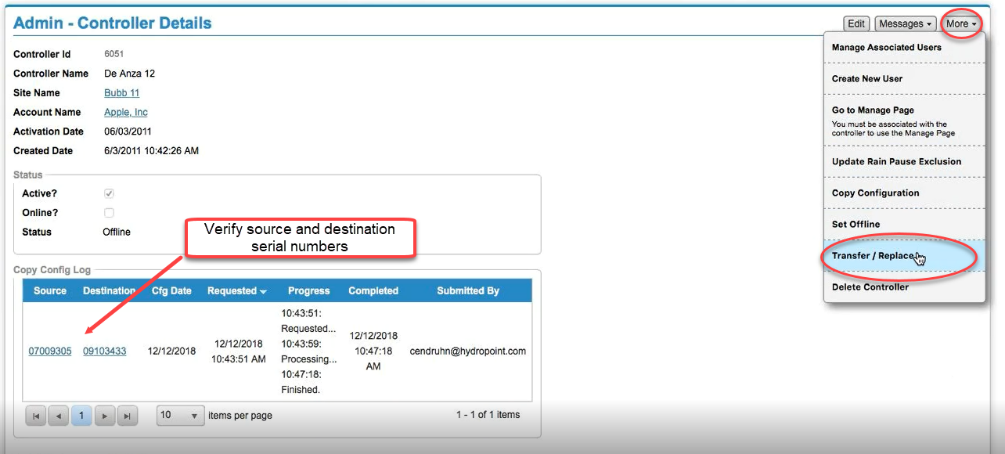
3. The Transfer/Replace window displays. In the Destination controller field, enter in the serial number of the new controller. You can also use the drop-down tabs to select the destination controller.
4. Click Start Transfer. There will be a wait time while the data transfers. This may take 10-20 minutes.
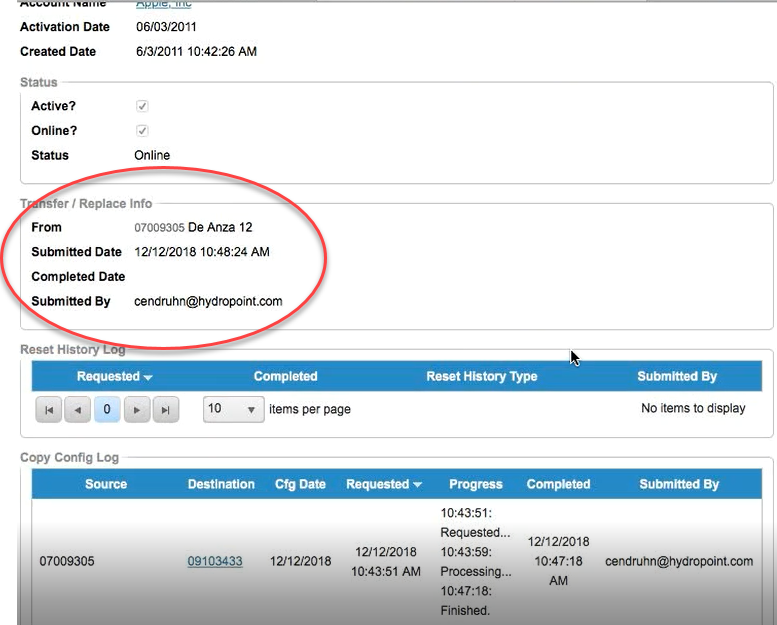
5. On the Admin-Controllers Details page in the Transfer/Replace Info section, you will see a status screen. When the transfer and replace is finished, a date will display next to Completed Date.
Step 6
Old Sim Card Deactivation
If the old SIM card is being replaced, it will need to be deactivated via the provider’s web portal (AT&T), AFTER the transfer and replace process is successfully completed.
Mass deactivation requests can also be submitted to IT helpdesk by emailing helpdesk@hydropoint.com.
Links to assist you:
Aeris portal: (requires legacy credentials)
https://aerport.aeris.com/web/guest/dashboard#/home
AT& T portal:
https://simmanagement.att.com/provision/jsp/login.jsp;jsessionid=BBD96FC72F11EB73EE73B76D6564210B